Optocam Zero: a pocket digital camera you print and solder yourself
Optocam Zero is a Raspberry Pi Zero based compact digital camera made using off the shelf components.
At a glance
- What is it?
- Optocam Zero is a Raspberry Pi Zero based camera that is built from off the shelf parts and a fully 3D printed case, and the repository ships the STL files, the bill of materials, a CAD file and a firmware image. The interesting engineering is in the constraints, a 1.4 inch screen, a 14500 cell and a 5 second boot, and the trade is that you assemble it yourself.
- Who is it for?
- Optocam Zero fits a maker who wants a small digital camera that prints and assembles with common parts, and who is comfortable with a soldering iron and a 3D printer, because the repository contains the print files, the CAD, the parts list and the build guide needed to make one.
- Can I use it commercially?
- Check first. The repository uses a licence we do not classify automatically, so read its LICENSE file before any commercial use.
- Is it still maintained?
- Yes. The repository last received commits 21 days ago.
- What is it written in?
- Mainly Python, according to GitHub's language statistics.
Answers come from the project's GitHub data, last synced on November 7, 2026, and from our analysis. They are not legal advice.
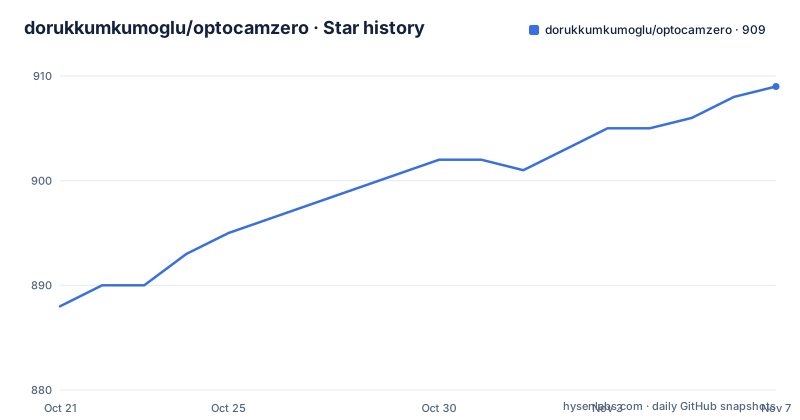
Star history
- dorukkumkumoglu/optocamzero909 ★ · +21
| Repository | 2026-10-21 | 2026-11-07 |
|---|---|---|
| dorukkumkumoglu/optocamzero | 888 | 909 |
21 Stars in the last 17 days, measured from the daily GitHub snapshot. Compare with other projects
Editorial analysis
The design goal was a toy camera that is genuinely fun to use
The project description calls Optocam Zero a Raspberry Pi Zero based compact digital camera made using off the shelf components, and the README explains the motivation in the first person.
The author designed it to have a very compact, carry everywhere and have fun sort of camera. As he was inspired by Kodak cameras and similar toy cameras, he wanted it to feel playful, enjoyable and intuitive to use. He also aimed to make it relatively easy to build so that others can build one and have fun with it, and that is why all the case parts are easily printable and the electronics use off the shelf components that are easy to find.
That is the right way to read the whole project. This is not a product competing with a compact camera on price or on image quality. It is a design exercise in the spirit of the Kodak and toy cameras the author was imitating, where the constraint that produces the interesting result is the same constraint that makes it a hobby rather than a purchase.
The Kodak reference is worth dwelling on for a moment, because those cameras had physical qualities that a modern device cannot easily have. They were small, they had a single fixed focal length, they had a viewfinder you had to compose against, and they had a mechanical shutter button. A digital camera built today from a Raspberry Pi Zero and a small LCD can reproduce the smallness, and the documentation says the interface is intended to be intuitive and simple.
The features list supports the reading. There is GIF recording and playback, a custom filter maker with up to five filters in the hotspot interface, eight photo filters included, an autofocus camera module, and screen dimming when inactive to preserve battery. The last of those is a detail that only matters on a device with a small battery, which tells you how the constraints shaped the design.
The specs are set by the size of the parts, not by taste
The specifications section is where the design constraints become visible, and reading them together tells you what the author was optimising for.
The display is a 240 by 240 pixel 1.4 inch LCD, and the image capture is 2592 by 2592 pixels JPEG, with the image saving in the background while the preview stays active. The dimensions are 51 by 71 by 18 millimetres, excluding the camera and screen bump. The battery is a 14500 type lithium ion cell, giving 70 to 80 minutes of use per charge, and it is interchangeable. Charging is USB-C, and the device can be used while charging.
The numbers in the update section are the ones that tell you about the engineering effort. It now boots in 5 seconds with the buildroot image, and the camera preview is a consistent 25 to 30 frames per second on the screen.
A consistent 25 to 30 frames per second preview is the hard part of a project like this. The Raspberry Pi Zero is a very small computer, and it has to decode a 2592 by 2592 JPEG stream, downscale it to 240 by 240, and put it on a small LCD at 25 to 30 frames per second while also writing files to storage and serving a hotspot interface for image transfer. The five second boot is the other visible improvement, and the documentation credits the buildroot image for it.
A 14500 cell giving 70 to 80 minutes is a real limitation, and it is a consequence of the size target rather than a choice the author could have optimised away. A bigger cell would have made the thing bigger, and the whole point was that it fits in a pocket.
The repository is a build kit, and the hardware folder is the manual
The repository layout is small and it is entirely a hardware project. The top level contains a .github directory, a .gitignore, a LICENSE, the README, an assets directory, and two directories that carry the work: hardware and software.
Everything you need to build one is included in the repository, and the hardware folder holds the 3D print files, the required parts list and a detailed step by step build guide. The README directs a prospective builder to the parts list to get an idea of the cost for the required tools and parts, and to the build guide PDF for a clear idea of what the build involves.
The hardware folder is itemised, and the itemisation is the useful part. There is the parts list in markdown, the build guide as a PDF, a print-ready directory with Bambu Studio project files ready to print for transparent PETG or PETG with PETG-CF, an stls directory with individual files for the camera parts, and a cad directory holding the STEP file for customisation.
Three details there are worth noting. The project files are for Bambu Studio rather than a generic slicer, so the default print profiles are tuned for a specific toolchain. The print material is specified, transparent PETG or a PETG and PETG-CF mix, which suggests the case is printed in a clear plastic to show the internals, and PETG-CF for the parts that need stiffness. And the STEP file is provided, which means the case can be modified rather than merely reprinted, and the README mentions a 3D printable TPU protective sleeve and lanyard design is available.
The software folder holds the Optocam Zero code and an installation guide, plus camera controls information. The firmware images themselves are published as releases, and the recent ones are named as Optocam Zero Firmware Image v1.2.1, v1.2.0 and v1.0.0, dated 2026-10-18, 2026-07-20 and 2026-07-03.
The hotspot is how the photos get off the device
One design decision runs through the whole project and is easy to miss: the camera has no card reader workflow to speak of, and transfers happen over a hotspot.
The features list describes easy and fast image transfer through a hotspot interface, optimized both for mobile and desktop. The custom filter maker is also in the hotspot interface, up to five filters, which means the filter editing happens on a device that is not the camera, presumably a phone or a laptop, through a browser.
That is a sensible choice for a camera with a 1.4 inch screen and no keyboard. A 240 by 240 pixel display is enough to frame a shot and to scroll a menu, and not enough to edit a filter or to pick which of a hundred photos to keep. Moving that work to a browser on another device means the camera needs no expensive screen and no input method, and the constraints work with each other.
The alternative would be a USB port and a mass storage mode, which is what most small cameras do. The hotspot approach avoids the storage stack and the connector, at the cost of needing a second device nearby to get photos off, and the documentation says the transfer is optimized for both mobile and desktop rather than for one of them.
The screen dimming when inactive is the same thinking applied to power. A device that spends most of its life in a pocket with a backlit LCD is a device that needs charging constantly, so the display turns itself down when you are not using it, and 70 to 80 minutes becomes usable rather than merely a specification.
Building it means a soldering iron and a printer, not a screwdriver
The repository is candid about what a build involves, and an evaluation should be honest about the barrier.
The electronics use off the shelf, common components, and the case is fully 3D printed apart from fasteners. That is the accessible part. The barrier is the assembly: this is a camera with an autofocus module, a small LCD, a battery, a Raspberry Pi Zero and a hotspot interface, all of which have to be connected correctly, and the author has written a step by step build guide and a BOM precisely because the build is not self-evident from the parts list.
The BOM is also where the true cost lives, and the README says to check it to get an idea of the cost for the required tools and parts. That is a distinction worth making. Someone who already owns a printer and a soldering iron is looking at components; someone who does not is looking at a printer and a soldering iron as part of the budget, and the parts list covers both.
For people who would rather not build, the releases contain firmware images, which suggests the firmware is the part that is hard to reproduce rather than the hardware. The releases are named as firmware images and the source tree is in the software folder with an installation guide, so the realistic path for a non-maker is to flash a released image onto a board and assemble the case.
The licence on the project record is a custom one that GitHub cannot classify, with the LICENSE file in the repository as the reference. That is worth checking before you print parts for a camera you intend to sell, since the terms are not visible from the project page.
Where Optocam Zero is the wrong choice
Three situations rule it out, and they are all about expectations rather than about the design.
The first is if you need a finished product. There is no shop, no warranty, no support organisation and no guarantee that a firmware release will still be available in two years. The firmware images are published as GitHub releases of a project under an individual author, and the most recent one is a patch release. That is a fine arrangement for a personal build and a poor foundation for something a business depends on.
The second is if the physical constraints are wrong for the job. 51 by 71 by 18 millimetres is genuinely pocketable, but a 1.4 inch display, a fixed autofocus module and a 14500 cell giving 70 to 80 minutes of use is a specific product. If your photography involves long sessions, bright sunlight where a small dimmed LCD is hard to see, or anything where you need to change a lens, this is not the shape of the answer.
The third is if you want to extend the software in a supported way. The software folder holds the code, the installation guide and the camera controls information, and the project is described in terms of the camera rather than in terms of a reusable library. There is no statement in the documentation about an API, a plugin interface or a supported way to add a feature, and the primary language on the project record is Python, which is consistent with a script that drives the camera rather than a library others build on.
What the project is genuinely good at is being a complete, self-contained design that other people can copy. Every part of the design is published, from the STEP file to the print profiles to the firmware image, and the author's stated goal was that others can build one and have fun with it. Judged on that basis, the repository does what it says it does.
Editorial conclusion
Optocam Zero fits a maker who wants a small digital camera that prints and assembles with common parts, and who is comfortable with a soldering iron and a 3D printer, because the repository contains the print files, the CAD, the parts list and the build guide needed to make one. It is the wrong choice if you need a finished product with a warranty, and it is the wrong choice if the 51 by 71 by 18 millimetre envelope and the 70 to 80 minute battery life will not do the job you have in mind. Before you order parts, read the parts list for the full cost of the tools as well as the components, and check the firmware image releases rather than the source tree, because the releases are what carry the buildroot image that boots in five seconds.
Frequently asked questions
What is Optocam Zero?
It is a Raspberry Pi Zero based compact digital camera made using off the shelf components, with a fully 3D printed case apart from fasteners, an autofocus camera module, a 1.4 inch LCD and a 14500 lithium ion battery. The project is designed to be easy to build so others can build one.
What is in the Optocam Zero repository?
The hardware folder contains the parts list, the build guide as a PDF, Bambu Studio project files ready to print, individual stl files for the camera parts and a STEP CAD file for customisation. The software folder contains the code, an installation guide and camera controls information, and the assets folder holds photos and an exploded view.
How do I get photos off an Optocam Zero?
Through the hotspot interface, which the documentation describes as easy and fast image transfer optimized both for mobile and desktop. The same hotspot interface is where the custom filter maker lives, with up to five custom filters.
How long does the Optocam Zero battery last and how fast does it boot?
It uses a 14500 type lithium ion battery giving 70 to 80 minutes of use per charge, and the documentation states that it now boots in 5 seconds with the buildroot image. The screen dims when inactive to preserve battery, and USB-C charging lets the device be used while charging.
Is Optocam Zero still being developed?
The last push to the repository was on 2026-10-18 and the repository is not archived, with firmware image releases v1.2.1 on 2026-10-18, v1.2.0 on 2026-07-20 and v1.0.0 on 2026-07-03. The licence is a custom one that GitHub cannot classify, with the terms in the LICENSE file.
Official sources
Add this badge to your README
If you maintain this project, the badge below links readers to this analysis and shows its maintenance status from the daily GitHub snapshot. Paste the markdown into your README; add ?metric=license or ?metric=stars to the image URL for a different field.

[](https://hysenlabs.com/projects/dorukkumkumoglu-optocamzero)Star history chart for your README
[](https://hysenlabs.com/projects/dorukkumkumoglu-optocamzero)Was this useful?