BoltzGen: binder design as a YAML spec and a ranked output directory
BoltzGen: Toward Universal Binder Design
At a glance
- What is it?
- BoltzGen is an MIT-licensed Python pipeline that designs protein binders against a target and returns a filtered, ranked set of structures, driven by a design specification written in YAML. The judgement is that the specification format and the resumable pipeline are the engineering, while the model weights and the scale of the design run are the cost.
- Who is it for?
- BoltzGen fits a structural biology team that already has a target and wants a batch of candidate binders with a diversity-optimised shortlist rather than a single fold, and that has GPU hardware and the patience for a run that takes hours. It does not fit a team without a CUDA GPU, since the ESMFold2 weights and the pipeline itself are GPU-oriented, and it does not fit anyone expecting a design to be experimentally validated by the tool.
- Can I use it commercially?
- Yes. MIT is a permissive licence: you can use, modify and sell software built on it, as long as you keep its copyright and licence notices.
- Is it still maintained?
- Yes. The repository last received commits 6 days ago.
- What is it written in?
- Mainly Python, according to GitHub's language statistics.
Answers come from the project's GitHub data, last synced on November 7, 2026, and from our analysis. They are not legal advice.
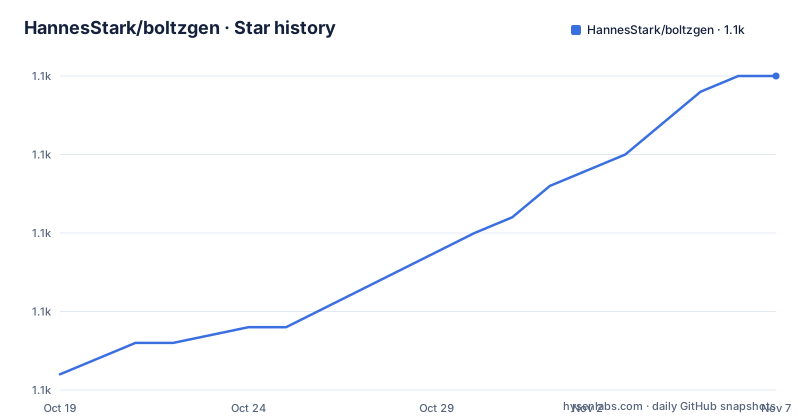
Star history
- HannesStark/boltzgen1,100 ★ · +19
| Repository | 2026-10-19 | 2026-11-07 |
|---|---|---|
| HannesStark/boltzgen | 1.1k | 1.1k |
19 Stars in the last 19 days, measured from the daily GitHub snapshot. Compare with other projects
Editorial analysis
The unit of work is a design specification file
BoltzGen is a Python pipeline for protein design, and its central interface is a YAML file. The command `boltzgen run` takes a design specification and produces a set of ranked designs.
The example command shows the shape of the work:
boltzgen run example/vanilla_protein/1g13prot.yaml \
  --output workbench/test_run \
  --protocol protein-anything \
  --num_designs 10 \
  --budget 2
Two of those flags carry the real design decisions. `--num_designs` is the number of intermediate designs, and the comment in the documentation is blunt about the scale: in practice you will want between 10,000 and 60,000. `--budget` is how many designs end up in the final diversity-optimised set, so the example above asks for 10 intermediate designs and a final set of 2, which is a smoke test rather than a real run.
The `example/` directory in the repository is the best available documentation of the format, and its range shows how general the specification is. There are directories for `nanobody/`, `fab_scaffolds/`, `fab_targets/`, `cyclotide/`, `helicon_against_peptide_in_pmhc/`, `denovo_zinc_finger_against_dna/`, `binding_disordered_peptides/`, `binding_disordered_regions_of_proteins/`, `inverse_folding/`, `small_molecule_from_file_and_smiles/`, `protein_binding_small_molecule/`, and harder cases under `hard_targets/`. There are also standalone specification files such as `design_spec_showcasing_all_functionalities.yaml` and `residue_constraints_test.yaml`.
The topic tags place the project in antibody design, nanobody design, peptide design, miniprotein design, denovo design and protein engineering, which is consistent with that directory listing.
Check the specification, then look at the structure before you run
The documentation describes a five-step workflow, and the second step is the one most people skip.
Step one is writing the YAML that specifies your target and what you want designed. Step two is checking whether the specification is what you intended, and the documentation gives a specific command for that:
boltzgen check example/vanilla_peptide_with_target_binding_site/beetletert.yamlThe `check` command produces an mmcif file, and the instruction is to visualise it in a protein structure viewer, with PyMOL, Chimera or the Mol* online viewer named as options. The expected result is that the viewer shows the binding site in a different colour from the rest of the target. That is a concrete, checkable condition: if the binding site is not highlighted where you expected, your specification is wrong, and finding that out before a multi-hour design run is worth one minute.
Step three is the `run` command itself. Step four is that your filtered, ranked set of designs appears in the `--output` directory. Step five is the iteration step, and the documentation is candid that you will likely want to do it: rerunning the filtering with different settings takes about 15 seconds, using `boltzgen run --steps filtering --output ...`, or the `filter.ipynb` Jupyter notebook, which is described as often more convenient.
That separation of a long design phase from a cheap filtering phase is the practical structure of the tool. You do not regenerate designs to change how they are ranked, you re-rank the existing set.
The output directory is a self-describing record of the pipeline
The pipeline output layout is documented in detail, and reading it tells you what the pipeline actually does.
`config/` and `steps.yaml` hold the configuration files. `intermediate_designs/` holds the output of the design step, with CIF and NPZ files for the designed proteins and targets before inverse folding. `intermediate_designs_inverse_folded/` holds the output of the inverse folding, folding and analysis steps, again as CIF and NPZ.
Inside that second directory the structure of the pipeline becomes visible. There is a `/refold_cif` directory with the refolded complex structures of target and binder, described as the primary input to the analysis and filtering steps. There is a `/refold_design_cif` directory with the refolded binder structures without the target. And there are two metric files, `/aggregate_metrics_analyze.csv` and `/per_target_metrics_analyze.csv`, which are the outputs of the analysis step.
The final directory `final_ranked_designs/` contains two selections. `intermediate_ranked_<N>_designs/` holds the top-N quality designs, with CIFs copied from `refold_cif`. `final_<budget>_designs/` holds the quality plus diversity set, also copied from `refold_cif`. Alongside them are `all_designs_metrics.csv` for every design considered by filtering, `final_designs_metrics_<budget>.csv` for the selected final set, and a `results_overview.pdf` of plots.
One detail in the documentation is worth carrying into your own analysis. The note on the inverse-folded files says that for designed residues only the backbone atoms will have coordinates, and sidechain coordinates will be 0,0,0. So the structures in `intermediate_designs_inverse_folded/` are not full-atom models, and the files you want to inspect in a viewer are the refolded ones.
The `*.npz` files are described as metadata files, and they sit next to the CIFs throughout.
Protocols pick the model, and the default is not the only option
The protocol flag selects the modelling stack, and the documentation describes two configurations.
SolubleMPNN is the default inverse-folding model, with ESMFold2 scoring. The `protein-small_molecule` protocol instead uses BoltzIF and Boltz2 affinity. The `protein-anything` protocol used in the examples is the general one.
The reason a protocol exists at all is that the inverse folding and scoring steps differ by design target. A peptide, a nanobody, a small molecule and a constrained region all need different handling, and the protocol is where that difference is encoded. The Docker example shows the flag in use:
docker run --rm --gpus all -v "$(realpath workdir)":/workdir -v "$(realpath cache)":/cache -v "$(realpath example)":/example boltzgen \
    boltzgen run /example/vanilla_protein/1g13prot.yaml --output /workdir/test \
  	--protocol protein-anything \
   	--num_designs 2
The volumes in that command are worth reading. `workdir` is the output, `cache` is where models are downloaded to, and `example` is mounted for the specification file. The `--gpus all` flag is not optional in practice.
There is a separate `requirements-esmfold2.txt` file at the repository root, and a `docs/esmfold2.md` page for installation and cache settings. That split exists because ESMFold2 is the heavyweight dependency, and a user running a protocol that does not need it should not have to install it.
The repository also ships a `slurm-example/` directory, which tells you the project expects cluster execution for serious runs, and a `scripts/` directory.
The weights are the real installation cost
The installation section is short, and the warnings that follow it are the part that matters for planning.
The package installs with pip in an environment with Python 3.11 or newer, and the package metadata declares `requires-python = ">=3.11"`. The documentation points at a `docs/dependencies.md` page for NumPy and Numba compatibility bounds and states that Python 3.11 and 3.13 combinations are the tested ones. The detailed instructions recommend a Miniconda environment:
conda create -n bg python=3.12followed by `conda activate bg` and then `pip install boltzgen`. The note is explicit that you must activate the environment every time you work with BoltzGen, including in a new terminal session. An editable local install is `pip install -e.`.
The cost is the model weights. The documentation states that models download automatically, about 6 GB for Boltz, plus about 33 GB for ESMFold2 weights and runtime, and that ESMFold2 requires a CUDA 13 compatible NVIDIA driver. The Docker path has a build argument to handle this, `DOWNLOAD_WEIGHTS`, which when set to true bakes the weights into the image at build time rather than downloading them on first run.
The dependency list in `pyproject.toml` explains where the weight comes from: `huggingface_hub` is the downloader, `torch>=2.4.1` and `pytorch-lightning` are the model runtime, and `nvidia-ml-py` is for GPU monitoring. There is also `uv>=0.12.3,<0.13` as a runtime dependency, plus scientific stack entries such as `numpy>=2.0.2,<2.5`, `numba>=0.61.0,<0.66`, `biotite`, `gemmi>=0.6.5`, `rdkit`, `biopython`, `hydra-core` for configuration, `scikit-learn`, `pandas` and `matplotlib`.
The `boltzgen` console script is declared as `boltzgen = "boltzgen.cli.boltzgen:main"`.
An interrupted run can be picked back up
One operational feature stands out for a job that runs at the scale the project suggests, and it is easy to miss.
The documentation states that if a run is ever interrupted, you can restart it with `--reuse`, and that no progress is lost. For a pipeline that generates tens of thousands of intermediate designs and then refolds and analyses them, an interruption without that flag would mean starting over, so the resumability is what makes the suggested 10,000 to 60,000 design scale practical at all.
The second operational point is the recommendation to try a small run first. The documentation suggests first running with something like `--num_design 50`, checking that everything behaves as desired, and then increasing to between 10,000 and 60,000. The flag name is written both as `--num_designs` in the command examples and as `--num_design` in this sentence, which is a small inconsistency in the documentation rather than a documented alias, so it is worth checking which one your installed version accepts.
The project also states that BoltzGen should be run on a GPU, and includes a figure showing the time required for each step in the pipeline for a single design on an A100 GPU. That figure is a timing reference, not a promise about throughput on your hardware.
The `filter.ipynb` notebook at the repository root is the other piece of the workflow. Since filtering takes about 15 seconds, doing it interactively in a notebook rather than through the command line is a reasonable choice, and the notebook is included in the repository for exactly that.
MIT licensed, actively released, and built on vendored code
The licensing is straightforward. The project is MIT licensed with a `LICENSE` file at the repository root, so the code can be used, modified and redistributed in a commercial or closed-source setting without an obligation to publish anything. That is a licensing observation rather than legal advice, and the `LICENSE` file governs.
The release history shows a project moving through a 0.x line with regular releases. v0.3.0 came on 2026-02-10, v0.3.1 on 2026-03-06, and v0.3.2 on 2026-05-01. The package metadata in the repository declares version `0.3.2`, and the last push was on 2026-10-06, so the tree is ahead of the last tag. A 0.x version means the API is still moving, which is normal for a research pipeline and worth remembering if you build automation on top of the output directory layout.
The package data section of `pyproject.toml` is worth a look because it names what is vendored. The package ships `resources/config/**/*`, runtime resources, a metrics normalisation file, and it explicitly includes the licence and notice files for two vendored components: `_vendor/ligandmpnn/LICENSE` with its `NOTICE.md`, and `task/esmfold2/LICENSE.*` with its `NOTICE.md`. So the inverse folding model and the ESMFold2 task code are carried inside the distribution with their own attribution, which is the correct handling under an MIT-licensed project.
The repository root also has a `Dockerfile` built on `nvidia/cuda:12.2.2-cudnn8-devel-ubuntu22.04` with Python 3.11 installed from the deadsnakes PPA, a non-root user created with a configurable UID and GID, and `HF_HOME` pointed at `/cache` so the weight cache is a volume. The `PYPI_DESCRIPTION.md` file is what PyPI renders as the package long description, and there is a `tests/` directory plus `pytest` and `ruff` in the optional dependency groups.
Editorial conclusion
BoltzGen fits a structural biology team that already has a target and wants a batch of candidate binders with a diversity-optimised shortlist rather than a single fold, and that has GPU hardware and the patience for a run that takes hours. It does not fit a team without a CUDA GPU, since the ESMFold2 weights and the pipeline itself are GPU-oriented, and it does not fit anyone expecting a design to be experimentally validated by the tool. Verify first that the weights you need are available for your protocol, because the documentation states that models download automatically at about 6 GB for Boltz plus about 33 GB for ESMFold2, that ESMFold2 requires a CUDA 13 compatible NVIDIA driver, and that a design run at 10,000 to 60,000 intermediate designs is the scale the project suggests, so check the disk and the wall-clock budget before you start.
Frequently asked questions
How do I install BoltzGen?
In an environment with Python 3.11 or newer, run `pip install boltzgen`. The detailed instructions recommend a Miniconda environment created with `conda create -n bg python=3.12` and activated with `conda activate bg` before installing, and a `docs/dependencies.md` page covers the NumPy and Numba bounds.
How many designs should I generate with BoltzGen?
The documentation suggests first running with something like `--num_design 50` to check that everything behaves as desired, and then increasing to between 10,000 and 60,000 intermediate designs. `--budget` then sets how many designs are kept in the final diversity-optimised set.
How do I check that my BoltzGen design specification is correct?
Run `boltzgen check <your.yaml>` and visualise the resulting mmcif file in a protein structure viewer such as PyMOL, Chimera or the Mol* online viewer. The binding site should appear in a different colour from the rest of the target.
What happens if a BoltzGen run is interrupted?
You can restart it with `--reuse` and no progress is lost. The filtering step can also be rerun on its own with `boltzgen run --steps filtering --output ...`, or through the `filter.ipynb` notebook, which the documentation says is often more convenient and takes about 15 seconds.
What are the hardware and storage requirements for BoltzGen?
The project states that BoltzGen should be run on a GPU and that models download automatically, about 6 GB for Boltz plus about 33 GB for ESMFold2 weights and runtime. ESMFold2 requires a CUDA 13 compatible NVIDIA driver.
Official sources
Add this badge to your README
If you maintain this project, the badge below links readers to this analysis and shows its maintenance status from the daily GitHub snapshot. Paste the markdown into your README; add ?metric=license or ?metric=stars to the image URL for a different field.

[](https://hysenlabs.com/projects/hannesstark-boltzgen)Star history chart for your README
[](https://hysenlabs.com/projects/hannesstark-boltzgen)Was this useful?