Running SimpleLogin yourself: DNS, DKIM and Docker
The SimpleLogin back-end and web app
At a glance
- What is it?
- The simple-login/app repository is the SimpleLogin back-end and web app: a Flask service that receives mail for per-site aliases and forwards it, shipped as Docker containers alongside Postgres and Postfix. It also carries rough edges worth reading before you deploy, since pyproject.toml claims MIT and version 0.1.0 while the repository is AGPL-3.0 and the tags sit at v4.83.2.
- Who is it for?
- Self-host SimpleLogin only if you already have a Linux server with port 25 open, a domain whose DNS you control, and patience for propagation delays. Read the licence from the LICENSE file at the root rather than from pyproject.toml, which declares MIT and version 0.1.0 while the repository ships AGPL-3.0 and tags at v4.83.2.
- Can I use it commercially?
- Yes, with strict conditions. AGPL-3.0 is a network copyleft licence: if people use a modified version over a network, for example as a hosted service, you must offer them its source code under the same licence.
- Is it still maintained?
- Yes. The repository last received commits 2 days ago.
- What is it written in?
- Mainly Python, according to GitHub's language statistics.
Answers come from the project's GitHub data, last synced on November 15, 2026, and from our analysis. They are not legal advice.
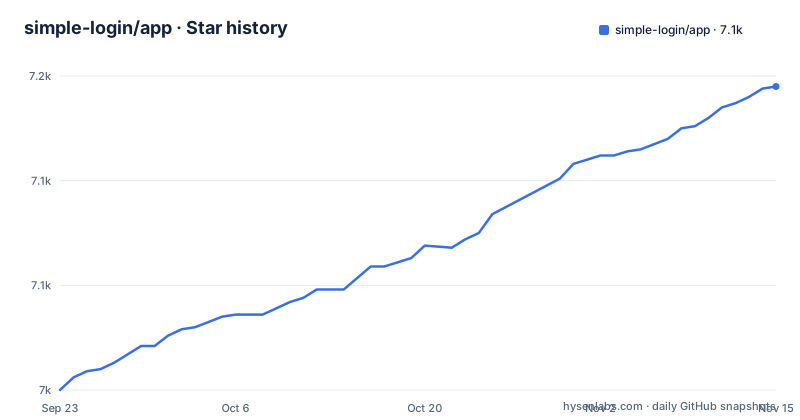
Star history
- simple-login/app7,145 ★ · +145
| Repository | 2026-09-23 | 2026-11-15 |
|---|---|---|
| simple-login/app | 7k | 7.1k |
145 Stars in the last 53 days, measured from the daily GitHub snapshot. Compare with other projects
Editorial analysis
Why an alias needs a mail server you control
What lives in simple-login/app is the half of SimpleLogin that speaks SMTP and serves the web interface, and that is exactly why a browser extension on its own cannot do the job. Reusing a single address everywhere is what makes one person traceable across unrelated services. An alias per site breaks that link, but the mail sent to each alias still has to land somewhere you control before it reaches the address you actually own. That somewhere is this code. It takes mail in, checks it, and forwards it onward.
So the repository is an infrastructure job rather than a pip install. The prerequisites ask for a Linux server, either a VM or a dedicated box, with at least 2 GB of RAM because most components run as Docker containers, and with four ports open: 25 for email, 80 and 443 for the web app, and 22 so you can still get in over ssh. Two hostnames carry the whole arrangement, one for mail at `mydomain.com` and one for the interface at `app.mydomain.com`, and the walkthrough is written for Ubuntu 18.04 LTS with a note that the steps adapt to other distributions.
The audience is narrow and worth naming: people who want per-site addresses without handing a mailing list to every site they touch, and who are prepared to run the mail plumbing that makes those addresses work.
Docker, Postgres and a bridge network pinned to 10.0.0.0/24
The stack is assembled from containers, and the guide fixes the network shape by hand before anything starts. Docker itself comes either from Docker's Ubuntu page or from its convenience script:
curl -fsSL https://get.docker.com | shThen the dedicated bridge, created with an explicit subnet because the mail container is later configured to accept connections from exactly this range:
sudo docker network create -d bridge \
    --subnet=10.0.0.0/24 \
    --gateway=10.0.0.1 \
    sl-network
Data stays on the host in four directories you create yourself, and the comments in the commands say what each one holds:
mkdir sl
mkdir sl/pgp # to store PGP key
mkdir sl/db # to store database
mkdir sl/upload # to store quarantine emails
That last directory is the interesting one. Mail the server is not willing to forward is quarantined rather than dropped, which means a self-hosted instance has a folder you have to look at. If you already run a database, the guide tells you to skip the Postgres section entirely and copy the existing host, port, username and password into the configuration instead. For checking DNS later, the utility comes from dnsutils:
sudo apt update && sudo apt install -y dnsutilsNote the subnet choice. 10.0.0.0/24 is also the range many home routers hand out, so on a network that already uses it the collision has to be resolved here, in the bridge definition, rather than somewhere in the mail configuration.
Five DNS records stand between you and deliverable mail
Most of the work is DNS, and the guide treats it that way. Four record types decide whether mail to your alias domain is accepted: an MX record sending `mydomain.com.` to `app.mydomain.com.` with priority 10, an A record pointing `app.mydomain.com.` at the server address, an SPF TXT record stating that only this server may send as the domain, and a DMARC TXT record telling receivers what to do when the two disagree. DKIM adds a fifth, carrying the public half of the signing key. Every one of them comes with a verification command:
dig @1.1.1.1 mydomain.com mx
dig @1.1.1.1 app.mydomain.com a
dig @1.1.1.1 mydomain.com txt
dig @1.1.1.1 _dmarc.mydomain.com txt
The MX lookup should come back with priority 10 and your mail host, the A lookup with the server address, and the two TXT lookups with the SPF value `v=spf1 mx ~all` and the DMARC value `v=DMARC1; p=quarantine; adkim=r; aspf=r`. A stricter DMARC line is offered as well, `v=DMARC1; p=reject; adkim=s; aspf=s`.
Two warnings come attached to these steps. DNS changes can take up to 24 hours to propagate, so verify before assuming a mistake. And if the A record is fronted by CloudFlare, the Proxy option has to be disabled, since a proxied address is not the host holding the mailbox.
1024-bit DKIM keys and registrars that break on long TXT records
DKIM signs outgoing mail with a private key and publishes the public half, so a receiver can tell that a message claiming your domain really left your server. The guide says DKIM is highly recommended to reduce the chance your mail ends up in the recipient's spam folder, and just as explicit about the key size. It asks for 1024 bits rather than 2048, and gives the reason: some registrars do not handle long TXT records well, so the shorter key buys a setup that survives contact with ordinary DNS interfaces.
That is a real downgrade in signing strength, chosen for compatibility, and it is the kind of trade-off worth naming rather than burying. The generation is two commands:
openssl genrsa -out dkim.key -traditional 1024
openssl rsa -in dkim.key -pubout -out dkim.pub.key
Publishing the key means flattening the PEM file into a single line with the header and footer removed, which the guide does with one pipeline rather than by hand:
sed "s/-----BEGIN PUBLIC KEY-----/v=DKIM1; k=rsa; p=/g" $(pwd)/dkim.pub.key | sed 's/-----END PUBLIC KEY-----//g' |tr -d '\n' | awk 1The result replaces the placeholder in `v=DKIM1; k=rsa; p=PUBLIC_KEY`, published as a TXT record on `dkim._domainkey.mydomain.com.`. On the server side the signing library is pinned hard: `dkimpy == 1.0.5` in the dependency list, and `pyspf ~= 2.0.14` alongside a commented-out git pin kept in the file with a note that it waits for a new pyspf release.
Gunicorn on 7777, uv sync --locked, and a Node 10 build stage
The container build tells you what actually runs. It has two stages: a `node:10.17.0-alpine` stage that runs `npm ci` over the frontend package files, and an `ubuntu:22.04` stage that carries the Python application. Dependencies are installed with uv, downloaded as a pinned release tarball (UV_VERSION 0.10.12) and checked against a recorded sha256 hash before it is allowed to run, then the interpreter comes from the repository's own `.python-version` file and `uv sync --locked` installs strictly from `uv.lock`. Build tooling, including curl, build-essential, cmake, ninja and clang, is purged afterwards so the running image carries the app and little else.
The service runs under Gunicorn (gunicorn ~= 20.0.4 in pyproject.toml, with gunicorn.conf.py at the root), and the image puts the virtualenv on PATH:
ENV PATH="/code/.venv/bin:$PATH"Anything else at the top level is worth a glance before you deploy: `alembic.ini` with a `migrations/` directory for schema changes through Flask-Migrate, `example.env` for configuration, `cron.py` with `crontab.yml` and `crontab-all-hosts.yml` for scheduled work, `job_runner.py`, `event_listener.py`, and `newrelic.ini` for monitoring. The Dockerfile builds on 22.04 while the written walkthrough still targets 18.04 LTS, so the guide you are following is older than the image you will run.
Pointing the extension and mobile apps at your own instance
Here is the part that trips people up. The clients are distributed separately, as a Chrome and Firefox extension and as Android and iOS apps, and they ship pointed at somebody else's server. Once your own instance is up, the entire switch is one setting: the `API URL` inside SimpleLogin's extension or mobile app is changed to your server, and the clients talk to your database from then on. Nothing in this repository does that for you, and no client source is here to modify.
Two things follow from that arrangement. First, if your server is down or mid-migration, the clients have nothing to talk to and there is no hosted fallback in the code, so the aliases stop resolving at the moment your mail host stops answering. Second, everything that makes aliases useful, the PGP key in `sl/pgp`, the database in `sl/db`, and the quarantine folder in `sl/upload`, lives on the machine you just pointed the clients at, which makes backup and migration your problem rather than the project's.
For anything beyond the code, the project keeps two public places: a roadmap board and a discussion forum in the same repository, both linked from the setup guide, with feature ideas and votes accepted there.
Where pyproject.toml and the repository disagree
The packaging metadata is the weakest part of the repository and it will mislead anyone auditing a deployment. Three fields are wrong in ways that matter. The licence field reads MIT, while the licence file at the repository root is AGPL-3.0. The version field reads 0.1.0, while the release tags are at v4.83.2. And the project description reads "SimpleLogin partner API", which describes neither the back-end nor the web app that this code actually contains.
The dependency list has the same split personality. It asks for Python `~=3.12.0`, a recent interpreter, and then pins `flask ~= 1.1.2`, `wtforms ~= 2.3.3`, `arrow ~= 0.16.0` and `ipython ~= 7.31.1`, all from an earlier era of the ecosystem. Some pins are exact on purpose: `dkimpy == 1.0.5`, `Flask-Limiter == 1.5`, `sqlalchemy-utils == 0.36.8`, which means the mail-signing and rate-limiting behaviour you get is fixed and will need deliberate work to move. Others tell you what the service reaches for: boto3, sentry_sdk for error reporting, PGPy and python-gnupg for the key handling behind `sl/pgp`, coinbase-commerce for payments, and Flask-Limiter for rate limiting.
Practically, this means the licence question is answered by the LICENSE file and the version question by the tags. Neither is answered by the file you would reach for first.
What self-hosting costs you: port 25, bounces and quarantine
There is no configuration that turns this into a small job. The single hardest requirement is the port itself. The guide states that port 25 must be open, and many hosts and providers block outbound mail on 25 by default, which means the deciding factor is often your provider rather than your setup. If the port is closed, the DNS, the DKIM key and the container stack are all correct and the aliases still deliver nothing.
Bounce handling and reputation are yours too. Because the server sends as your domain, a misconfigured forward or a spam run damages the domain's sending record, and SPF plus DMARC are what let receivers judge it. The guide pushes DKIM as the answer to landing outside spam folders, and the `sl/upload` quarantine folder exists because mail the server will not forward is held for inspection rather than discarded, so a healthy instance still needs someone reading that directory.
The last gap is operational. Alembic migrations under `migrations/` are how schema changes ship, so plan for upgrading a running instance, restoring `sl/db` from a backup, and moving to a new server. Budget for reverse proxy and TLS on top of Gunicorn, for host security updates on a machine you now own, and for migration work.
Editorial conclusion
Self-host SimpleLogin only if you already have a Linux server with port 25 open, a domain whose DNS you control, and patience for propagation delays. Read the licence from the LICENSE file at the root rather than from pyproject.toml, which declares MIT and version 0.1.0 while the repository ships AGPL-3.0 and tags at v4.83.2. The first thing to verify is whether your provider allows outbound mail on port 25 at all, because without it the alias half of the system delivers nothing.
Frequently asked questions
Who is behind SimpleLogin?
The code sits in the simple-login/app repository on GitHub, the project site is https://simplelogin.io, and pyproject.toml lists the author as SimpleLogin with the contact address [email protected]. Feature ideas and votes are collected on a roadmap board and a discussion forum inside the same repository.
Is SimpleLogin.com legit?
The project names https://simplelogin.io as its site and simple-login/app as its code, released under AGPL-3.0 from the LICENSE file at the repository root. Anyone can check that pairing directly, and the self-hosting guide is published in the same README, so the software you would install is the software the repository describes.
How to use SimpleLogin correctly?
Bring up the instance first, then change the API URL setting inside the Chrome or Firefox extension, or inside the Android and iOS app, to your own server. Before that, the DNS has to resolve: an MX record with priority 10 to app.mydomain.com, an A record for app.mydomain.com, and TXT records for DKIM, SPF and DMARC.
Official sources
Add this badge to your README
If you maintain this project, the badge below links readers to this analysis and shows its maintenance status from the daily GitHub snapshot. Paste the markdown into your README; add ?metric=license or ?metric=stars to the image URL for a different field.

[](https://hysenlabs.com/projects/simple-login-app)Star history chart for your README
[](https://hysenlabs.com/projects/simple-login-app)Was this useful?