rpi4-osdev: fifteen parts, one page per Raspberry Pi subsystem
Tutorial: Writing a "bare metal" operating system for Raspberry Pi 4
At a glance
- What is it?
- A tutorial that builds a bare metal operating system for the Raspberry Pi 4 in C, starting from a cross-compiler and ending with a TCP/IP web server. The prerequisite list is more honest than most, and the written text stops mid-word in the compiler section.
- Who is it for?
- Take this tutorial if you want to write an OS that boots on real hardware and learn the boot protocol by hand, and if you are willing to buy the two small pieces of hardware it names. Check three things first.
- Can I use it commercially?
- Yes. CC0-1.0 is a permissive licence: you can use, modify and sell software built on it, as long as you keep its copyright and licence notices.
- Is it still maintained?
- Yes. The repository last received commits 73 days ago.
- What is it written in?
- Mainly C, according to GitHub's language statistics.
Answers come from the project's GitHub data, last synced on November 14, 2026, and from our analysis. They are not legal advice.
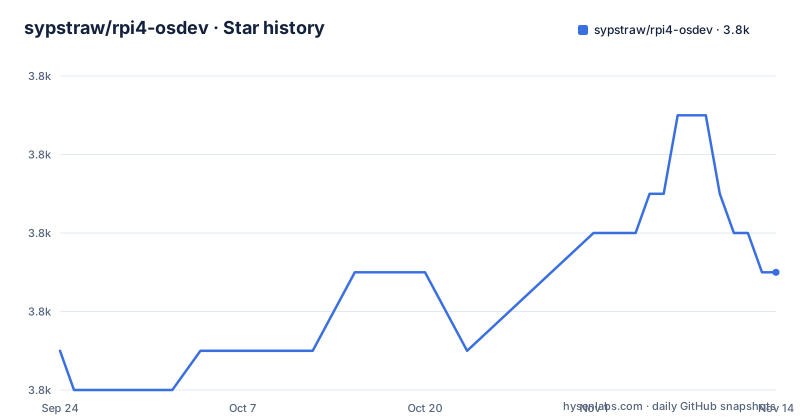
Star history
- sypstraw/rpi4-osdev3,773 ★ · +2
| Repository | 2026-09-24 | 2026-11-14 |
|---|---|---|
| sypstraw/rpi4-osdev | 3.8k | 3.8k |
2 Stars in the last 51 days, measured from the daily GitHub snapshot. Compare with other projects
Editorial analysis
Fifteen parts, one hardware subsystem each
The repository is organised as a numbered sequence that maps almost one directory to one piece of the machine. After `part1-bootstrapping/` and `part2-building/` come `part3-helloworld/`, `part4-miniuart/`, and `part5-framebuffer/`, which is where output to a screen first becomes possible. From there the sequence widens: `part6-breakout/`, `part7-bluetooth/`, `part8-breakout-ble/`, `part9-sound/`, then `part10-multicore/` and `part11-breakout-smp/` for symmetric multiprocessing, `part12-wgt/`, `part13-interrupts/`, `part14-spi-ethernet/`, and finally `part15-tcpip-webserver/`. Reading the directory names tells you the curriculum: serial output before graphical output, one core before many, then interrupts, then a network stack, then a server on top of it. The pairing of `part7-bluetooth/` and `part8-breakout-ble/` is the one that stands out, since both appear as separate parts rather than one, suggesting the BLE work is treated as a distinct exercise.
Get Raspbian booting before writing a single line
The software prerequisite step is not optional and the page is blunt about it: don't proceed until you get Raspbian running. The argument is that if you cannot get someone else's OS running you will not be able to write your own, so flashing the card with Raspbian through Raspberry Pi's Imager tool doubles as a test of the hardware setup. That test has a specific failure mode described from experience: connected to a not brilliant TV, the display was just black until `hdmi_safe` was set to 1 in the `config.txt` file on the SD card. Other video options in that file are pointed at as the next place to look. So the order of operations is deliberately conservative. Confirm the board, the power supply, the HDMI lead, the card, and the monitor all work under a known-good operating system before any of it is trusted to run code you wrote, because a black screen during bare metal debugging has far more possible causes than a black screen under Raspbian.
The cross-compiler target name is the whole instruction
The Pi 4 runs on an Arm Cortex-A72 processor while the dev machine is likely Intel, so the build has to target a different architecture, which is what a cross-compiler is for. The two supported paths are given as concrete downloads rather than as general advice. On Linux through WSL, you download and unpack Arm's gcc compiler from their GitLab tooling page, and you need to use the AArch64 ELF bare-metal target, the author says for reasons not covered at that point in the text. Because GNU make is needed soon after, the WSL route is a single `sudo apt install make`. On Mac, XCode from the App Store supplies developer tools including make, and LLVM is recommended through Homebrew, which in the author's case was `brew install llvm`. The note that this works on an M1 MacBook Pro matters, because that machine is itself Arm rather than Intel, so the same cross-compilation setup covers both architectures on the dev side.
The verification note is dated, and the prose stops mid-word
A note at the top of the page carries a date: Tuesday 4th August 2026. It states that all parts have been updated to reflect the latest RPi4 firmware changes, and that they have all been confirmed working when built on an Apple MacBook Pro M1 running MacOS Tahoe 26.6, with Clang 21.0.0 or Arm's gcc 15.2.1, and Node 24.13.1. That is a useful level of specificity, since bare metal code sits close to firmware and a firmware change can break a part that was working last year. Two limits are worth stating plainly. The confirmation is on one hardware configuration and one set of toolchain versions, so a different board revision or compiler may behave differently. And the written text on this page ends in the middle of the Mac clang section, on a sentence about a machine that runs an ARM processor rather than an Inte, with the remaining guidance on other hosts not present here.
Tweezers and a serial cable are listed as hard prerequisites
The hardware list is unusually honest about the physical part. Alongside the Pi 4 with a dedicated power supply and HDMI lead, a monitor or TV connected over HDMI, a micro-SD card to boot from, and the dev machine, the page names a pair of eyebrow tweezers, noting they were borrowed from the author's wife, as useful for inserting and removing the micro-SD card in the tiny slot on the board. It also names a USB to serial TTL cable, with the reason given plainly: it lets you see what your OS is doing long before you can write information to the screen. That single line explains the ordering of the whole curriculum, since `part4-miniuart/` comes before `part5-framebuffer/` precisely because serial output is available earlier. There is also a practical note about the dev machine itself, since you need to be able to write to the micro-SD card from it, which for the author meant buying an adapter and possibly a USB card reader if the laptop has no slot.
The repository is a published website as well as source
The tree shows this is not only a code drop. A `CNAME` file, a `_config.yml`, an `_includes/` directory, and a `.github/` directory together are the shape of a Jekyll site published through GitHub Pages, which matches the recorded homepage at rpi4os.com. Sitting next to them is a file called `google69636ed483fc239e.html`, which is a Google site verification artefact left in the repository root, and `RPI-BUILD.md` as a separate document alongside the main README. That combination means the tutorial prose is maintained in the same repository as the code it describes, so a reader can read the site and read the sources from one place, but it also means the repository root is not a clean software package layout. There is no build script, manifest, or test configuration at the top level; the build is part of the tutorial content itself, in `part2-building/`.
CC0 for the prose, no releases for the code
Two repository facts shape how you can reuse any of it. The licence recorded for the project is CC0-1.0, the public domain dedication, which is an unusual choice for code but a natural one for tutorial prose and images: it means the text and diagrams can be copied into your own material without attribution obligations. It does not automatically cover the underlying Raspberry Pi firmware or any code you might copy from elsewhere while following the steps. Second, there are no GitHub releases for this repository, so there is nothing to download and nothing to pin. The default branch is `master` and its last push was 2026-09-03, and the repository is not archived, so the parts are still being revised even though they arrive as moving branches rather than as versions.
Editorial conclusion
Take this tutorial if you want to write an OS that boots on real hardware and learn the boot protocol by hand, and if you are willing to buy the two small pieces of hardware it names. Check three things first. The prerequisite list includes eyebrow tweezers and a USB to serial TTL cable, not as jokes, because the SD slot is tiny and the serial console is your only output before the framebuffer works. The last part is a TCP/IP web server, so this is a fifteen-stage project rather than an afternoon. And note the toolchain note is dated: it says all parts were updated as of Tuesday 4th August 2026 and confirmed on MacOS Tahoe with Clang 21 and Arm gcc 15.2.1, so verify against your own compiler versions before assuming a part still builds.
Frequently asked questions
What does rpi4-osdev teach you to build?
A bare metal operating system for the Raspberry Pi 4 written in C, across fifteen parts that go from bootstrapping and building through mini UART output, the framebuffer, Bluetooth and BLE, sound, multicore and SMP, weight, interrupts, SPI Ethernet, and finally a TCP/IP web server.
What hardware do I need for the rpi4-osdev tutorial?
A Raspberry Pi 4 with a dedicated power supply and HDMI lead, a monitor or TV over HDMI, a micro-SD card to boot from, and a dev machine that can write to that card. The page also names eyebrow tweezers for the tiny card slot and a USB to serial TTL cable for seeing output before the screen works.
How do I set up a cross-compiler for rpi4-osdev?
On Linux through WSL, download and unpack Arm's gcc compiler and use the AArch64 ELF bare-metal target, then install make. On Mac, install XCode from the App Store for the developer tools and use Homebrew to install LLVM, which also works on Apple Silicon machines.
What licence is the rpi4-osdev tutorial released under?
CC0-1.0, the public domain dedication, which suits tutorial prose and images. The repository publishes no GitHub releases, so the parts are only available from the default branch, master, last pushed 2026-09-03.
Official sources
Add this badge to your README
If you maintain this project, the badge below links readers to this analysis and shows its maintenance status from the daily GitHub snapshot. Paste the markdown into your README; add ?metric=license or ?metric=stars to the image URL for a different field.

[](https://hysenlabs.com/projects/sypstraw-rpi4-osdev)Star history chart for your README
[](https://hysenlabs.com/projects/sypstraw-rpi4-osdev)Was this useful?