BumpMesh: adding real surface texture to 3D prints in the browser
Add a phyiscal texture to your 3D Print.
At a glance
- What is it?
- BumpMesh, published as CNCKitchen/stlTexturizer, is a browser tool that displaces the surface of STL, OBJ, 3MF and STEP meshes with 101 built-in textures. It is a good fit for makers who want knurling, tread or mould grain without modelling relief, and a poor fit for headless pipelines.
- Who is it for?
- Adopt BumpMesh if you want textured prints without modelling relief in CAD and you are comfortable working inside a browser session, especially for layered work where each layer carries its own projection and painted surface. Do not adopt it as the core of a headless build pipeline, since no command line interface or scriptable API is documented.
- Can I use it commercially?
- Check first. The repository uses a licence we do not classify automatically, so read its LICENSE file before any commercial use.
- Is it still maintained?
- Yes. The repository last received commits 3 days ago.
- What is it written in?
- Mainly JavaScript, according to GitHub's language statistics.
Answers come from the project's GitHub data, last synced on November 7, 2026, and from our analysis. They are not legal advice.
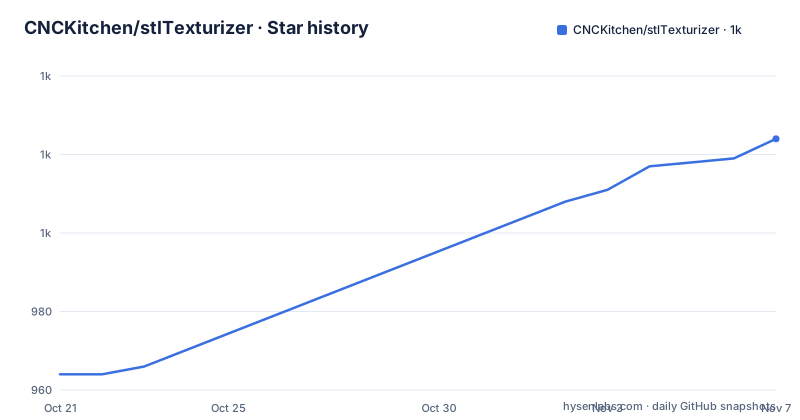
Star history
- CNCKitchen/stlTexturizer1,024 ★ · +60
| Repository | 2026-10-21 | 2026-11-07 |
|---|---|---|
| CNCKitchen/stlTexturizer | 964 | 1k |
60 Stars in the last 17 days, measured from the daily GitHub snapshot. Compare with other projects
Editorial analysis
Displacing a print without modelling relief in CAD
BumpMesh, published by CNC Kitchen under the name CNCKitchen/stlTexturizer, attacks a narrow and very practical problem: giving a 3D print a physical surface texture before it reaches the slicer. The loop described in the project documentation is load a mesh, pick a texture, tune the parameters, export a new displaced STL. Nothing is installed on the machine. The tool runs in a browser tab, its source is JavaScript, and the top level of the repository is a single index.html next to a js/ directory, a textures/ folder, an assets/ folder and a style.css.
The user this is for is specific. Someone holding a CAD export or a downloaded model who wants knurling, carbon twill, a mould grain or a tyre tread on the surface, and who would rather not build that relief in the CAD package. It also suits makers who want more than one texture on a single part, because up to four layers can sit on one mesh with independent settings for each. The project homepage is bumpmesh.com, and the author is credited as Stefan Hermann.
Seven projection modes decide where the map lands
The projection mode is the first real decision, because it determines how a two-dimensional displacement map lands on a three-dimensional surface. Triplanar is the default and blends three planar projections based on surface normals, which the feature list calls the best option for complex shapes. Cubic, also called Box, projects from six box faces with edge-seam blending and smart axis dominance. Cylindrical wraps the texture around an axis with a configurable cap angle, Spherical maps spherically around the object, and Planar XY, XZ and YZ give flat axis-aligned projections for parts that are basically prismatic.
Around those sits a transform layer. Scale U and V can be independent or locked, running from 0.05x to 10x on a logarithmic scale, and Offset U and V position the map on each axis. Rotation is applied to the texture before projection. For Cubic and Cylindrical work there are Seam Blend Strength, which softens hard edges where projection faces meet, and Seam Band Width, which controls how wide the blending zone at those edges is. Displacement itself scales from 0 to 100 percent amplitude, and a symmetric mode keeps 50 percent grey neutral while white pushes out and black pulls in, so the part keeps its volume.
Four layers, two masking mechanisms and one paint brush
Several textures can be combined on one model. Up to four layers are supported, each with its own texture, projection, size, height and painted surface. The sidebar always edits the highlighted layer, whose surfaces show in teal while everything else stays grey, and a layer either covers the layers below where it is painted or adds its relief to them. New layers start empty in Include Only mode with the fill tool ready, so you click the surfaces the texture should cover.
Masking works through two separate mechanisms. Angle masking suppresses texture on near-horizontal top or bottom faces, with a 0 to 90 degree threshold for each. Surface painting lets you exclude surfaces, marked in orange, or include them exclusively. The circle brush runs in Precision mode by default, refining the mesh under the stroke itself so the edge stays fine on a 12-triangle cube as on a scan, and it never modifies the base mesh. Standard mode instead marks every whole triangle the brush touches, which suits quickly selecting the flat faces of a CAD model. There is also a single-triangle brush, a bucket fill that flood-fills adjacent faces up to a configurable dihedral-angle threshold, and holding Shift erases.
Subdivision and QEM decimation bracket the displacement
Two mesh operations carry the pipeline. Adaptive subdivision splits edges until they fall to or below a target length, and it respects sharp creases above a 30 degree dihedral angle. QEM decimation then simplifies the result down to a target triangle count using Quadric Error Metrics, with boundary protection, link-condition checks, normal-flip rejection and crease preservation, so a heavily displaced surface does not collapse into noise.
The update notes claim roughly twice as many triangles for the same memory, with pipeline peak cut from about 660 to about 330 bytes per subdivided triangle and bit-identical output, alongside a two to three times speed improvement. A hard safety cap stops subdivision at 10 million triangles to prevent running out of memory, and an amplitude overlap warning appears when the displacement depth exceeds 10 percent of the smallest model dimension. Export reports progress through the subdivision, displacement, decimation and writing stages, and you can set both an edge-length threshold and an output triangle limit.
Serving the tool yourself through the bundled nginx image
The hosted page needs nothing on your machine, but the repository also ships a container setup, which is the practical route for a self-hosted copy or a workshop LAN. The image is nginx with the static site copied in, and it exposes port 80:
FROM nginx:alpine

COPY nginx.conf /etc/nginx/conf.d/default.conf
COPY index.html /usr/share/nginx/html/
COPY changelog.html /usr/share/nginx/html/
COPY style.css /usr/share/nginx/html/
COPY logo.png /usr/share/nginx/html/
COPY js/ /usr/share/nginx/html/js/
COPY textures/ /usr/share/nginx/html/textures/
COPY assets/ /usr/share/nginx/html/assets/

EXPOSE 80
The compose file maps a host port onto the container and pulls its settings from an environment file. Both files are in the repository root, and the defaults live in .env.example:
services:
  bumpmesh:
    container_name: ${CONTAINER_NAME:-bumpmesh}
    build: .
    image: bumpmesh:latest
    ports:
      - "${HOST_PORT:-8080}:${CONTAINER_PORT:-80}"
    restart: unless-stopped
The environment file that feeds those variables is a short list of container settings:
# Container settings
CONTAINER_NAME=bumpmesh
HOST_PORT=8080
CONTAINER_PORT=80
With the host port left at its default, the site answers on port 8080 and the same index.html runs in your browser. A podman-compose.yaml and an nginx.conf also sit at the repository root, and the project's own usage instructions stop at opening index.html, so the container files are the clearest path for your own instance.
What the documentation leaves unsaid
The gaps are worth naming. No rollback procedure is documented, and there is no headless command line mode or scriptable interface, so every run happens in a browser session and the result is downloaded by hand. Custom texture uploads are kept in the browser only, and the documentation warns that the browser may clear them at any time, so your own displacement map is not a durable asset. Saved project files use the .bumpmesh extension and are the only way to keep layers, their paint and their texture choices together in one place.
File support is narrower than the feature count suggests. STEP and STP imports are tessellated in the browser by a separate project, meshStep, with coarse, standard and fine quality presets, and the 3MF path relies on fflate for ZIP decompression. If your workflow needs an exact CAD B-rep downstream of displacement, this tool does not claim to provide it. Licensing is another open item: the licence field shows a custom licence that GitHub cannot classify, so the LICENSE file in the repository root is the only place to read the real terms.
Against a hand-written vertex displacement script
The realistic alternative is not another web page, it is a script of your own. Loading an STL, offsetting every vertex along its normal by a height field, and writing a new binary STL gives you full control of the pipeline, runs unattended on a build server, has no browser dependency and pins cleanly to a version. What you give up is everything this project wraps around that core operation: a catalogue of 101 built-in seamless textures across eight categories, seven projection modes, four texture layers, angle masking, painted surface selection, the section view for inspecting cavities and hollow interiors, and mesh diagnostics for open edges and shell count.
The trade is therefore a question of what you are optimising for. If the goal is one deterministic mesh transformation inside an existing automated toolchain, a hand-written script is lighter, easier to test and easier to reproduce. If the goal is an iterative, visual workflow where someone tries a weave on a curved part and checks the inside of a cavity before committing to a print, the browser tool gets there faster, because features such as the section view, the turntable preview and the round-trip project file are exactly the parts a bare script leaves you to rebuild.
Editorial conclusion
Adopt BumpMesh if you want textured prints without modelling relief in CAD and you are comfortable working inside a browser session, especially for layered work where each layer carries its own projection and painted surface. Do not adopt it as the core of a headless build pipeline, since no command line interface or scriptable API is documented. Read the LICENSE file before you build on it, because the licence field shows a custom licence that GitHub cannot classify. Before committing a part, check in your own browser that the section view shows the interior surfaces you expect to be textured, and confirm that your custom displacement map is still present after a reload, since uploads live in browser storage only.
Frequently asked questions
Does BumpMesh stlTexturizer need to be installed on my machine?
No installation is required for the hosted version, where the whole pipeline runs in the browser at bumpmesh.com. If you prefer to host it yourself, the repository includes a Dockerfile and a compose file that serve the same static site through nginx.
Which file formats can BumpMesh import, and what does it export?
Import covers STL in binary and ASCII form, OBJ through the Three.js OBJLoader, 3MF as a ZIP container decompressed with fflate, and STEP or STP CAD files tessellated in the browser by the separate meshStep project. Export produces a binary STL with the displacement baked in.
How many textures can be applied to a single model in BumpMesh?
Up to four layers, each with its own texture, projection, size, height and painted surface. A layer can cover the layers beneath it or add its relief to them, and the .bumpmesh project file keeps layers, paint and textures together.
Can I rotate or reorient a model in BumpMesh before exporting?
A part rotation gizmo is listed among the recent updates, and Place on Face in the viewer drops a chosen face onto the print bed. Texture placement itself is controlled separately by Scale U/V, Offset U/V and Rotation, which act on the displacement map before projection.
What licence does BumpMesh stlTexturizer use?
The licence field for the repository shows a custom licence that GitHub cannot classify, so the terms come from the LICENSE file rather than from a standard identifier such as MIT or Apache-2.0. Read that file before you build a commercial workflow on top of the output.
Does BumpMesh keep my uploaded custom textures between sessions?
Only inside the browser. The documentation states that uploads are kept under Your textures in the gallery in that browser only, and that the browser may clear them at any time, so a custom displacement map is worth keeping a copy of elsewhere.
Official sources
Add this badge to your README
If you maintain this project, the badge below links readers to this analysis and shows its maintenance status from the daily GitHub snapshot. Paste the markdown into your README; add ?metric=license or ?metric=stars to the image URL for a different field.

[](https://hysenlabs.com/projects/cnckitchen-stltexturizer)Star history chart for your README
[](https://hysenlabs.com/projects/cnckitchen-stltexturizer)Was this useful?