Unity-WaterBuoyancy floats objects by density, not by script
Water Buoyancy Simulation for Unity
At a glance
- What is it?
- Unity-WaterBuoyancy is a small Unity project that applies buoyancy forces to objects inside a tagged water volume, so an object with half the density of water settles half submerged. It ships as ready made day and night prefabs and needs Unity 2018.3.0 or newer, and the last push was on 2026-04-11.
- Who is it for?
- Unity-WaterBuoyancy suits a Unity project that needs objects to float, sink and bob with a plausible density relationship, and it suits people who want the behaviour in a scene rather than in a custom physics solver.
- Can I use it commercially?
- Yes. MIT is a permissive licence: you can use, modify and sell software built on it, as long as you keep its copyright and licence notices.
- Is it still maintained?
- Activity is slowing. The repository last received commits 7 months ago.
- What is it written in?
- Mainly C#, according to GitHub's language statistics.
Answers come from the project's GitHub data, last synced on November 7, 2026, and from our analysis. They are not legal advice.
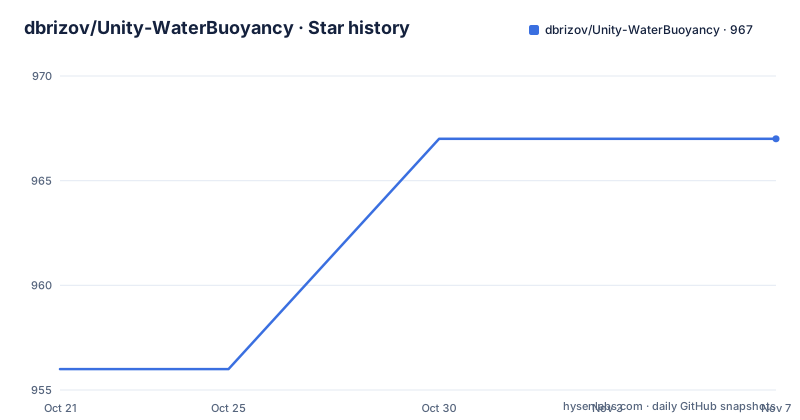
Star history
- dbrizov/Unity-WaterBuoyancy967 ★ · +11
| Repository | 2026-10-21 | 2026-11-07 |
|---|---|---|
| dbrizov/Unity-WaterBuoyancy | 956 | 967 |
11 Stars in the last 17 days, measured from the daily GitHub snapshot. Compare with other projects
Editorial analysis
Buoyancy computed from density, not authored by hand
The core idea of this project is small and physical: an object floats or sinks depending on how its density compares with the density of the water.
The README states the rule directly. If an object has density lesser than the density of the water, it will float. If an object has greater density, it will sink. And if an object has density equal to half the density of the water, then the object will submerge exactly half of its volume, with the other half above the water.
That third case is the one that makes it a simulation rather than a trigger. A boolean float or sink would be a one line script and would look wrong the moment a raft sat low in the water. Here, the submerged fraction is a consequence of the density ratio, so the behaviour scales: a crate half as dense as water rides higher, one at the same density stays under, and something denser sinks.
The audience is a game or simulation developer who needs floating debris, rafts, buoys or swimmers in a Unity scene and does not want to hand-author buoyancy forces for every object. The README links to a buoyancy reference for the underlying physics, which is a reasonable sign that the model follows the standard Archimedes-style reasoning rather than a look-up table of hand-tuned values.
Two scripts and a tag contract
The implementation is described in terms of two scripts and one naming contract, and understanding them is the whole setup.
The scripts are WaterVolume.cs and FloatingObject.cs:
WaterVolume.cs
FloatingObject.cs
The division of labour matters. The water volume applies buoyancy forces only to floating objects, so a rigidbody inside the water that has not opted in is unaffected by the volume. The floating object script is what marks an object as a participant.
The contract between them is a tag. The water volume needs to have a tag named Water Volume in order for the floating objects to detect collisions with the water. Both halves therefore depend on the same Unity tag existing in the project, which is a setup step that is easy to miss and impossible to miss once it fails. If the tag is missing or spelled differently, the floating objects simply never detect the water.
This is a string-based contract rather than a component reference or a physics layer, which is both its strength and its weakness. The strength is that a volume works for any object in the scene that carries the right tag, with no per-object wiring. The weakness is that the connection between the two halves is invisible in the inspector, so a typo in the tag produces silence rather than an error, and the same mechanism cannot distinguish two different volumes with different water types.
Day and night prefabs differ only in their shader
The project ships prefabs rather than asking you to build a scene from scratch, and the choice between them is narrower than it looks.
There are two ready to go prefabs, WaterPro_DayTime and WaterPro_NightTime, both located in the Prefabs folder. The README is explicit that the only difference between the two is that they use different shaders for daylight and moonlight.
That is a useful thing to know, because the obvious assumption is that a night preset changes the lighting setup, the fog, the skybox and the reflection behaviour. It does not. The same water surface, the same buoyancy behaviour, the same interaction model, with a shader swapped to match the different light conditions.
So the decision reduces to a question about your scene. If the water sits under daylight, use WaterPro_DayTime. If the water sits under moonlight or a dim night environment, use WaterPro_NightTime. Getting this wrong is a visual bug rather than a functional one, and it is the kind of thing that only shows up once the lighting is set up and the scene is running.
Using the prefab also means you inherit its setup, including the procedural mesh that the water volume script depends on, which is the subject of the next point.
The water volume only works with the procedural mesh
There is one hard constraint in the project, and the README states it without softening it: WaterVolume.cs works only with the procedural Mesh in the project due to performance optimizations.
This is the kind of limitation that decides whether the project is usable for you, so it deserves a careful reading. The script is not a general purpose buoyancy volume that can be dropped onto any collider. It is written against a specific mesh geometry that ships with the project, and the reason given is performance. Presumably the volume computes its contents against that mesh in a way that is cheaper than a general solution would be.
The practical consequences are these. If you want a lake, a pool or an ocean in a shape that is not the shipped mesh, you are either stuck with the shape you are given or you are writing your own volume script. If you swap the mesh for a different one, for a level that needs a different silhouette, the behaviour you get is undefined rather than slightly wrong. And if you are profiling a scene and the water is expensive, the mesh choice is not a free variable.
For a project whose water is a single rectangular or pool-shaped body, this is a reasonable trade. For an open ocean with a moving surface, or a river carved from a spline, it is the thing that will send you looking for a different implementation.
A Unity project you copy, not a package you install
The repository layout tells you how this is meant to be consumed. The top level contains Assets/, Packages/, ProjectSettings/ and a README, alongside a.gitignore and the licence file.
Those three directories are the structure of a Unity project itself. This is not published as a package with a manifest and a version constraint, and there are no GitHub releases to install from. What you have is a working project folder that you open in the Unity editor and take what you need from.
The system requirement is Unity 2018.3.0 or later versions, with the README adding that you are free to try older versions. That is an old baseline for a Unity project, and the advice to try older versions is more of an aside than a recommendation.
The practical adoption path is therefore: clone or download the repository, open it in Unity, look at the ready made prefabs, and copy the scripts and prefab into your own project. The README's setup section assumes you already know how to add a tag to a Unity project and where the Prefabs folder is. If you are new to Unity, the missing piece is not this repository but that vocabulary.
An MIT licence and a repository that stopped moving in April
The licence is the MIT License, with copyright for 2015 Denis Rizov, and the full permission text is reproduced in the README. MIT is permissive: you can use the scripts in a commercial game, modify them, and redistribute them, with the only obligation being that the copyright notice and permission notice travel with copies or substantial portions of the software. For a component you drop into a game project, that is about as simple as it gets.
The maintenance picture is the part to note. The last push to the repository was on 2026-04-11, which is more than six months before this review, and the repository is not archived. There are no GitHub releases at all, so there is no version history to consult and no tag to pin to. What you get is the state of the master branch as it stood on that date.
That is a normal state for a Unity asset that solved its problem and has been stable for years, and there is no sign of anything being broken. But if you are building on top of it, plan on owning it. There is no upstream to send a pull request to for a fix, no changelog to read when a new Unity version lands. The code is small enough that reading both scripts and adapting them is a realistic alternative to waiting for an upstream release.
Editorial conclusion
Unity-WaterBuoyancy suits a Unity project that needs objects to float, sink and bob with a plausible density relationship, and it suits people who want the behaviour in a scene rather than in a custom physics solver. It is the wrong choice if you need buoyancy over an arbitrary mesh, because WaterVolume.cs is documented as working only with the procedural mesh in the project, and the wrong choice for a modern Unity codebase that expects a package rather than an Assets folder you copy by hand. Before you use it, confirm the two scripts and the Water Volume tag are set up as described, pick the prefab whose shader matches your scene lighting, and note that the last push was on 2026-04-11 with no GitHub releases, so there is no upgrade history to follow.
Frequently asked questions
How do I set up Unity-WaterBuoyancy in a Unity project?
Use the ready made prefabs WaterPro_DayTime and WaterPro_NightTime from the Prefabs folder, and note that the two scripts that matter are WaterVolume.cs and FloatingObject.cs. The water volume must carry the tag Water Volume so floating objects can detect collisions with it.
What Unity version does Unity-WaterBuoyancy need?
The README states Unity 2018.3.0 or later versions, and adds that you are free to try older versions. The repository is a Unity project folder with Assets, Packages and ProjectSettings rather than a published package.
Can I use a custom mesh for the water volume?
Not with the shipped script. The README states that WaterVolume.cs works only with the procedural Mesh in the project due to performance optimizations, so a different water shape means writing your own volume implementation.
How do floating objects decide whether they sink?
By density comparison with the water. An object lighter than the water floats, one heavier sinks, and an object with half the density of the water submerges exactly half of its volume with the rest above the surface.
What is the licence for Unity-WaterBuoyancy?
The MIT Licence, copyright 2015 Denis Rizov, with the full permission text in the README. The last push to the repository was on 2026-04-11 and there are no GitHub releases.
Official sources
Add this badge to your README
If you maintain this project, the badge below links readers to this analysis and shows its maintenance status from the daily GitHub snapshot. Paste the markdown into your README; add ?metric=license or ?metric=stars to the image URL for a different field.

[](https://hysenlabs.com/projects/dbrizov-unity-waterbuoyancy)Star history chart for your README
[](https://hysenlabs.com/projects/dbrizov-unity-waterbuoyancy)Was this useful?