pixop/video-compare for synchronized visual video inspection
Split-screen video comparison tool using FFmpeg and SDL2
At a glance
- What is it?
- pixop/video-compare is a C++14 desktop tool that displays two inputs in sync through FFmpeg and SDL2. It suits codec, scaling, color, timing, and filter comparisons, including still images and image sequences.
- Who is it for?
- Adopt pixop/video-compare when an engineer needs an interactive desktop view of two synchronized inputs, especially for codec, resize, color, or filter differences. Do not treat it as an automated quality gate or batch result generator because the documented interface centers on an SDL2 application.
- Can I use it commercially?
- Yes, with conditions. GPL-2.0 is a copyleft licence: if you distribute software that includes it, you must release that software's source code under the same licence. Running it internally without distributing it does not trigger that obligation.
- Is it still maintained?
- Yes. The repository last received commits 1 day ago.
- What is it written in?
- Mainly C++, according to GitHub's language statistics.
Answers come from the project's GitHub data, last synced on November 7, 2026, and from our analysis. They are not legal advice.
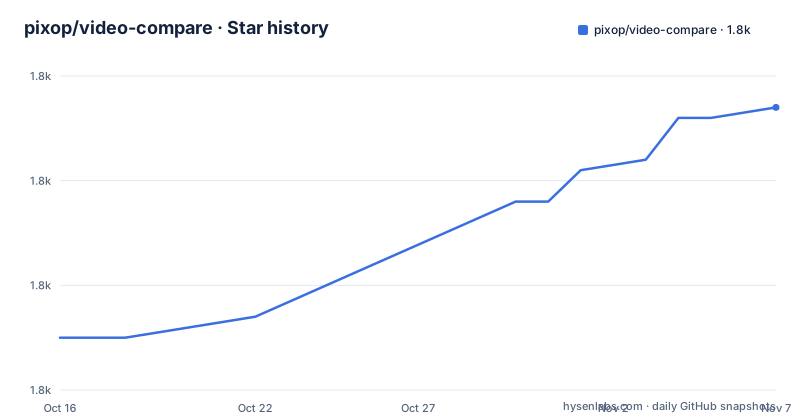
Star history
- pixop/video-compare1,817 ★ · +22
| Repository | 2026-10-16 | 2026-11-07 |
|---|---|---|
| pixop/video-compare | 1.8k | 1.8k |
22 Stars in the last 22 days, measured from the daily GitHub snapshot. Compare with other projects
Editorial analysis
What pixop/video-compare solves
pixop/video-compare addresses a specific visual inspection problem: two video renditions often look similar in metadata and basic playback checks while showing visible differences caused by codecs, resizing algorithms, frame-rate conversion, deinterlacing, color processing, or filters. The tool places two inputs together so an engineer can examine them in synchronized motion rather than switching repeatedly between separate players.
The intended users are people comparing encodes or processing results. A developer might place a reference beside a filtered or downscaled rendition, while a video engineer could inspect color-format or dynamic-range handling. The project also accepts images and image sequences because FFmpeg supplies the input handling. That makes the same interface useful beyond two conventional video files, although the README does not describe batch output, numeric image metrics, or an automated report workflow.
The comparison does not require identical inputs. The README states that the two videos may differ in resolution, frame rate, scanning method, color format, dynamic range, protocol, container, codec, or duration. This is an important design choice. It makes pixop/video-compare useful during encoding and transcoding work, where the source and rendition routinely have different technical properties. It also means the viewer must present both inputs in a common window without requiring the operator to normalize them first.
Synchronized playback and display architecture
The application is written in C++14 and uses FFmpeg libraries together with SDL2. Based on the repository layout, the implementation is divided among `src/`, with tests under `tests/`, formatting rules in `.clang-format` and `.clang-tidy`, and platform dependency handling in `download_and_extract_windows_deps.sh` and `windows_deps.mk`. The README does not publish a detailed class diagram or frame-processing sequence, so a stronger internal architecture claim would go beyond the available project documentation.
The observable data flow starts with a left input and a right input. FFmpeg handles demuxing, decoding, hardware acceleration where requested, and command-line filters. SDL2 provides the desktop window and interactive display. The interface adds synchronized navigation, playback controls, analysis modes, and layout choices rather than treating this as a direct invocation of the `ffmpeg` executable.
Several options affect what reaches the display. `-b` changes processing to 10 bits per color component instead of the default 8 bits. Window sizing changes the presentation, while `-a on` turns on automatic in-buffer loop playback and enables continued looping when the buffer fills or end-of-file is reached. A bidirectional ping-pong mode is also available. These are playback and presentation controls. The README does not claim that `video-compare` writes transformed output files.
HDR handling is another distinct part of the path. By default, HDR video is converted to sRGB with an initial peak light level of 500 nits. `-R` can set another peak level, and `-T rel -L 500` is documented for simulating the relative light-level difference between HDR and SDR video on an HDR display. Metadata such as MaxCLL can dynamically affect the specified peak light level during decoding. The README does not explain color-management behavior beyond these documented options.
Install paths for Linux, macOS, Windows, and source builds
Homebrew is the shortest documented installation route. This command installs the packaged application. A successful Homebrew installation should make the `video-compare` command available for the basic invocation shown later.
brew install video-compareThe README notes that the standard Homebrew FFmpeg formula is somewhat minimal. It recommends `ffmpeg-full` for broader codec and format support, with JPEG XL given as an example. Use this second command when the comparison requires a format or decoder outside the standard formula:
brew install ffmpeg-fullOn Arch Linux, the documented AUR package is cloned and built locally. The reader should run the commands in the cloned directory, where `makepkg` can produce and install the package under that user's package workflow.
git clone https://aur.archlinux.org/video-compare.git
cd video-compare
makepkg -sic
For Windows 10 x86 64-bit systems, the releases page provides pre-built `.zip` archives. The documented procedure is to download and extract the archive, open a command prompt, and run `video-compare.exe`. The README does not publish portable dependencies beside these steps, so users should inspect the archive rather than assume that an unrelated FFmpeg executable will satisfy it.
The README points source users to its build section. The visible `makefile` confirms that a source build exists, but the exact invocation must come from the complete repository documentation.
A first synchronized comparison
The simplest first use places two videos side by side in the default visual compare layout. Supply both paths after `video-compare`. The README recommends matching the operating system's DPI setting when HD 1080p video should be doubled on a display such as Retina 5K.
video-compare video1.mp4 video2.mp4If exact one-to-one pixel presentation is required on a high-density display, `-d` enables high DPI mode. This changes the relationship between video pixels and screen pixels rather than the media files themselves.
video-compare -d video1.mp4 video2.mp4For videos with a known timing offset, `-t` shifts the right video's presentation timestamps. The README defines a positive value as delaying the left presentation, while a negative value conversely delays the right presentation. That sign convention deserves attention because the option's naming and effect are not phrased in a one-to-one way.
video-compare -t 0.080 video1.mp4 video2.mp4The double underscore placeholder avoids repeating a long path. With `__`, the application can use the same input on one side. The README identifies time-shift and filter comparisons as examples, although it does not define every option required to construct those examples.
video-compare some/very/long/and/complicated/video/path.mp4 __Window sizing is useful when the desktop cannot display the source dimensions. `-w 1280x720` fixes that size and scales the frame to fit. `-W` instead fits the window to usable display bounds while preserving aspect ratio, which accounts for interface elements such as taskbars and OS menus.
Filters, decoders, and uneven input properties
FFmpeg filters can be applied through `-l` for the left input and `-r` for the right input. The following documented command crops and pads the left side and converts it to grayscale before padding it with a modified width:
video-compare -l crop=iw:ih-240 -r format=gray,pad=iw+320:ih:160:0 video1.mp4 video2.mp4This feature is useful when the comparison concerns cropping, padding, grayscale conversion, deinterlacing, denoising, or speed changes. FFmpeg's filter documentation is the authoritative reference for each filter's syntax. The project does not need a custom filter for every operation because the filter lists are passed through the command line.
Input selection can also be explicit. `--left-demuxer vapoursynth` selects a demuxer that cannot be auto-detected. `--right-decoder h264_cuvid` selects a decoder for one side. Hardware acceleration can be assigned to both sides with `--hwaccel cuda`, or to one side with `--left-hwaccel videotoolbox`. These options avoid forcing the operator to edit a configuration file when the decoder, demuxer, or acceleration method differs between inputs.
The AV1 example relies on `libdav1d` and decoder options. `export_side_data=film_grain` disables grain synthesis during decoding, allowing a grain-synthesized and non-synthesized presentation to be inspected together.
video-compare --right-decoder libdav1d:export_side_data=film_grain input_av1.mkv __This flexibility has a cost. It delegates much of input compatibility to the installed FFmpeg build, the named demuxer or decoder, and the host's hardware stack. An option accepted by the command line does not by itself establish that a particular binary or driver can decode the file.
Comparison layouts, bit depth, and practical limits
The default view is a side-by-side visual comparison. The README also documents subtraction mode, which combines subtraction with zoom and magnification controls, and stacked modes that avoid a slider. `-m vstack` displays both inputs vertically at full size. The documentation also names `hstack` as the corresponding horizontal stacking mode, but does not include a complete command for it.
video-compare -m vstack video1.mp4 video2.mp4Ten-bit processing can reduce visible banding when the display, graphics driver, and output path support it. The tradeoff is explicit: fidelity improves while performance takes a hit.
video-compare -b video1.mp4 video2.mp4The README provides no frame-rate target, latency measurement, or list of affected systems. Engineers should therefore avoid stating a specific processing cost based on the project's documentation alone.
The main functional limit is that this is an interactive visual tool. None of the documented features describe exporting side-by-side media, calculating PSNR or SSIM, producing machine-readable findings, or running unattended across a test corpus. Subtraction mode is useful for human inspection, but the README does not identify it as a replacement for formal video-quality metrics. A team needing repeatable batch scoring would have to use another tool or an external wrapper, neither of which is specified here.
There is also no documentation for accessibility behavior, multi-monitor control, remote display, or headless operation. Those omissions matter for adoption, but they do not prove the features are absent. They mean the README does not establish support for them.
Licensing, maintenance, and upgrade work
The repository identifies the project under `GPL-2.0`, with the license file stored as `LICENSE.md`. That designation matters when an organization distributes a modified executable or incorporates project code into another work, because the GPL contains conditions concerning distribution and source availability. This is not legal advice, and the complete `LICENSE.md` should govern the actual use case.
The repository is not archived. Its last push was on 2026-10-13, and the listed releases include `20261004` on 2026-10-04, `20260828` on 2026-08-28, and `20260708` on 2026-07-08. Those dates establish recent repository and release activity, but they do not describe compatibility between every release or guarantee future changes.
Upgrade cost depends on the installation route. Homebrew users can receive packages through that package manager, while Arch Linux users build the AUR package locally. Windows releases provide pre-built x86 64-bit archives. Source builds add dependency and compiler management because the project includes a `makefile`, platform dependency files, and bundled third-party code under `third_party/`.
FFmpeg compatibility is part of the practical upgrade surface. Filters, demuxers, decoders, and hardware acceleration are selected through FFmpeg-facing options. Before replacing an existing binary, an engineer should retain the exact invocation and check whether its decoder, filter, and acceleration choices remain valid in the new release.
Editorial conclusion
Adopt pixop/video-compare when an engineer needs an interactive desktop view of two synchronized inputs, especially for codec, resize, color, or filter differences. Do not treat it as an automated quality gate or batch result generator because the documented interface centers on an SDL2 application. Before adoption, verify that the target machine can open both inputs with the installed FFmpeg build, that the required decoder and hardware acceleration are available, and that the intended display layout and timing correction match the comparison.
Frequently asked questions
How do I install pixop/video-compare on macOS?
The README documents Homebrew installation with `brew install video-compare`. It recommends `ffmpeg-full` when the standard Homebrew FFmpeg formula lacks the required codec or format support.
Can pixop/video-compare compare videos with different resolutions or codecs?
Yes. The README says the inputs can differ in resolution, frame rate, scanning method, color format, dynamic range, protocol, container, codec, or duration. Playback is synchronized through the application rather than requiring identical source properties.
How do I compare the same video with a filter applied to one side?
Use `-l` or `-r` to provide side-specific FFmpeg filter lists, and use `__` where the same path should not be typed twice. The README gives an example that combines common filters with separate left and right additions.
Does pixop/video-compare support hardware-accelerated decoding?
The README documents `--hwaccel` for both inputs and side-specific options such as `--left-hwaccel`. It also documents explicit decoder selection, including an AV1 `libdav1d` example, but availability depends on the named decoder and host configuration.
Can pixop/video-compare compare images and image sequences?
The README states that FFmpeg's input flexibility allows pixop/video-compare to compare images and image sequences as well as videos. It does not document a separate batch-report workflow for those inputs.
Official sources
Add this badge to your README
If you maintain this project, the badge below links readers to this analysis and shows its maintenance status from the daily GitHub snapshot. Paste the markdown into your README; add ?metric=license or ?metric=stars to the image URL for a different field.

[](https://hysenlabs.com/projects/pixop-video-compare)Star history chart for your README
[](https://hysenlabs.com/projects/pixop-video-compare)Was this useful?