PyOD 3: 61 detectors, three activation paths, and an install that writes outside your project
A Python library for anomaly detection across tabular, time series, graph, text, image, and audio data. 60+ detectors, benchmark-backed ADEngine orchestration, and an agentic workflow for AI agents.
At a glance
- What is it?
- PyOD 3 is a Python anomaly detection library covering tabular, time series, graph, text, image and audio data through one fit and predict interface, with ADEngine and an agent-facing layer on top. The catalog is far wider than what a plain pip install puts on disk.
- Who is it for?
- PyOD 3 fits teams holding unlabeled data that spans more than one modality and who want one fit and predict contract, or teams driving detection from an agent through the od-expert skill or the MCP server. It does not fit a pipeline whose outlier step is already one box inside a scikit-learn Pipeline.
- Can I use it commercially?
- Yes. BSD-2-Clause is a permissive licence: you can use, modify and sell software built on it, as long as you keep its copyright and licence notices.
- Is it still maintained?
- Yes. The repository last received commits 2 days ago.
- What is it written in?
- Mainly Python, according to GitHub's language statistics.
Answers come from the project's GitHub data, last synced on November 14, 2026, and from our analysis. They are not legal advice.
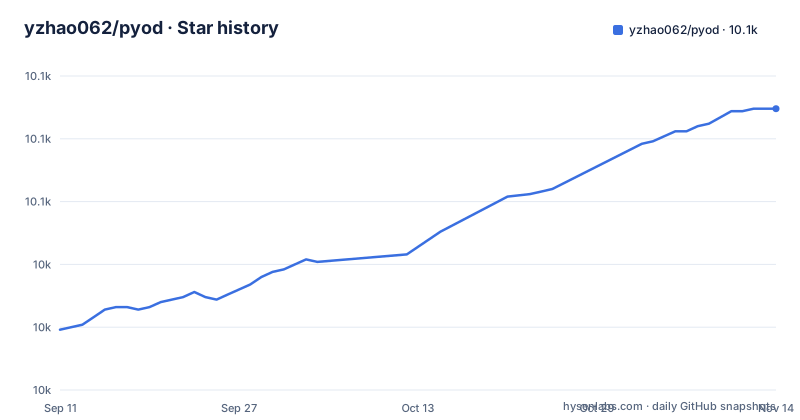
Star history
- yzhao062/pyod10,087 ★ · +88
| Repository | 2026-09-11 | 2026-11-14 |
|---|---|---|
| yzhao062/pyod | 10k | 10.1k |
88 Stars in the last 64 days, measured from the daily GitHub snapshot. Compare with other projects
Editorial analysis
Sixty-one detectors, two score attributes, one constructor call
Every detector in the catalog answers in the same shape. The reference example builds IForest with no arguments, fits it, then reads two attributes: decision_scores_ on the fitted object and decision_function on rows it has never seen.
from pyod.models.iforest import IForest
clf = IForest()
clf.fit(X_train)
y_train_scores = clf.decision_scores_          # training anomaly scores
y_test_scores = clf.decision_function(X_test)   # test anomaly scores
What the snippet leaves out matters as much as what it does. There is no threshold, no train and test split, no metric, and no step that turns a score into a label. Scoring a row and judging it are separate jobs, and this snippet only does the first one. Anyone who needs the second sets a cut on the score arrays by hand.
The 61 detectors and the 6 core dependencies are different numbers
PyOD counts 61 detectors across tabular, time series, graph, text, image and audio data,. pyproject.toml declares torch>=2.0, sentence-transformers>=5.0.0 and openai>=1.0 as optional dependencies, alongside suod, xgboost, combo, pythresh and a huggingface entry, and it names no detector that consumes any of them. A tabular detector such as the one above works after a plain install. Plan the install against the families you intend to use, not against the headline number.
matplotlib and numba are not optional in the base install
joblib>=1.5
matplotlib
numpy>=1.19
numba>=0.51
scipy>=1.5.1
scikit-learn>=0.22.0
Six lines govern every PyOD install, and two of them are hard to justify on a server that only scores numbers. matplotlib carries no version floor in this file at all, and numba sits at >=0.51 beside numpy>=1.19. A job that never draws a chart still installs a plotting library and a compiler front end, so both land in your image and both join the list of packages you patch on a schedule. Every bound here is a lower bound with no ceiling, which leaves the resolver free to walk each one forward. The installation guide at pyod.readthedocs.io/en/latest/install.html is where the README sends anyone who wants conda, a source build or troubleshooting.
The skill install writes into ~/.claude/skills/, and Codex has no user-global directory to write to
The core install is one line:
pip install pyodWhat follows it is a choice, and the two agent paths do not write to the same place:
pyod install skill              # Claude Code: user-global (~/.claude/skills/)
pyod install skill --project    # Codex: project-local (./skills/, Codex has no user-global dir)
Claude Code receives a skill directory under your home folder. Codex has no user-global directory, so its copy lands in the project's ./skills/ instead. That difference has a concrete cost: a shared runner image, or a CI job, that installs the skill once for Claude Code hands a Codex agent nothing. pyod info is the check. It looks for ~/.claude/ or ~/.codex/ to identify your agent stack, prints the install state of every activation path along with version and detector counts, and recommends the matching install command. Run it before concluding that an agent is ignoring your model.
Ten stateless MCP tools, and the multi-turn investigation lives in an installed file
The MCP path needs the optional extra and starts a server rather than installing a skill:
pip install pyod[mcp]
pyod mcp serve                 # alias for `python -m pyod.mcp_server`
Ten stateless tools are exposed: knowledge queries named list_detectors, explain_detector, compare_detectors and get_benchmarks, and planning calls that begin with profile_data, plan_detection and build_detector. Stateless is the word to hold on to. The server keeps no conversation and no dataset handle, so an agent talking to it over MCP resends context on every call. The full multi-turn Layer 3 flow arrives through the od-expert skill, which is a set of files installed for Claude Code and Codex.
ADEngine chooses the detector, so your code stops naming one
Layer 2 exists for the case where you would rather not pick. You give ADEngine data and it chooses, compares and assesses, with routing described as benchmark-backed against ADBench, TSB-AD, BOND and NLP-ADBench. profile_data is the documented hook for describing your own data before the choice is made. The examples directory shows how to inspect the decision yourself: examples/compare_all_models.py and examples/auto_model_selection_example/ run the comparison, and examples/ad_engine_example.py covers the engine.
No migration guide at the top level, and one alias left over from v3.0.0
Maintenance here is current. The last push was on 2026-10-28, v3.6.7 shipped on 2026-10-12, and v3.6.6 and v3.6.5 preceded it on 2026-09-17 and 2026-08-17. The repository is not archived, and the badge row points at a testing workflow and Coveralls for coverage. Upgrading is where the documentation thins. The top level holds CHANGES.txt for the changelog, CITATION.cff for citation metadata, SECURITY.md and a todo directory, and no migration document, so a change in default behaviour between two minor versions turns into a read through a text file instead of a note attached to your upgrade. One rename is documented in passing: the v3.0.0 command pyod-install-skill still works as an alias for pyod install skill, which tells you the name changed and that old scripts kept running. Packaging is declarative, with version and dependencies marked dynamic in pyproject.toml and setup.py reduced to a call to setup(). Classifiers cover Python 3.9 through 3.13 against a requires-python floor of >=3.9, and nothing here states what happens on a newer interpreter.
Where PyOD stops: labeled data, and the scikit-learn estimator you already run
The honest comparison is not PyOD against scikit-learn as a replacement, since requirements.txt already depends on scikit-learn>=0.22.0 and PyOD is a wider catalog built on part of what you have installed. The difference is one of approach. scikit-learn's detectors are estimators that compose inside a Pipeline alongside column transformers, so preprocessing and scoring form a single graph you can cross-validate. PyOD keeps detectors as standalone classes across six data families and moves between them with ADEngine, which is a routing decision rather than a composition. Choose PyOD when the data family is the thing blocking you, and stay with the scikit-learn estimator when the outlier step is one box in a pipeline you have already wired. The README's example takes a feature matrix and returns score arrays without labels; check the detector you choose for whether it can use labels you already have.
Editorial conclusion
PyOD 3 fits teams holding unlabeled data that spans more than one modality and who want one fit and predict contract, or teams driving detection from an agent through the od-expert skill or the MCP server. It does not fit a pipeline whose outlier step is already one box inside a scikit-learn Pipeline. Before anything else, run pyod info on the target machine: it prints the version, the detector counts and the install state of each activation path, and a missing skill directory means no agent conversation ever reaches your data.
Frequently asked questions
What are the three types of anomaly detection?
The repository does not define a three-type taxonomy, and its packaging keywords list anomaly detection, outlier detection, novelty detection and out-of-distribution detection as separate terms. PyOD organizes its own catalog by data family instead: tabular, time series, graph, text, image and audio.
What is anomaly detection used for?
PyOD's packaging metadata names fraud detection among its keywords and lists financial and insurance, education, science and research, developers, and information technology as intended audiences.
How can I detect anomalies in Python?
Install the core with pip install pyod, build a detector such as IForest, call fit on a feature matrix, then read decision_scores_ for the training rows and decision_function on new ones. Outside the tabular case, pyproject.toml declares optional extras including torch>=2.0, sentence-transformers>=5.0.0 and openai>=1.0 that you install yourself.
Which model is best for anomaly detection?
Its benchmark-backed routing points at ADBench, TSB-AD, BOND and NLP-ADBench, so the comparison lives in those benchmarks, and examples/compare_all_models.py is where the repository puts a head to head run of its own.
Official sources
Add this badge to your README
If you maintain this project, the badge below links readers to this analysis and shows its maintenance status from the daily GitHub snapshot. Paste the markdown into your README; add ?metric=license or ?metric=stars to the image URL for a different field.

[](https://hysenlabs.com/projects/yzhao062-pyod)Star history chart for your README
[](https://hysenlabs.com/projects/yzhao062-pyod)Was this useful?