rackstack: A Parametric OpenSCAD Mini Rack for Small Hardware
A modular 3d-printable mini rack system.
At a glance
- What is it?
- rackstack is a modular, 3D-printable rack system for single-board computers, mini PCs, small switches, power hubs, and other compact equipment. Its main strength is OpenSCAD customization, while the need for M3 and M4 hardware, evaluation prints, and per-rack assembly makes it less suitable as a zero-preparation enclosure.
- Who is it for?
- Adopt rackstack when you want a printable, customizable home rack for compact hardware and can complete its mechanical assembly. Do not choose it if you need a turnkey enclosure, standard 19-inch rack compatibility, or guaranteed printer tolerances without testing.
- Can I use it commercially?
- Yes. MIT is a permissive licence: you can use, modify and sell software built on it, as long as you keep its copyright and licence notices.
- Is it still maintained?
- Yes. The repository last received commits 142 days ago.
- What is it written in?
- Mainly OpenSCAD, according to GitHub's language statistics.
Answers come from the project's GitHub data, last synced on November 7, 2026, and from our analysis. They are not legal advice.
Star history
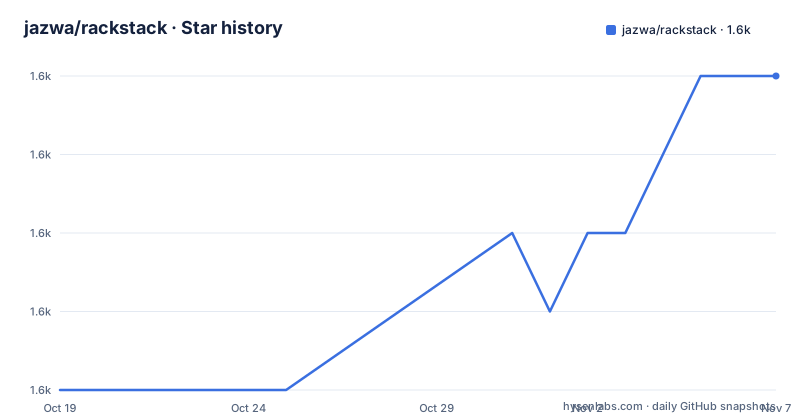
- jazwa/rackstack1,563 ★ · +4
| Repository | 2026-10-19 | 2026-11-07 |
|---|---|---|
| jazwa/rackstack | 1.6k | 1.6k |
4 Stars in the last 19 days, measured from the daily GitHub snapshot. Compare with other projects
Editorial analysis
rackstack Targets the Space Between Desktop Clutter and Full Racks
rackstack addresses a specific hardware-organization problem: compact computers and network accessories often do not fit the mounting patterns of a full-size rack, but they still need a repeatable way to sit together. The project is aimed at users organizing single-board computers, mini PCs, small switches, power hubs, and similar equipment in a home lab or other compact setup.
The system is modular at two levels. The rack frame establishes the physical envelope, while separate components under `rack-mount/` provide ways to hold equipment. The README lists an enclosed box for box-shaped objects that do not have mounting holes, a front-mounted tray, a configurable patch panel, and angle brackets. This separation matters because it avoids treating every device as a conventional screw-mounted rack unit. The box system, in particular, appears designed for equipment whose enclosure can support the accessory rather than have holes added to it.
The project is written in OpenSCAD, and the frame dimensions, corner treatment, and other rack variables can be changed through source files. Pre-generated STLs are supplied for roughly 200 mm³ mini, 180 mm³ micro, and 100 mm³ nano frames. That combination targets users who want ready-to-print output without giving up the ability to alter the design later. It is less appropriate for a buyer who expects a complete commercial cabinet with rails, fasteners, and enclosure already assembled.
The Frame Uses Separate Bars, Rails, Walls, Plates, and Feet
Based on the repository layout and README, rackstack is assembled from discrete printed components rather than one large shell. A single rack uses left and right Y-bars, four X-bars, four main rails, left and right side walls, two XY-plates, and two optional feet. The main front rails accept M4 hex nuts and screws for mounted equipment, while side rails use M3 hardware.
The frame is designed around joining parts with M3 fasteners, dowel pins, and optional magnets. The single-rack bill of materials lists 12 M3x12 FHCS, 16 M3x16 FHCS, 28 M3 hex nuts, four 3x10 steel dowel pins, eight 6x2 neodymium disc magnets, and at least 2 ml of super glue. The magnets are glued to plastic, so the assembly depends on adhesive parts and basic handling. The dowel pins help define alignment between printed pieces, which is useful when several OpenSCAD parts must fit together accurately.
Individual racks can be stacked and fastened together. Joining two racks requires four printed `rackJoiner` parts, eight M3 hex nuts, and eight M3x12 FHCS. This makes expansion possible without redesigning the entire rack, although each additional rack increases the number of joints, printed parts, and fasteners involved. The design supports mix-and-match configurations, including different colors, but the README does not document a formal wiring, ventilation, cable-management, or grounding scheme.
OpenSCAD Profiles and rbuild.py Control the Generated Parts
The source is organized around `config/`, helper code, rack components under `rack/`, and mounting accessories under `rack-mount/`. The README identifies `config/rackFrame.scad` as the place to change rack variables, while `config/print.scad` contains tolerance settings that may need adjustment. Generated files are placed under profile-specific directories such as `stl/micro/` or `stl/custom/`.
The project includes a Python build script, `rbuild.py`, that invokes the OpenSCAD command-line binary. The script needs its OpenSCAD path configured before use. The documented requirements are `openscad` and `python3`. The build command can generate all parts for a profile, and the script can also target a single component. A separate `--nightly` option is documented for a configured nightly OpenSCAD build, but its behavior depends on the local executable path and is not explained as a required production path.
OpenSCAD gives the project a useful engineering workflow. Dimensions can be changed before producing files, and the same source can support different rack profiles. The tradeoff is that generated STLs are not the only maintenance surface. If a profile changes, the affected print files and mounting accessories need to remain compatible. The README does not specify automated regression checks, versioned configuration files, or a documented process for migrating an existing printed rack to a changed frame.
Install OpenSCAD and Generate a Micro Rack
The first practical step is to install `openscad` and `python3`, then open `rbuild.py` and configure the path to the OpenSCAD binary. The README does not give operating-system-specific package commands, so there is no safe installation command to add here. After the executable path is configured, the documented micro-profile build command is:
python3 rbuild.py -b all -c microThis generates the parts defined in `rack/print` and places the resulting STLs in `stl/micro`. The generated set should include the frame components listed in the README, subject to the configured profile and the build script's output behavior. To build only the Y-bar files into a custom directory, use:
python3 rbuild.py -b yBar -c micro -t customThe `-t custom` target directs those files to `stl/custom`. The build script is therefore useful for both a complete initial set and later adjustment of individual parts. The reader should inspect the output directory before sending a job to the printer, and should check the relevant files under `rack/print/` for orientation and support guidance. The repository includes separate documentation for those printing details, but the cleaned README does not reproduce all of them.
Print the Evaluation Part Before Committing to a Full Rack
rackstack explicitly warns that the evaluation part should be printed before the actual rack parts. The relevant source file is `rack/print/eval_P.scad`. Its purpose is to test whether the configured fits are too tight or too loose for the printer and material. If necessary, tolerances can be changed in `config/print.scad`, and the layer height in that file should also be adjusted as stated by the README.
This is a concrete limitation of the project rather than a minor disclaimer. The printed joints depend on ordinary FDM output, and the README says it is very likely that default tolerances will need editing. A printer with different calibration, material, or geometry may therefore produce a different fit. The evaluation print gives the user a way to discover that issue before printing many parts, but it does not define a universal tolerance for every printer.
The README says that conventional plastics such as PLA, PETG, and ABS can be used, while warning about PLA's thermal limits. It also recommends higher infill for all parts. Those statements are useful boundaries for equipment selection, but the repository does not specify a required nozzle temperature, enclosure, infill percentage, or material standard in the provided documentation. The user must check the individual print files and assembly guide for those details.
Mounting Accessories Solve Different Equipment Constraints
The available mounting systems show that rackstack is not limited to a single tray format. The enclosed box is intended for box-shaped objects that do not need mounting holes. That approach is useful when the device's own case can provide the support surface. The tray uses only the front rails and can optionally include bottom screw mounts. The patch panel provides a linear array of configurable Keystone slots. Angle brackets offer another simple option and are derived from the enclosed-box system.
These approaches have different mechanical assumptions. A front-rail tray leaves more of the device's lower surface available but depends on the front rails being sufficiently rigid. An enclosed box can accommodate an object without dedicated holes, but its retention and fit depend on the generated geometry. A patch panel is a structured accessory for a specific kind of port layout, rather than a general storage solution. The configurable slot count can help match a planned panel, but the README does not state which Keystone dimensions are assumed beyond identifying the slots as configurable.
The catalog under `rack-mount/catalog/` contains additional preconfigured rack-mountable parts. The README invites additions, indicating that accessory coverage is extensible. However, it does not document a formal compatibility table connecting every catalog item to every rack profile. For a specific device, the relevant check is whether its physical dimensions and required mounting method match the chosen accessory and configured frame.
rackstack Is More Customizable Than It Is Turnkey
The main advantage over a conventional fixed mini-rack enclosure is source-level control. Dimensions and corner treatment can be changed in OpenSCAD, profiles can target different approximate volumes, and the mounting directory contains several accessory strategies. The build script also supports a custom output directory, which helps separate experimental parts from pre-generated files.
The corresponding costs are assembly and tolerance management. A single rack already requires numerous printed parts, M3 and M4 fasteners, dowel pins, magnets, adhesive, and hex keys. Stacking adds more printed joiners and fasteners. The user must select the correct profile, generate or download the files, test fits, follow orientation and support guidance, and assemble the frame. The repository provides an assembly guide, but the README itself does not document a fully automated build or a plug-and-play installation procedure.
rackstack is also not a standard 19-inch rack implementation. Its profiles are based on compact footprints in the 100 mm³ to 200 mm³ range, and its accessory mounting pattern is specific to this design. Users who need compatibility with existing rack-mount equipment should verify rail geometry, front-rail spacing, and the selected mounting system before printing. Users who only need a box, shelf, or small-device stand may get more predictable results from a purpose-built enclosure.
Maintenance Scope Includes Source, Profiles, and Printed Joints
The repository is not archived, and its last push was on 2026-06-19. The listed releases are v1.2.0 from 2024-10-19, v1.1.1 from 2023-09-04, and v1.1.0 from 2023-09-01. These dates describe the repository and release history; they do not by themselves establish that every part or every printer profile has received recent review.
Because the project is licensed under MIT, the repository provides a permissive license for use and modification, subject to its terms. This is a practical consideration for organizations that intend to alter the OpenSCAD source, distribute generated STLs, or incorporate the design into an internal hardware layout. The license does not remove the need to inspect the actual license file and preserve required notices where applicable.
Upgrade cost is likely to involve more than changing a package version. A new release could alter OpenSCAD sources, profile defaults, tolerances, print guidance, or accessory geometry. Existing racks are already assembled physical objects, so compatibility with those racks depends on which dimensions and interfaces changed. The README does not provide a migration guide or a version compatibility matrix. That makes source comparison and a small evaluation print the practical first checks when moving from one release or custom configuration to another.
Editorial conclusion
Adopt rackstack when you want a printable, customizable home rack for compact hardware and can complete its mechanical assembly. Do not choose it if you need a turnkey enclosure, standard 19-inch rack compatibility, or guaranteed printer tolerances without testing. Verify your printer's build volume, test `eval_P.scad`, inspect the profile dimensions, and confirm the required M3 and M4 hardware before printing a full set of parts.
Frequently asked questions
What is jazwa/rackstack used for?
rackstack is a modular 3D-printable mini rack for organizing single-board computers, mini PCs, small switches, power hubs, and other compact equipment. It uses customizable OpenSCAD frame parts and separate mounting accessories.
How do I build rackstack STLs?
Install `openscad` and `python3`, configure the OpenSCAD binary path in `rbuild.py`, then run `python3 rbuild.py -b all -c micro`. The README says this generates all parts defined in `rack/print` and places the STLs in `stl/micro`.
Do I need to test fit before printing rackstack?
The README recommends printing `rack/print/eval_P.scad` first to test tolerances. It says fits may need adjustment in `config/print.scad`, including the layer height setting, before committing to the full rack.
Official sources
Add this badge to your README
If you maintain this project, the badge below links readers to this analysis and shows its maintenance status from the daily GitHub snapshot. Paste the markdown into your README; add ?metric=license or ?metric=stars to the image URL for a different field.

[](https://hysenlabs.com/projects/jazwa-rackstack)Star history chart for your README
[](https://hysenlabs.com/projects/jazwa-rackstack)Was this useful?