PyEMD: empirical mode decomposition, with the splines left open
Python implementation of Empirical Mode Decompoisition (EMD) method
At a glance
- What is it?
- PyEMD is a Python implementation of Empirical Mode Decomposition and its variants, including EEMD, CEEMDAN and a just-in-time compiled version, with the envelope spline, stopping criterion and extrema detection all replaceable. It suits a signal processing researcher who wants to see inside the algorithm, and the package name on PyPI is not the repository name.
- Who is it for?
- Adopt PyEMD when you need a time series decomposed into intrinsic mode functions and want to see and change the algorithm's internals, because the splines, stopping criteria and extrema detection are all switchable rather than fixed. Do not adopt it for a single decomposition where a fixed method will do, since the default settings are already tuned, and be careful with the just-in-time compiled build, because the compilation cost dominates on small signals.
- Can I use it commercially?
- Yes. Apache-2.0 is a permissive licence: you can use, modify and sell software built on it, as long as you keep its copyright and licence notices.
- Is it still maintained?
- Yes. The repository last received commits 119 days ago.
- What is it written in?
- Mainly Python, according to GitHub's language statistics.
Answers come from the project's GitHub data, last synced on November 7, 2026, and from our analysis. They are not legal advice.
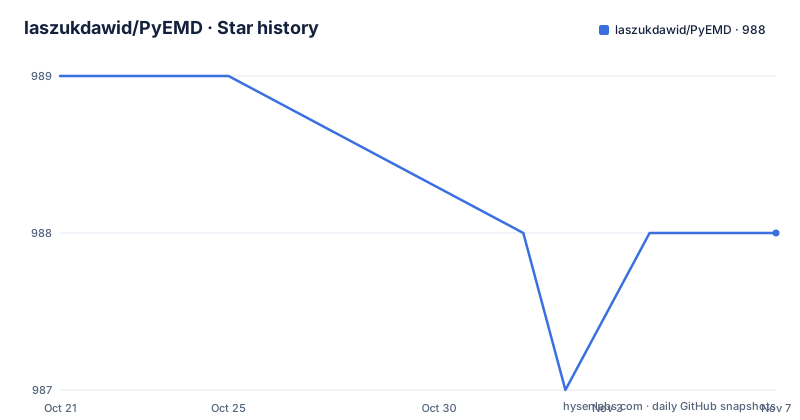
Star history
- laszukdawid/PyEMD988 ★ · -1
| Repository | 2026-10-21 | 2026-11-07 |
|---|---|---|
| laszukdawid/PyEMD | 989 | 988 |
-1 Stars in the last 17 days, measured from the daily GitHub snapshot. Compare with other projects
Editorial analysis
Four algorithms behind one import
PyEMD is a Python implementation of the Empirical Mode Decomposition method, and the package contains multiple EMD variations. The README says the package intends to deliver more in time.
The variations are the point of the project. There is Ensemble EMD, EEMD. There is Complete Ensemble EMD, CEEMDAN. There are different settings and configurations of vanilla EMD. And there is Just-in-time compiled EMD, JitEMD.
There is also image decomposition, EMD2D and BEMD, which is marked experimental with no support.
The basic call is short, because the defaults are meant to be enough. In most cases the default settings are enough, and you simply import EMD and pass your signal to the instance or to the emd() method:
from PyEMD import EMD
import numpy as np

s = np.random.random(100)
emd = EMD()
IMFs = emd(s)
The EEMD path is the same shape with EEMD and eemd(), and the CEEMDAN path with CEEMDAN. Both of those carry a Windows instruction that is worth heeding: please do not skip the if __name__ == "__main__" section. That guard exists because these methods are parallel by nature, and the ensemble variants spawn worker processes, which on Windows means re-importing the module and running the work at import time.
from PyEMD import EEMD
import numpy as np

if __name__ == "__main__":
    s = np.random.random(100)
    eemd = EEMD()
    eIMFs = eemd(s)
The project is Apache-2.0 licensed, the primary language is Python, and the last push to the master branch was on 2026-07-11, with v1.10.0 published the same day.
The three dials, and the defaults for each
PyEMD allows you to use different splines for envelopes, stopping criteria and extrema interpolations, and those three choices are where most of the behaviour lives.
The available splines are natural cubic, which is the default, pointwise cubic, Hermite cubic, Akima, PChip and linear. Akima and PChip are the interesting ones for signal work because they are shape-preserving, so a spline through local extrema does not overshoot the way a natural cubic can, and that overshoot shows up as artefacts in the envelope and therefore in the extracted components.
The available stopping criteria are Cauchy convergence, which is the default, a fixed number of iterations, and a number of consecutive proto-imfs.
The extrema detection options are discrete extrema, the default, and parabolic interpolation.
Each of these defaults is a real decision rather than a placeholder, and each of them changes what you get. Discrete extrema will find every local maximum and minimum in the sampled signal, including ones that are noise, and parabolic interpolation estimates the extremum position between samples, which gives a smoother envelope at the cost of assuming a local shape. The Cauchy criterion measures the change in the mean of the envelopes and stops when it falls below a tolerance, which is the standard way to decide the sift has converged.
The combination of a shape-preserving spline with parabolic extrema detection is a common choice for noisy sensor data, and the example directory has a file called example_spline_capabilities.py for comparing them.
The visualisation helper and the two plots worth knowing
The package contains a simple visualisation helper that can help, for example, with time series and instantaneous frequencies, and it is the part of the API that turns a list of arrays into something you can look at.
import numpy as np
from PyEMD import EMD, Visualisation

t = np.arange(0, 3, 0.01)
S = np.sin(13*t + 0.2*t**1.4) - np.cos(3*t)

# Extract imfs and residue
# In case of EMD
emd = EMD()
emd.emd(S)
imfs, res = emd.get_imfs_and_residue()

# In general:
#components = EEMD()(S)
#imfs, res = components[:-1], components[-1]

vis = Visualisation()
vis.plot_imfs(imfs=imfs, residue=res, t=t, include_residue=True)
vis.plot_instant_freq(t, imfs=imfs)
vis.show()
Two methods do the work. plot_imfs draws the intrinsic mode functions with the residue, and include_residue=True is what puts the leftover trend on the same axes, which is the plot you actually want because the residue is where the slow component goes. plot_instant_freq draws the instantaneous frequency of each component, and the comment in the example points out the general form, where the components list is sliced so that everything but the last element is an IMF and the last is the residue.
That slicing pattern is worth internalising, because the EEMD and CEEMDAN calls return a single list of components while the plain EMD class gives you the imfs and the residue separately through get_imfs_and_residue(). The two shapes coexist because the ensemble methods have no residue of their own, they just produce a list that ends with one.
The just-in-time build, and when it costs more than it saves
JitEMD is the experimental branch of the project and the README is unusually honest about it.
Just-in-time compiled EMD is a version of EMD which exceeds on very large signals or when reusing the same instance multiple times. It is strongly suggested for use in Jupyter notebooks when experimenting by modifying the input rather than the method itself, and the point of that advice is the shape of the workload: many calls, each on a large signal, with the algorithm fixed.
The problem with JIT is that the compilation happens on the first execution and it can be quite costly. With small signals, or performing the decomposition just once, the extra time for compilation will be significantly larger than the decomposition, making it less performant.
That is the honest trade, and it is rare to see a project spell it out. The optimisation pays for itself only when the compiled kernel is amortised over enough work, and for a one-off call on a few hundred samples it is a large net loss.
The author also says plainly that this is experimental as its value is still questionable, and that the author is not proficient in JIT optimisation so mistakes could have been made. Enabling it is an extra on the install:
pip install EMD-signal[jit]The optional dependency behind it is numba at 0.62.0 or newer for Python 3.10 and above, which is the mechanism the just-in-time compilation uses.
Installing, and the name that is not the repository name
The install section opens with a note that catches people out: the downloadable package is called emd-signal, not PyEMD. The repository is PyEMD, the import is from PyEMD, and the package you install is EMD-signal.
The quickest way through pip:
pip install EMD-signalor with uv:
uv add emd-signal
#or
# uv pip install EMD-signal
Conda is also supported through the conda-forge channel:
conda install -c conda-forge emd-signalAnd from source, the README says the best way to install if you only want to use EMD and its variations is through pip, but if you want the latest version you might want to build the package yourself, either by downloading the code as a ZIP or by cloning it:
git clone https://github.com/laszukdawid/PyEMDpython3 -m pip install .or in one command:
python3 -m pip install git+https://github.com/laszukdawid/PyEMD.gitThe README adds two practical notes. The source install goes into your current environment, so if you work on many projects or share resources with others it suggests virtual environments. And for an editable install you use the -e flag for pip.
The runtime dependencies are numpy at 1.12 or newer, scipy at 0.19 or newer, pathos at 0.2.1 or newer, and tqdm at 4.64.0 with an upper bound below 5.0. The pathos dependency is the one to understand, since it is what provides the process parallelism the ensemble methods use, and the requirements file shows pathos pulling in multiprocess, dill and pox.
Editorial conclusion
Adopt PyEMD when you need a time series decomposed into intrinsic mode functions and want to see and change the algorithm's internals, because the splines, stopping criteria and extrema detection are all switchable rather than fixed. Do not adopt it for a single decomposition where a fixed method will do, since the default settings are already tuned, and be careful with the just-in-time compiled build, because the compilation cost dominates on small signals. Before you install, note that the package on PyPI is emd-signal rather than PyEMD, and that you still import it as `from PyEMD import EMD`.
Frequently asked questions
How do I install PyEMD?
The downloadable package is called emd-signal, so run `pip install EMD-signal`, or `conda install -c conda-forge emd-signal`, or `uv add emd-signal`. The README notes that installing from source with `python3 -m pip install .` puts it in your current environment, so it suggests virtual environments when you work on several projects.
Which EMD variations does PyEMD implement?
Ensemble EMD, EEMD, Complete Ensemble EMD, CEEMDAN, and Just-in-time compiled EMD, JitEMD, along with different settings of vanilla EMD. There is also image decomposition with EMD2D and BEMD, which is marked experimental with no support.
Which splines and stopping criteria can I change in PyEMD?
The splines are natural cubic, the default, pointwise cubic, Hermite cubic, Akima, PChip and linear. The stopping criteria are Cauchy convergence, the default, a fixed number of iterations, and a number of consecutive proto-imfs. Extrema detection is either discrete extrema, the default, or parabolic interpolation.
When is the JIT build of PyEMD worth using?
The README says just-in-time compiled EMD exceeds on very large signals or when reusing the same instance multiple times, and suggests it for Jupyter notebooks where you change the input rather than the method. The trade is that compilation happens on the first execution and can be costly, so with small signals or a single decomposition the compilation time will be significantly larger than the decomposition itself.
Official sources
Add this badge to your README
If you maintain this project, the badge below links readers to this analysis and shows its maintenance status from the daily GitHub snapshot. Paste the markdown into your README; add ?metric=license or ?metric=stars to the image URL for a different field.

[](https://hysenlabs.com/projects/laszukdawid-pyemd)Star history chart for your README
[](https://hysenlabs.com/projects/laszukdawid-pyemd)Was this useful?