agent-starter-react: a Next.js frontend for a LiveKit voice agent
A complete voice AI frontend app for LiveKit Agents with Next.js
At a glance
- What is it?
- agent-starter-react is a Next.js starter template that gives a LiveKit agent a browser interface with voice, transcriptions, media controls and virtual avatar support. It is built to be edited, and the bundled token endpoint is a development convenience you must replace before shipping.
- Who is it for?
- Adopt agent-starter-react when you want a working browser client for a LiveKit agent and plan to own the token layer anyway, and write your own frontend when you need the native look of the Android, Flutter, Swift or React Native starters.
- Can I use it commercially?
- Yes. MIT is a permissive licence: you can use, modify and sell software built on it, as long as you keep its copyright and licence notices.
- Is it still maintained?
- Yes. The repository received new commits within the last day.
- What is it written in?
- Mainly TypeScript, according to GitHub's language statistics.
Answers come from the project's GitHub data, last synced on November 7, 2026, and from our analysis. They are not legal advice.
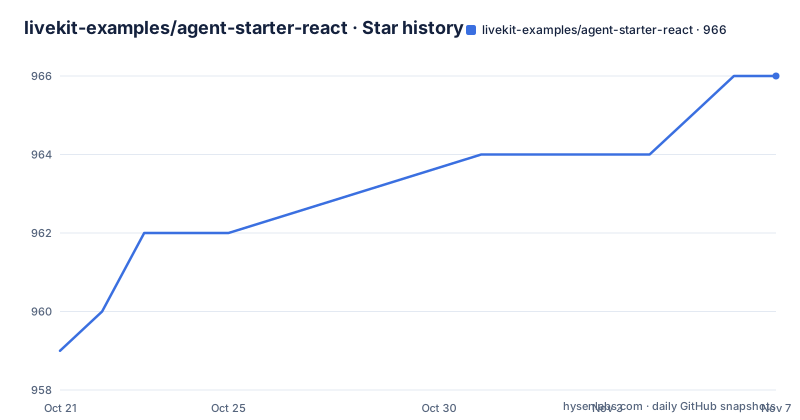
Star history
- livekit-examples/agent-starter-react966 ★ · +7
| Repository | 2026-10-21 | 2026-11-07 |
|---|---|---|
| livekit-examples/agent-starter-react | 959 | 966 |
7 Stars in the last 17 days, measured from the daily GitHub snapshot. Compare with other projects
Editorial analysis
A browser client for a LiveKit agent, built to be taken apart
agent-starter-react is the front end half of a LiveKit Agents deployment. The repository describes it as a complete voice AI frontend app for LiveKit Agents with Next.js, and it leans on two libraries to do the heavy lifting: the Agents UI component set for the interface, and the LiveKit JavaScript SDK for the connection.
The scope it claims is wider than a chat box. It supports real-time voice interaction with LiveKit Agents, camera video streaming, screen sharing, transcriptions, and virtual avatar integration. The audio visualizer can be rendered in five styles, named bar, grid, radial, wave and aura. There is light and dark theme switching with system preference detection, and branding, colors and UI text are all meant to be changed.
That last point is the design intent. The README says the template is free to use or modify as you see fit, and the project structure places business logic inside components/app while the Agents UI pieces live under components/agents-ui and the primitive shadcn/ui pieces under components/ui. Shadcn installs components into the components/ folder as local files rather than as a locked dependency, which means the visualizer or the control bar is yours to rewrite line by line.
The audience is a developer who already has, or is about to build, a LiveKit agent and wants a polished client without designing one from scratch.
The token route is where a session is authorised
Every LiveKit client needs a token, and this template ships two ways to get one, which the README describes as development options only.
The first is the LiveKit Cloud development token server. You switch on the Development token server toggle on your project's Settings page in LiveKit Cloud, copy the Token server ID, and put it in your environment file:
LIVEKIT_TOKEN_SERVER_ID=<your-token-server-id>The second is a token endpoint included in the app at app/api/token/route.ts, which needs the project's own LiveKit credentials in .env.local:
LIVEKIT_URL=wss://<project-subdomain>.livekit.cloud
LIVEKIT_API_KEY=<your_api_key>
LIVEKIT_API_SECRET=<your_api_secret>
The credentials for that route can be filled in for you when the LiveKit CLI clones the template:
lk app create --template agent-starter-reactOr they can be copied from the project's Settings page by hand.
The dependency list explains how the endpoint works. It includes livekit-server-sdk, which is the server side library capable of minting tokens, and jose, a JSON Web Signature library, which is what a hand rolled token endpoint would use to sign them. The frontend side brings in livekit-client, and the README notes that a Session object can be created from a TokenSource and provided to components by wrapping them in an AgentSessionProvider, with an example in components/app/app.tsx.
Automatic dispatch or one named agent, decided by AGENT_NAME
Pointing the app at an agent is a single configuration decision, and the template exposes it as an environment variable. The .env.example file lists AGENT_NAME with the comment that leaving it blank enables automatic dispatch and providing an agent name enables explicit dispatch.
AGENT_NAME=With the variable blank, the room will be handed to whichever agent claims it. Set it, and the client asks for that agent by name. The README links explicit dispatch to the LiveKit agent dispatch documentation, so the semantics live in the server side agent, not in this frontend. What the template contributes is the plumbing that carries the choice.
There is a related behaviour that surprises first time users. The app ships pointed at the LiveKit homepage agent, which is also reachable at livekit.com, so a fresh clone talks to somebody else's agent without any setup. That agent accepts voice and text input only, which means the video and screen sharing controls are hidden until the app is pointed at your own agent. In other words the missing camera buttons are a configuration signal, not a broken feature.
For the agent itself, the README points at the Agent Builder for a no-code setup, and at the Python and Node.js starter agents, or the voice AI documentation, when you want to write your own.
Running the template locally with pnpm
The setup path in the README is short, and it assumes pnpm rather than npm or yarn.
git clone https://github.com/livekit-examples/agent-starter-react.git
cd agent-starter-react
pnpm install
pnpm dev
After that you open http://localhost:3000 in a browser. The dev script runs next dev --turbopack, so the Next.js 15 development server with the Turbopack bundler serves the app.
Two details in package.json matter before you start. The engines field requires Node 24.x, which pins the major version, so an older Node install will need upgrading before anything else. The package manager is pnpm, and pnpm-lock.yaml at the top of the repository is the lockfile that goes with it.
The script set is conventional for a Next.js project: build runs next build, start runs next start, lint runs next lint, and the formatting pair is prettier --write. and prettier --check., matching the presence of.prettierrc and.prettierignore at the top level. There is also a taskfile.yaml, so the project can also be driven with task if you prefer that runner.
Other files at the top level tell you what else is wired in: eslint.config.mjs and.eslintrc.json for linting, postcss.config.mjs for styling, tsconfig.json and next.config.ts for TypeScript and Next configuration, components.json for the shadcn setup, and renovate.json for dependency update automation.
Business logic lives in components/app, not in the UI kit
The project structure table is the most useful map a reader gets, because it separates what the starter gives you from what you own.
session-view.tsx initializes the application and the LiveKit session, and renders the view controller plus the session UI, including the chat transcript, media tiles and the control bar. view-controller.tsx manages the transition between the welcome view and the session view based on LiveKit session state. welcome-view.tsx renders the welcome UI when the session is not connected. chat-transcript.tsx handles chat transcript transitions, and tile-layout.tsx handles the layout and transitions of media tiles across application states.
The split has a practical consequence for anyone changing behaviour. Agents UI components mostly require access to a LiveKit session object, because that is where agent state and audio tracks come from. Passing a session into a component therefore means wrapping it in an AgentSessionProvider, and the README points at components/app/app.tsx as the reference for how this app does it.
So if you want a different control bar or a new transcript behaviour, you do it in components/app and compose the primitives underneath, rather than editing the vendored Agents UI files. The README states that Agents UI components, like most shadcn components, take as many primitive attributes as possible, so the supported route for customisation is props and composition rather than forking the source.
The remaining top level directories are conventional: app/ holds the Next.js routes and the token endpoint, hooks/ holds React hooks, lib/ holds helpers, fonts/ and public/ hold assets, and styles/ holds stylesheets.
Agents UI is installed like a shadcn component, not a dependency
The way the interface layer is distributed is unusual enough to be worth understanding. The README describes the Agents UI components as covering core UI elements such as media controls, audio visualizers, chat transcripts and providing session data, and says that Shadcn installs components into the components/ folder so you can customize them like any other local component.
The package.json confirms the mechanism with a dedicated script:
pnpm dlx shadcn@latest add --yes @agents-ui/all && pnpm formatRunning that pulls the component set into components/agents-ui and then runs prettier over the tree. The script name in package.json is shadcn:install.
The practical upshot is that this template does not pin a version of the Agents UI package for you. components.json is the shadcn configuration file that says where components land and how they are styled, and the copies in components/ are ordinary source files in your repository. Upgrading the UI layer means re-running the install command and reviewing the diff, not bumping a version range.
The dependency list shows what else is wired in around it. The Radix UI primitives sit under @radix-ui/react-*, with shadcn components in components/ui, icons from @phosphor-icons/react and lucide-react, next-themes for theme switching, motion for animation, sonner for toasts, and embla-carousel-react for carousels. Two entries stand out as capabilities the template carries: @rive-app/react-webgl2, a Rive renderer on WebGL2, and @xyflow/react, a node graph library. The @livekit/components-react package is the React binding for the LiveKit client.
The development token server will not survive a production review
The README is direct about this, and the warning sits next to the configuration that enables it. Both token options are for development only, because any client can request a token. The documented fix for production is to build your own token generation that integrates with your authentication system, then either add an authentication layer to app/api/token/route.ts or point tokenEndpoint in app/page.tsx at your own token server and drop the development token server.
That is the single most important line in the whole template for anyone deploying it, and it is easy to miss because the default path works perfectly on localhost. A client that can request any token is not an authentication mechanism.
There is a second boundary. The template is a frontend, and it expects an agent to exist somewhere. Out of the box there is only the LiveKit homepage agent, which takes voice and text only. Video, screen sharing and the avatar path appear once you point the app at your own agent, which means running an agent process and dealing with its dispatch behaviour.
The last limitation is the one that decides between templates. This repository covers React for the browser, and the README lists parallel starters for Android, Flutter, Swift and React Native. Those are separate repositories with separate state, and a mobile product built on this one would have to redo that work.
A template to fork, not a package to depend on
The maintenance situation matches what a starter template should look like. The last push to main was on 2026-10-19, so the repository is being worked on, and the project carries renovate.json for dependency update automation, which is consistent with a template trying to track the moving versions of the packages it depends on. The repository publishes no GitHub releases, so there is no tagged version to pin, and the package.json version field reads 0.1.0 with the package marked private.
The licence is MIT, which means you can take the code, change it and ship it, keeping the copyright notice and licence text with any substantial redistribution. For a template intended to be edited, that is the right choice, and the practical caution is the ordinary one: keep the licence file with what you redistribute.
The alternative approach is worth naming explicitly. Instead of starting from this template, you can build the client yourself on livekit-client, which is the same SDK this template uses, and assemble the interface with your own components and your own auth. The difference is who owns the work: the template hands you a working session view, transcript, tile layout and control bar in exchange for its opinions about component structure and its development token server. Forking it means you inherit both the good parts and the debt, and the alternative means you write the session lifecycle, the provider wiring and the token exchange yourself.
Related starters exist for the agent side too, in Python and Node.js, which is where the other half of this work usually lives.
Editorial conclusion
Adopt agent-starter-react when you want a working browser client for a LiveKit agent and plan to own the token layer anyway, and write your own frontend when you need the native look of the Android, Flutter, Swift or React Native starters. Verify three things before building on it: the token route at app/api/token/route.ts, which currently lets any client request a token and needs an authentication layer for production, the AGENT_NAME value in .env.local, which decides whether you get automatic dispatch or one named agent, and the Node 24.x engine requirement in package.json, since the template pins a specific runtime. The last push to main was on 2026-10-19 and the repository publishes no GitHub releases, so treat the template as a moving target you fork rather than a versioned dependency.
Frequently asked questions
How do I run agent-starter-react locally?
Clone the repository, run pnpm install and then pnpm dev, then open http://localhost:3000. The dev script runs next dev --turbopack, and package.json requires Node 24.x.
How do I connect agent-starter-react to my own LiveKit agent?
Point the app at an agent by setting AGENT_NAME in .env.local, leaving it blank for automatic dispatch or setting the agent's name for explicit dispatch. Until you do that, the app talks to the LiveKit homepage agent, which accepts voice and text only, so video and screen sharing stay hidden.
Is the bundled token endpoint safe for production?
No. The README states that both token options are for development only because any client can request a token. For production you add an authentication layer to app/api/token/route.ts or point tokenEndpoint in app/page.tsx at your own token server.
How do I customize the interface in agent-starter-react?
Agents UI and shadcn components are installed into the components/ folder as local source files, so you edit them like any other component. Business logic belongs in the components/app folder, and the README points at components/app/app.tsx for an example of providing a LiveKit session through an AgentSessionProvider.
Which frameworks have their own agent starter?
The README lists parallel starters for Android, Flutter, Swift and React Native alongside this React one, and separate starter agents for Python and Node.js on the agent side.
Official sources
Add this badge to your README
If you maintain this project, the badge below links readers to this analysis and shows its maintenance status from the daily GitHub snapshot. Paste the markdown into your README; add ?metric=license or ?metric=stars to the image URL for a different field.

[](https://hysenlabs.com/projects/livekit-examples-agent-starter-react)Star history chart for your README
[](https://hysenlabs.com/projects/livekit-examples-agent-starter-react)Was this useful?