OmniBot: two repository names in one file, and a local service on your LAN
Your on-phone / mobile AI agent (Claw), capable of operating terminals and performing a wide range of tasks in the Android world.
At a glance
- What is it?
- An on-device Android agent in Flutter and Kotlin that reads and writes files, drives a browser, runs an Alpine environment on the phone and connects to a Codex CLI running on your computer. The development instructions have you enable a local service on the device, copy its address and token into a browser interface running on your laptop, and the release packaging has a flag that bundles an API key if you ask for it.
- Who is it for?
- This is aimed at someone who wants agent capability on an Android device itself rather than a phone acting as a remote control, and the terminal, browser and workspace access are the substance of it. Two things to weigh before you install.
- Can I use it commercially?
- Check first. The repository uses a licence we do not classify automatically, so read its LICENSE file before any commercial use.
- Is it still maintained?
- Yes. The repository last received commits 2 days ago.
- What is it written in?
- Mainly Dart, according to GitHub's language statistics.
Answers come from the project's GitHub data, last synced on November 14, 2026, and from our analysis. They are not legal advice.
Star history
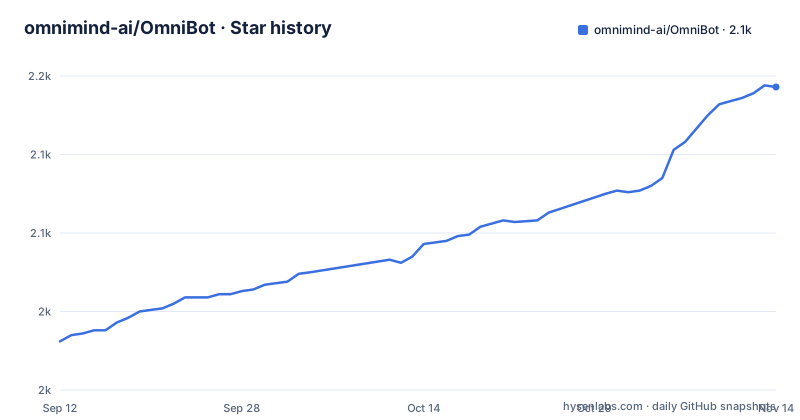
- omnimind-ai/OmniBot2,143 ★ · +162
| Repository | 2026-09-12 | 2026-11-14 |
|---|---|---|
| omnimind-ai/OmniBot | 2k | 2.1k |
162 Stars in the last 63 days, measured from the daily GitHub snapshot. Compare with other projects
Editorial analysis
An agent on the device, not a remote control for one
The stated ambition is to go past chat into a full loop: understand, decide, execute, reflect. The build is native Android Kotlin underneath a Flutter interface, which is why the repository holds an application module and a separate user interface module rather than one project. What the agent can reach is the interesting part. There is a tool ecosystem made of skills, an Alpine environment it initialises on startup, browser access, the Model Context Protocol, and Android system-level tools. System-level actions cover scheduled tasks, alarms, creating, querying and updating calendar entries, and audio playback control. Productivity is file reads and writes, browsing the workspace, using a browser, and a terminal. Memory comes in two forms, short and long term, with embedding support for the long-term kind. An iOS and macOS version exists as a separate project, so this repository is Android only.
Two repository names appear in the same file
The file links its own release page and its own issue tracker to a repository with a longer name than the one you are reading, adding a prefix to the project name. The development instructions then tell you to clone that same longer name in the clone command, while the architecture diagram near the bottom labels its own root folder with the longer name too. So within one document the project is called two things, and a reader following the clone command lands on a different path than the repository page uses. Nothing breaks, since the clone URL appears to resolve, but it means any script deriving one identifier from the other will be wrong somewhere. It is also a small signal about how much of this documentation is synchronised by hand rather than generated.
A service on the device, and a token typed into a laptop browser
The web interface is a separate front end that talks to the phone, and the instructions are specific about how. You install and start the app on an Android device, keep the computer and the device on the same trusted network, then open the app's local service settings, enable it and copy two things: its address and its token. The default port is 8899, though the file insists you use the address the app displays rather than assuming it. On the computer you start the development server pointed at that address:
VITE_WEBCHAT_PROXY_TARGET=http://192.168.1.20:8899 pnpm devThen you open the URL the bundler prints, normally on port 5173, and paste the token into the browser. What the proxy preserves is worth noting: session cookies, realtime events over server-sent connections, workspace access and browser mirroring, all on one origin so the browser does not treat them as cross-site. A local service on a wireless network, authenticated by a pasted string, is the security surface to think about before doing this on a network you do not control.
Scheduled tasks run subagents, alarms only remind
The two are separated in one sentence, which is the kind of distinction that matters when you are granting an app calendar and notification access. A scheduled task executes a subagent flow, and a subagent can be assigned a complete task and behaves like a full agent. An alarm is reminder-only. So the scheduler has two very different power levels behind it, and the file is clear which is which. Skills work the same way: you install one by sending the app a repository link, and a recommended collection is linked for browsing. Once installed you enable or disable skills from the same repository view. Configuration happens in one place, with the settings page reachable from the left sidebar and per-scenario model settings inside it, including a note that memory embedding needs an embedding model while the other scenarios are better served by multimodal or vision-capable models.
Release builds can bundle a key, and the flag is opt-in
The packaging section is where this project is most careful, and it describes three different places a language model configuration can come from. Release builds use a worker URL as the default proxy for the interface's vision component, and they receive a route for a provider from the update worker, with the upstream key staying inside that worker rather than in the app. Debug builds instead read an OpenAI-compatible configuration from three environment variables covering the base URL, the key and the model, used for ordinary requests, for context compaction and for one named operation. For local acceptance testing on a physical device, a release build can be told to bundle that same configuration through a single build flag, and the file states plainly that ordinary release and continuous integration builds do not do this. The acceptance script reads the key from the shell and fails immediately when it is missing, rather than producing a test build that cannot call anything.
Two provider names, and three environment variables
Reading the packaging text closely, one provider appears under two names. The release path describes receiving a route from the update worker, naming the provider with a different label than the one used in the environment variable prefix for the base URL, the key and the model. That is the kind of mismatch that makes a support question hard to answer, since the flag that bundles one of them is named after the other. The three variables themselves are ordinary: an API base, a key and a model name. What is not ordinary is where they are allowed to live. In a debug build they are read from the environment at build time; in a release build the key stays in the worker and the app receives a route; and only when the explicit bundling flag is passed does the configuration travel inside the artefact, where anyone holding the file can read it.
Gradle builds the web front end for you
The Android build does not expect you to build the web interface first. Gradle runs a locked dependency install for it, executes the production build, clears stale assets and copies only the output directory into the application package. That is a good arrangement, because the most common failure with a hybrid app is shipping a stale bundle. There is a task to verify just that step without building the whole application, invoked with a target property naming the entry point. The file also draws a boundary explicitly: Flutter Web is not part of this workflow, so do not expect a browser build path. Two directories are called out as local output that must never be committed, the production output and the dependency directory, and the dependency install inside the build is locked to the lockfile rather than resolved fresh.
A remote bridge for the Codex CLI on your computer
One use case reaches outside the phone. To run the agent in Codex mode against a Codex command line client installed on a PC or a Mac, you start a bridge on that computer, where the client is already installed and logged in:
npx @thuocean/codex-bridgeThe bridge prints a setup interface where you choose the network address and a token mode, and then it prints a QR code, which you scan from the Codex settings inside the app. The bridge therefore becomes the authenticated path between the phone and a developer tool running on your desktop, and it inherits that tool's login rather than asking the phone to hold a credential of its own. Two details are left to the bridge's own documentation, its advanced options and its troubleshooting, which is reasonable for a component versioned separately from the app.
Editorial conclusion
This is aimed at someone who wants agent capability on an Android device itself rather than a phone acting as a remote control, and the terminal, browser and workspace access are the substance of it. Two things to weigh before you install. The development path exposes a local service on the device with a token you paste into a browser interface, on the instruction that the computer and device share a trusted network, which is reasonable on a home network and poor on shared or office wifi. And the packaging has an opt-in flag that bundles an LLM configuration into a release build, off by default and explicitly excluded from continuous integration builds, which is exactly the flag worth knowing about before someone turns it on. The rest is unusually well specified for a mobile agent, down to which subdirectories must not be committed.
Frequently asked questions
What is OmniBot?
An on-device AI agent for Android, built with native Android Kotlin and a Flutter interface, organised around an understand, decide, execute and reflect loop rather than chat alone. It can install skills, run an Alpine environment on the device, drive a browser, use the Model Context Protocol, act at system level, keep short and long term memory with embedding support, and read and write files and use a terminal.
What do I need to build OmniBot?
Flutter SDK 3.47.2 or newer and JDK 17 or newer, plus Node.js 20.19 or newer or 22.12 or newer with pnpm 10.28.0 for the web interface. The app is Android only; an iOS and macOS version lives in a separate project.
How does the OmniBot remote Codex bridge work?
You start the bridge on the computer where the Codex command line client is installed and logged in, choose the network address and token mode in its terminal setup, then scan the printed QR code from the Codex settings in the app. Advanced options and troubleshooting live in the bridge's own README.
Does an OmniBot release build contain an API key?
Not by default. In a release build the upstream key stays inside the update worker and the app receives a route, and regular release and continuous integration builds do not bundle the configuration. A release build can be told to bundle it for acceptance testing by passing one build flag, while debug builds read the base URL, key and model from three environment variables.
What is the difference between OmniBot scheduled tasks and alarms?
Scheduled tasks execute subagent flows, and a subagent can be given a complete task and behaves like a full agent. Alarms are reminder-only. The file separates the two explicitly, which matters because both sit behind the same scheduling surface with calendar and notification access.
Official sources
Add this badge to your README
If you maintain this project, the badge below links readers to this analysis and shows its maintenance status from the daily GitHub snapshot. Paste the markdown into your README; add ?metric=license or ?metric=stars to the image URL for a different field.

[](https://hysenlabs.com/projects/omnimind-ai-omnibot)Star history chart for your README
[](https://hysenlabs.com/projects/omnimind-ai-omnibot)Was this useful?