Debugprobe, the firmware behind the Raspberry Pi SWD and UART probe
Firmware source and binaries for the RP2040-based Debug Probe accessory
At a glance
- What is it?
- This repository holds the firmware source for the Raspberry Pi Debug Probe, the SWD and UART accessory built on the RP2040, and it also builds for a plain Pico or Pico 2 with a different board flag. The interesting part for anyone reading the code is that the same firmware serves three pieces of hardware, and the build system has to account for that.
- Who is it for?
- Debugprobe suits anyone who wants to read or modify the firmware of the Raspberry Pi Debug Probe rather than only use the shipping binary, and it suits someone who wants the same SWD and UART functionality on a plain Pico or Pico 2. It is the wrong tool if you are looking for a general debug adapter, since the feature set is the accessory's, and it is the wrong tool if you are not comfortable with a C toolchain, a CMake build and the Pico SDK.
- Can I use it commercially?
- Check first. The repository uses a licence we do not classify automatically, so read its LICENSE file before any commercial use.
- Is it still maintained?
- Yes. The repository last received commits 37 days ago.
- What is it written in?
- Mainly C, according to GitHub's language statistics.
Answers come from the project's GitHub data, last synced on November 7, 2026, and from our analysis. They are not legal advice.
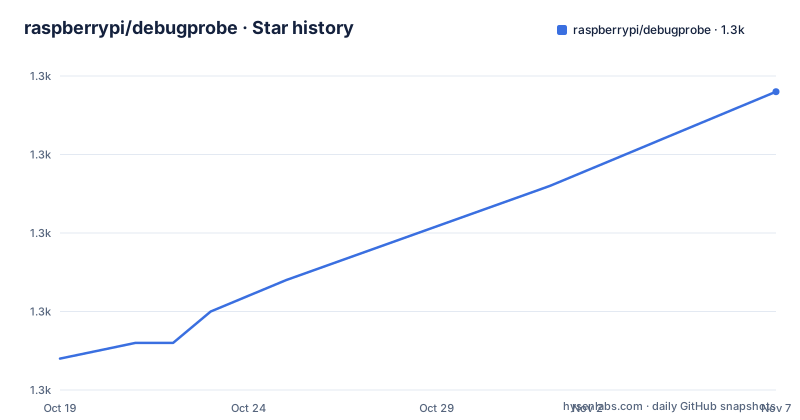
Star history
- raspberrypi/debugprobe1,284 ★ · +17
| Repository | 2026-10-19 | 2026-11-07 |
|---|---|---|
| raspberrypi/debugprobe | 1.3k | 1.3k |
17 Stars in the last 19 days, measured from the daily GitHub snapshot. Compare with other projects
Editorial analysis
One firmware, three boards
Debugprobe is the firmware source for the Raspberry Pi Debug Probe, the SWD and UART accessory built on the RP2040. The README also notes that it can be run on a Raspberry Pi Pico or a Pico 2, and the release tags are named accordingly, with debugprobe-v2.3.1 from 2026-05-29, debugprobe-v2.3.0 from 2026-02-11 and debugprobe-v2.2.3 from 2025-07-07.
That single sentence about running on a Pico is the structural fact about this repository, and it explains why the build instructions are as fiddly as they are. The same source produces three different binaries. The accessory gets debugprobe.uf2, the Pico build gets debugprobe_on_pico.uf2, and the Pico 2 build gets debugprobe_on_pico2.uf2. The filename changes, and more importantly the board configuration changes with it.
The reason the Debug Probe exists in the first place is worth a sentence, because the hardware is what a firmware needs to talk to. A debug probe is the bridge between a host USB port and a target microcontroller's serial wire debug pins, and the accessory form factor also gives you a UART connection to the target alongside it. The product page and the Pico pages are all linked from the README, and the official documentation lives on the Raspberry Pi documentation site, with a section on what the Debug Probe is, plus the Getting Started with Pico PDF.
Because this is firmware rather than a library, the repository reads differently from most of the projects in this catalogue. There is no public API. The things worth understanding are the build, the board variants, and the one runtime configuration detail that is unusual enough to be worth its own section.
The last push was on 2026-10-02, the default branch is master, and the licence is the one Raspberry Pi uses for its firmware, which the repository metadata does not classify into a standard bucket.
Building it, and where the Pico SDK comes in
The Hacking section of the README is for making changes to the code or studying it, and it walks through the build in a fixed order. First, clone the repository and change into it:
git clone https://github.com/raspberrypi/debugprobe
cd debugprobe
Then initialise and update the submodules, which is not optional because the build depends on them:
git submodule update --init --recursiveThen create and switch to a build directory:
 mkdir build
 cd build
Before running CMake you need to point the build at the Pico SDK. If your environment does not contain PICO_SDK_PATH, then either add it to your environment variables with export PICO_SDK_PATH=/path/to/sdk or add -DPICO_SDK_PATH=/path/to/sdk to the arguments to CMake. The README is specific about the version: PICO_SDK_PATH must point to a version 2.3.0 or greater install.
Then the build itself:
 cmake ..
 make
And the result is a debugprobe.uf2 that you can upload to your Debug Probe via the UF2 bootloader.
The repository layout explains where the pieces come from. There is a CMakeLists.txt at the root, a .gitmodules file, and two import scripts, pico_sdk_import.cmake and FreeRTOS_Kernel_import.cmake, which are the standard CMake glue that pulls in the Pico SDK and the FreeRTOS kernel. The freertos/ and CMSIS_DAP/ directories are the submodules, so the CMSIS-DAP protocol implementation and the RTOS come from elsewhere rather than being written here. The src/ and include/ directories hold the actual probe code, and get-version.sh is a script that stamps the version into the build.
The two import scripts are worth noting, because FreeRTOS is a real design decision. The Debug Probe firmware is a USB device that has to stay responsive while the target is being debugged, and running the host side logic on an RTOS rather than in a bare loop is how you get that responsiveness without starving the USB stack.
Building for the Pico, and the extra work the Pico 2 needs
The board variants are handled with a single CMake option, PICO_BOARD, and the README documents each case separately because the requirements are not identical.
For the Pico 1, you invoke cmake in the same sequence as before with the -DPICO_BOARD=pico option:
cmake -DPICO_BOARD=pico ..That builds with the configuration for the Pico and calls the output program debugprobe_on_pico.uf2, as opposed to debugprobe.uf2 for the accessory hardware. The README also notes that if you first ran through the whole sequence to compile for the Debug Probe, then you do not need to start back at the top, you can just go back to the cmake step. That is a small courtesy, and it is the kind of thing that only gets written down when someone has done it the hard way.
The Pico 2 is where the instructions get stricter. If you are using an existing debugprobe clone, you must completely regenerate your build directory or use a different one, and you must also sync and update the submodules:
git submodule sync
git submodule update --init --recursive
mkdir build-pico2
cd build-pico2
cmake -DPICO_BOARD=pico2 ../
That produces debugprobe_on_pico2.uf2.
The requirement to regenerate rather than reuse the build directory is the interesting instruction. A CMake build directory caches the configuration, and a cached configuration from a different board target is exactly the kind of thing that produces a binary that half works. The Pico 2 has a different RP2350 silicon and a different memory layout, so reusing a configured tree is a recipe for a build that links against the wrong assumptions. The submodule sync step is there for the same reason, since the submodules are what carry the board support packages and the CMSIS-DAP code.
Using a separate build-pico2 directory, as the README does, avoids the problem entirely and is the pattern to copy if you are switching boards repeatedly.
AutoBaud, and a host side configuration detail that surprises people
AutoBaud is the one runtime feature the README explains, and it is worth reading because the mechanism is unusual.
AutoBaud is the mode which automatically detects and sets the UART baud rate as data arrives. Normally a UART link needs both ends to agree on a baud rate, and if they disagree you get garbage. The AutoBaud mode measures the incoming data to work out the rate, which removes the need to configure the host to match the target.
To enable AutoBaud, you configure the USB CDC port to a specific custom baud rate:
9728 (0x2600)The rule is that changing the baud rate to any other value disables AutoBaud. So 9728 is not an arbitrary speed the link runs at, it is a sentinel value that the firmware recognises as the request to switch into auto-detection mode.
The note attached to it is a practical warning about host software. Some Linux serial tools cannot set custom baud values, while PuTTY on Windows and any terminal that supports arbitrary baud rates works. That is a real constraint rather than a caveat, because a great deal of the Linux tooling for serial ports, including the terminal emulators people reach for first, exposes a fixed list of standard rates. If you are on Linux and your terminal cannot be configured to 9728, the feature is simply not available to you through that path.
Everything else about the probe lives in the official documentation rather than in this repository, which is the sensible division for firmware. The Raspberry Pi documentation site has a section on what the Debug Probe is, and the Getting Started with Pico PDF covers the board and the SDK.
The practical summary for someone deciding whether to build this: if you want to use the accessory as shipped, there is nothing here you need. If you want to change what the probe does, or run the same firmware on a Pico, this is the codebase, and the build is a normal CMake and Make workflow once the SDK is in place.
Editorial conclusion
Debugprobe suits anyone who wants to read or modify the firmware of the Raspberry Pi Debug Probe rather than only use the shipping binary, and it suits someone who wants the same SWD and UART functionality on a plain Pico or Pico 2. It is the wrong tool if you are looking for a general debug adapter, since the feature set is the accessory's, and it is the wrong tool if you are not comfortable with a C toolchain, a CMake build and the Pico SDK. Before building, check that you have the Pico SDK at version 2.3.0 or greater available through PICO_SDK_PATH, and read the AutoBaud section carefully, because enabling it requires setting an unusual custom baud rate of 9728 on the host serial port.
Frequently asked questions
What does the debugprobe repository contain?
It is the firmware source for the Raspberry Pi Debug Probe, the RP2040 based SWD and UART accessory. The same firmware can also be built for a Raspberry Pi Pico or Pico 2, and the README links the Debug Probe and Pico product pages and the official Raspberry Pi documentation.
How do I build the Debug Probe firmware?
Clone the repository, run git submodule update --init --recursive, create and enter a build directory, and make sure PICO_SDK_PATH points at a version 2.3.0 or greater install, either as an environment variable or as a CMake argument. Then run cmake .. and make, which produces debugprobe.uf2 for upload via the UF2 bootloader.
How do I build for the Pico and the Pico 2?
For the Pico, invoke cmake with -DPICO_BOARD=pico, which produces debugprobe_on_pico.uf2. For the Pico 2 you must completely regenerate the build directory or use a different one, sync and update the submodules, and configure with -DPICO_BOARD=pico2, producing debugprobe_on_pico2.uf2.
What is AutoBaud and how do I enable it?
AutoBaud automatically detects and sets the UART baud rate as data arrives. To enable it, configure the USB CDC port to the custom baud rate 9728, which is 0x2600, and changing to any other value disables the mode.
Which tools do I need to work on this firmware?
A C toolchain with CMake and make, the Pico SDK at version 2.3.0 or greater, and the submodules, which carry CMSIS-DAP and the FreeRTOS kernel and are pulled in by pico_sdk_import.cmake and FreeRTOS_Kernel_import.cmake.
Official sources
Add this badge to your README
If you maintain this project, the badge below links readers to this analysis and shows its maintenance status from the daily GitHub snapshot. Paste the markdown into your README; add ?metric=license or ?metric=stars to the image URL for a different field.

[](https://hysenlabs.com/projects/raspberrypi-debugprobe)Star history chart for your README
[](https://hysenlabs.com/projects/raspberrypi-debugprobe)Was this useful?