tiny-tpu: a systolic array TPU written in SystemVerilog
A minimal tensor processing unit (TPU), inspired by Google's TPU V2 and V1
At a glance
- What is it?
- tiny-tpu is a from-scratch tensor processing unit in Verilog, built around a systolic array of multiply-accumulate processing elements with a vector unit for bias, activation and loss, a dual-port unified buffer and a 94-bit control instruction bus. It suits a student or engineer who wants to read a working accelerator design rather than use a vendor toolchain, and the project ships demos and a hardened ASIC variant.
- Who is it for?
- Adopt tiny-tpu if you are studying accelerator design and want a complete, readable reference implementation with a documented instruction set and simulation harness. Skip it if you need a production inference engine, since this is an educational and research design with no released versions and a last push on 2026-04-03.
- Can I use it commercially?
- Not without permission. GitHub finds no licence file in the repository, and without a licence all rights are reserved by default: you may read the code but not reuse it. Check the README, or ask the authors, before using it.
- Is it still maintained?
- Activity is slowing. The repository last received commits 7 months ago.
- What is it written in?
- Mainly Verilog, according to GitHub's language statistics.
Answers come from the project's GitHub data, last synced on November 6, 2026, and from our analysis. They are not legal advice.
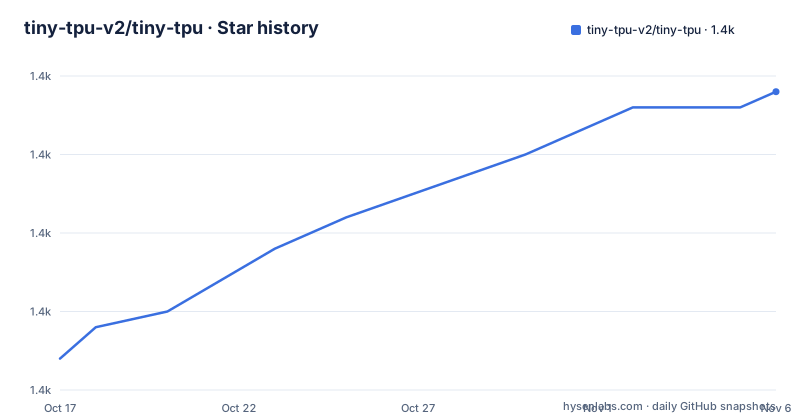
Star history
- tiny-tpu-v2/tiny-tpu1,414 ★ · +17
| Repository | 2026-10-17 | 2026-11-06 |
|---|---|---|
| tiny-tpu-v2/tiny-tpu | 1.4k | 1.4k |
17 Stars in the last 20 days, measured from the daily GitHub snapshot. Compare with other projects
Editorial analysis
What the project is
tiny-tpu is a minimal tensor processing unit, reinvented from Google's TPU V2 and V1. The primary language is Verilog, the default branch is `main`, the last push was on 2026-04-03, and the repository has no GitHub releases, so there is no version history to track. The design is small enough to read in an afternoon and complete enough to run a real network, and the README's table of contents runs from Motivation through Project Folders, Architecture, Instruction Set, an example instruction sequence, Future Steps and Setup, and then the practical part, adding a new module to the TPU, running commands from the Makefile, and fixed point viewing in gtkwave. That last group of sections is what tells you the project is meant to be modified, since the instructions are for adding your own module and looking at the resulting waveforms.
Three variants in one repository
The project folders section lists three sub-projects, and the difference between them is a matter of target. `mnist_demo/` is the DE1-SoC MNIST demo, with organized FPGA entry points in `fpga/`, JTAG host utilities in `host/`, checked-in and generated model data in `data/model/`, and generated outputs collected under `artifacts/`. `tiny-tpu-hardened/` is a hardened TPU variant with ASIC-ready RTL in `rtl/`, OpenLane inputs in `openlane/`, and focused regression benches in `sim/`. `xor_demo/` is a compact DE1-SoC XOR demo with Intel Quartus assets in `fpga/`, reusable TPU RTL in `rtl/`, board-level simulation in `sim/`, and preserved Quartus outputs in `artifacts/`. The hardened variant is the one that matters for anyone taking this further, because it moves the design from a simulation and a board demo toward an open-source ASIC flow.
The systolic array, and how data moves through it
The systolic array is a two-dimensional grid of processing elements, and the data movement is the whole point of the structure. Input values flow horizontally across the array, partial sums flow vertically down it, and weights remain fixed within each processing element during the computation. The processing element itself performs a multiply-accumulate operation every clock cycle, where incoming data is multiplied by a stored weight and added to an incoming partial sum to produce an output sum, and the incoming data also passes through to the next element for propagation across the array. That fixed-weight, moving-activation arrangement is what lets the array reuse each multiplier every cycle without any control logic deciding which operand goes where, and it is the reason a systolic array needs no instruction for the data movement itself.
The preprocessing, which is not free
The systolic array cannot consume matrices as they are laid out in memory, and the design handles that in hardware. Input matrices are rotated 90 degrees, implemented in hardware, and inputs are staggered for correct computation in the systolic array. Weight matrices are transposed and staggered to align with the mathematical formulas. The transposition is the notable one, because the buffer that feeds the array stores data in a row-major layout and the array wants it column-major, so the fix costs cycles and area. The choice to do it in hardware rather than in the host is what keeps the data path inside the accelerator, and it is one of the places where a design like this differs from a straightforward software implementation.
The vector unit and the unified buffer
The Vector Processing Unit performs element-wise operations after the systolic array, and the module it runs depends on the computation stage. The modules are pipelined, in order: bias addition, the Leaky ReLU activation function, MSE loss, and the Leaky ReLU derivative. The Unified Buffer is the dual-port memory that stores intermediate values, and the list of what it holds explains the training story. It stores input matrices, weight matrices, bias vectors, post-activation values for backpropagation, the activation leak factors, and the inverse batch size constant for MSE backpropagation. The interface is two read and two write ports per data type, data is accessed by specifying a start address and count, and reads can occur continuously in the background until the requested count is reached. The fact that post-activation values and leak factors are stored is what makes the design train a network rather than only run one.
The 94-bit instruction bus
The control unit reads a 94-bit instruction, and the instruction bus is divided into fields that directly control subsystems. The implementation is in `src/control_unit.sv`. The low bits are one-bit control signals, with bit 0 being the system mode switch, a general-purpose on and off for the control unit, bits 1 and 2 starting a unified buffer read transaction and selecting its transpose mode, and bits 3 and 4 being the valid flags for the two host write channels. The read geometry then follows, with bits 6 to 5 giving the read column size as a two-bit field, bits 14 to 7 the read row size as an eight-bit field where 0x08 reads eight rows, bits 22 to 15 the read address, and bits 25 to 23 a three-bit pointer select where 3'b001 routes the read pointer to the bias module in the vector unit. The write path follows, with bits 41 to 26 and 57 to 42 holding the first and second host write words as 16-bit fixed-point values, and bits 61 to 58 selecting the vector unit data pathway. The README notes the full instruction image is in the `images/` folder, and there is a documentation page on what a .gtkw file is, which is the wave viewer configuration format.
Building, simulating and looking at waveforms
The Makefile is where the practical work happens, and it is written for Icarus Verilog with cocotb as the test harness. The simulator is `iverilog` run through `vvp`, and the cocotb library path comes from `cocotb-config --prefix`. There is a Windows branch, because the cocotb VPI module name differs by platform, `cocotbvpi_icarus` on Windows against `libcocotbvpi_icarus` elsewhere, and iverilog uses a .vpl extension with no lib prefix there. The shell is forced to `C:/Program Files/Git/bin/sh.exe` on Windows so that negation and Unix commands work. The source list is explicit, naming `src/pe.sv`, `src/systolic.sv`, `src/fixedpoint.sv`, `src/control_unit.sv`, `src/unified_buffer.sv`, `src/vpu.sv`, the bias, leaky ReLU, loss and gradient descent modules, and `src/tpu.sv`. The test targets follow the same pattern, compiling with `$(IVERILOG) -o $(SIM_VVP) -s pe -s dump -g2012 $(SOURCES) test/`.
Editorial conclusion
Adopt tiny-tpu if you are studying accelerator design and want a complete, readable reference implementation with a documented instruction set and simulation harness. Skip it if you need a production inference engine, since this is an educational and research design with no released versions and a last push on 2026-04-03. Before you build, note the toolchain, where the Makefile drives Icarus Verilog with cocotb and forces a bash shell on Windows, and read the instruction set table first, since the 94-bit bus is the contract every module in the design depends on.
Frequently asked questions
What is tiny-tpu?
A minimal tensor processing unit written in Verilog, reinvented from Google's TPU V2 and V1. It has a systolic array of multiply-accumulate processing elements, a vector processing unit for bias, Leaky ReLU, MSE loss and the ReLU derivative, a dual-port unified buffer and a 94-bit control instruction bus.
How does data move through the tiny-tpu systolic array?
Input values flow horizontally across the array, partial sums flow vertically down it, and weights remain fixed within each processing element during the computation. Input matrices are rotated 90 degrees in hardware and inputs are staggered, while weight matrices are transposed and staggered to align with the mathematical formulas.
What is the unified buffer in tiny-tpu used for?
It is dual-port memory holding the intermediate values, namely input matrices, weight matrices, bias vectors, post-activation values for backpropagation, the activation leak factors and the inverse batch size constant for MSE backpropagation, accessed by a start address and a count with two read and two write ports per data type.
What tools does the tiny-tpu project use to simulate?
Icarus Verilog with cocotb as the test harness, driven by the Makefile. It selects the cocotb VPI module per platform, cocotbvpi_icarus on Windows and libcocotbvpi_icarus elsewhere, and forces a Git bash shell on Windows so that negation and Unix commands work.
Official sources
Add this badge to your README
If you maintain this project, the badge below links readers to this analysis and shows its maintenance status from the daily GitHub snapshot. Paste the markdown into your README; add ?metric=license or ?metric=stars to the image URL for a different field.

[](https://hysenlabs.com/projects/tiny-tpu-v2-tiny-tpu)Star history chart for your README
[](https://hysenlabs.com/projects/tiny-tpu-v2-tiny-tpu)Was this useful?