agterm's live sessions need zsh, a restart, and a global switch
A genuinely good terminal
At a glance
- What is it?
- agterm is a native macOS terminal built around a control API that agtermctl drives over a local socket, aimed at running several coding agents side by side. Prebuilt releases are arm64 and macOS 14 only, and installing the agent skill twice is explicitly discouraged.
- Who is it for?
- agterm suits someone running several long-lived coding agents at once who wants a scriptable handle on sessions, overlays, and windows, and who is on an Apple Silicon Mac on macOS 14 or later. It does not suit an Intel Mac, and the live-session mode that keeps processes alive carries three conditions you have to satisfy first.
- Can I use it commercially?
- Yes. MIT is a permissive licence: you can use, modify and sell software built on it, as long as you keep its copyright and licence notices.
- Is it still maintained?
- Yes. The repository received new commits within the last day.
- What is it written in?
- Mainly Swift, according to GitHub's language statistics.
Answers come from the project's GitHub data, last synced on November 15, 2026, and from our analysis. They are not legal advice.
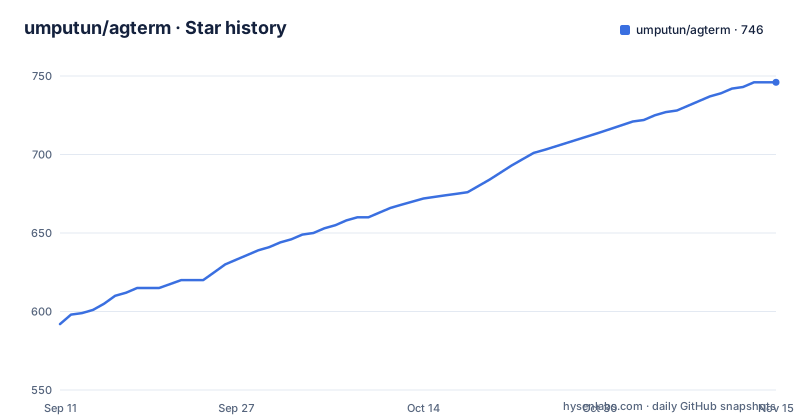
Star history
- umputun/agterm746 ★ · +154
| Repository | 2026-09-11 | 2026-11-15 |
|---|---|---|
| umputun/agterm | 592 | 746 |
154 Stars in the last 65 days, measured from the daily GitHub snapshot. Compare with other projects
Editorial analysis
Only two of the three restore modes are self-contained
agterm offers three restore modes, and only two of them are self-contained. The first restores the saved layout with fresh shells. The second starts the commands that were captured at quit. The third keeps the actual primary and split processes alive, and that one uses zmx. Live sessions are global rather than per-window, they require zsh as the macOS login shell, and they take effect only after you restart agterm. So the mode that actually preserves a half-finished build or a still-running test suite is the mode carrying three extra conditions, and those conditions arrive as one clause inside a feature bullet rather than as a setup section. For anyone arriving from tmux or screen that inverts the usual bargain, where persistence is the default and layout restoration is the fallback. The choice is really about which continuity you value: a restored shell is a new process wearing the old name, so its scrollback stops where the previous session ended, while a live session is the same process, which is the entire reason for running several agent sessions in parallel in the first place.
Install the agent skill by one route, never both
The agent skill arrives two ways. The Help menu installs it, alongside the agent status hooks and the command-line tool, and the readme notes that those menu items are optional and safe to rerun. The other route publishes the same skill as a plugin from the repository itself:
claude plugin marketplace add umputun/agterm
claude plugin install agterm@agterm
codex plugin marketplace add umputun/agterm
codex plugin add agterm@agterm
The instruction that follows is the useful one: install the skill by one route or the other, never both, because two copies leave it undefined which one the agent picks. That is an easy mistake to make and an awkward one to diagnose, since a duplicated skill shows up as inconsistent behaviour rather than an error. The same Help menu absorbs a second asymmetry. The Homebrew cask already installs agtermctl, while a disk-image install leaves you to put it on your PATH yourself. The status hooks follow the same split: they install from that menu, they cover Claude Code, Codex, Pi, OpenCode, and other agents, and their only job is to write a state onto the session row so a coding agent can report itself active, blocked, or completed.
Prebuilt releases are arm64 and macOS 14, and the dmg needs a second step
The platform floor is narrow and stated once: pre-built releases are for Apple Silicon arm64 Macs running macOS 14 or later. No Intel build is mentioned and no older macOS. Distribution is two routes, and one of them is a single command:
brew install --cask umputun/apps/agtermThe other is downloading the latest .dmg from the releases page and dragging agterm.app into /Applications. Both are signed with a Developer ID certificate and notarized by Apple, so Gatekeeper opens them without extra steps, which removes the usual friction from a manual install. The asymmetry comes afterwards: the cask installs the agtermctl command-line tool as part of the package, while the disk-image route leaves you to add it to your PATH through Help ▸ Install Command Line Tool…. That is the first thing to verify after a manual install, since the control API is the reason to be here. Nothing in the readme describes what happens on a machine outside that matrix, which leaves a source build as the route the Makefile documents.
make dist exits immediately unless VERSION is set
Most Makefile targets take no arguments and delegate to a shell script. One does not let you get away with that. The dist target is documented as a signed and notarized disk image, invoked as make dist VERSION=x.y.z with an optional PUBLISH flag, and it opens with a guard that fails when VERSION is empty, printing its own usage line and exiting 1:
make dist VERSION=x.y.zWithout the guard a release build would carry an unset version string, since the value is passed straight through to the release script along with the publish switch. Two neighbouring details explain the shape of the file. The default goal is help, so a bare make lists targets rather than building anything, and that help target is a grep and awk pipeline over the Makefile rather than a hardcoded list, which is why every target carries a trailing comment. And dist is the only target that can reach outward: the release script receives --publish only when PUBLISH is set, so a local rebuild is the default and publication is an explicit choice. The deploy target shows where a build lands, removing any existing agterm.app from ~/Applications and copying the Release product there. The Makefile also names that location at the top, with INSTALL_DIR pointing at the home Applications folder and RELEASE_APP pointing into build/DerivedData, so a per-user install never needs elevated rights and never touches the system Applications directory.
Every make target is a front door onto a script in scripts/
The Makefile describes itself as a thin front door over the shell scripts, with the scripts kept as the source of truth. The targets are help, prep, generate, build, run, release, deploy, test, test-app, lint, dist, and clean, and nearly all of them are one line each: prep runs ./scripts/setup.sh to build libghostty and the Ghostty resources once and idempotently, run and release hand off to their own scripts, and clean removes the build directory. generate is the interesting one, because it depends on prep and then runs:
xcodegen generateThat regenerates agterm.xcodeproj from project.yml, which makes the Xcode project a build artifact derived from a checked-in YAML file. Nobody edits the generated project; they edit the YAML and rebuild. The chain also fixes the order of operations on a new machine, since prep must succeed before generate and generate before build, so the Ghostty engine is compiled before anything links against it. build is a debug build with no launch, passing the project, the agterm scheme, the Debug configuration, and a derived data path under build/, which keeps artifacts inside the repository directory instead of the default location and makes clean a single recursive delete.
Lint is strict, and the UI test directory has no target
The quality gates are declared in the Makefile and are explicit about failing. Lint runs swiftlint with --strict and --quiet, so warnings fail the build alongside errors, and the target comment says so in as many words. Tests split in two: a test target for host-free agtermCore unit tests, and a test-app target for application-hosted AppKit unit tests. The split exists because some of them need the app's runtime and some deliberately do not. What is missing is just as informative. The repository carries an agtermUITests directory at the top level, and the Makefile has no target that runs it, so that suite has no documented entry point through the front door. The directory listing otherwise explains the shape of the codebase: agterm/ for the application, agtermCore/ for the logic the host-free tests exercise, agtermTests/ and agtermUITests/ for the two test tiers, cookbook/ for the larger scripted workflows, docs/ and site/ for documentation, packaging/ and plugins/ for distribution, scripts/ for the shell scripts, plus a .swiftlint.yml, a .revmux/ directory, and a .writing-style-names list.
Five nouns describe the entire hierarchy
The model section is five definitions long and does not grow. A window is a top-level bundle of workspaces and sessions, with its own macOS window and its own sidebar tree. A workspace is a named group of sessions for one project or context. A session is one running shell with a name, a working directory, and its own scrollback, and it is the row you see in the sidebar, keeping running while you work in another one. A session can split into two shells, side by side or top and bottom, both sharing that one sidebar row, and it can open a scratch terminal over itself. An overlay is the fifth term: one program in a temporary terminal above a session, which disappears when the program exits and leaves the shell underneath unchanged. The readme is equally clear about what agterm does not do. There is no deep agent integration and no invented way of working with agents; most questions of the form does it have X get answered with bind it yourself, using a command line in keymap.conf to turn any shell line into a key chord and an overlay to give an interactive program a real terminal over the session. That is also how a file manager or a git UI ends up one line away rather than a feature request, and why the readme points at a cookbook for the workflows that grow past a single line. Rendering, VT parsing, and shell I/O come from Ghostty through libghostty; everything above that layer, from the sidebar tree to agtermctl, is agterm's own.
Editorial conclusion
agterm suits someone running several long-lived coding agents at once who wants a scriptable handle on sessions, overlays, and windows, and who is on an Apple Silicon Mac on macOS 14 or later. It does not suit an Intel Mac, and the live-session mode that keeps processes alive carries three conditions you have to satisfy first. Before installing, pick one route for the agent skill rather than both, check whether agtermctl landed on your PATH if you came from the disk image, and decide whether zsh as your login shell is acceptable, since the third restore mode depends on it.
Frequently asked questions
what is ag term
agterm is a native macOS terminal with a deliberately small interface and a full control API. Shells live in named workspaces holding sessions, and the bundled agtermctl creates sessions, types into them, reads pane text back, runs programs in overlays, and moves windows over a local socket.
What does agterm need to run?
Pre-built releases are for Apple Silicon arm64 Macs running macOS 14 or later, and they are signed with a Developer ID certificate and notarized by Apple. The third restore mode, which keeps live processes with zmx, additionally requires zsh as the macOS login shell and a restart of agterm.
How do I install agterm?
With the Homebrew cask umputun/apps/agterm, which also installs the agtermctl command-line tool, or by downloading the latest .dmg from the releases page and dragging agterm.app into Applications. From the disk image, agtermctl has to be put on your PATH through Help ▸ Install Command Line Tool…
Should I install the agterm agent skill twice?
No. It is offered both from the Help menu and as a plugin from the repository, and the readme says to use one route or the other, never both, because two copies leave it undefined which one the agent picks.
What terminal engine does agterm use?
It embeds Ghostty's engine, libghostty, for rendering, VT parsing, and shell I/O. Everything above that layer, including workspaces, sessions, overlays, and agtermctl, is agterm's own.
Official sources
Add this badge to your README
If you maintain this project, the badge below links readers to this analysis and shows its maintenance status from the daily GitHub snapshot. Paste the markdown into your README; add ?metric=license or ?metric=stars to the image URL for a different field.

[](https://hysenlabs.com/projects/umputun-agterm)Star history chart for your README
[](https://hysenlabs.com/projects/umputun-agterm)Was this useful?