X1Plus: custom firmware for the Bambu Lab X1 built as an overlay, not a fork
Custom firmware for Bambu Lab X1 and X1 Carbon 3D printers
At a glance
- What is it?
- X1Plus is custom firmware for the Bambu Lab X1 and X1 Carbon that patches the vendor firmware on the printer itself rather than redistributing it, and the build is a Docker image that produces an .x1p image to copy to the SD card. The README documents the whole boot sequence from the host-side Electron installer through the first-stage scripts to the injected setup GUI.
- Who is it for?
- X1Plus fits a Bambu Lab X1 owner who wants to run their own firmware on the printer and is prepared to follow a build and install procedure involving a Docker image, an SD card, and a filesystem decryption key pulled from a live printer. It is the wrong choice if you want a supported product with a warranty, and it is the wrong choice if you cannot obtain that key or run the Linux and Docker toolchain.
- Can I use it commercially?
- Check first. The repository uses a licence we do not classify automatically, so read its LICENSE file before any commercial use.
- Is it still maintained?
- Yes. The repository last received commits 5 days ago.
- What is it written in?
- Mainly Python, according to GitHub's language statistics.
Answers come from the project's GitHub data, last synced on November 7, 2026, and from our analysis. They are not legal advice.
Star history
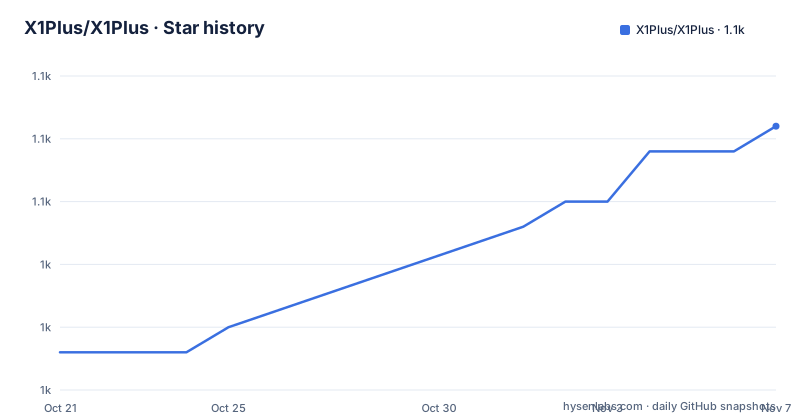
- X1Plus/X1Plus1,053 ★ · +9
| Repository | 2026-10-21 | 2026-11-07 |
|---|---|---|
| X1Plus/X1Plus | 1k | 1.1k |
9 Stars in the last 17 days, measured from the daily GitHub snapshot. Compare with other projects
Editorial analysis
An overlay that patches on the printer, not a redistribution
X1Plus is custom firmware for Bambu Lab X1 and X1 Carbon 3D printers, and the description of how it works is the most careful paragraph in the project.
The core concept is that the project builds an overlay on top of the Bambu Lab firmware and replaces only the parts needed to launch X1Plus. The project says it is very careful not to redistribute any of Bambu Lab's IP directly, and that when it is necessary to use or patch Bambu Lab binaries, they are downloaded directly from Bambu Lab servers and then patched on the printer.
That is a significant constraint, and it is the difference between this and a firmware fork. The vendor binaries are downloaded directly from Bambu Lab servers and patched on board the printer, so the shipped artefact contains patches and replacements rather than a complete modified system image.
The second constraint is the fail-safe one. The project tries to leave the printer in a fail-safe state by modifying as little of the on-printer flash as possible. For a device that is a manufacturing tool, a bricked printer is a much worse outcome than a bricked computer, and the design reflects that.
The result is a `.x1p` file, which the documentation describes as just a zip file with an `info.json` in it, and which the installer finds on the SD card and asks the user which one to install. The releases follow that scheme, with tags named `x1plus/3.1` and `x1plus/3.0`.
The licence is a custom one that GitHub cannot classify, with the terms in the LICENSE file at the root, and the primary language is Python, which is the scripting language the build tooling uses.
The build needs a key pulled off a live printer
The build instructions are unusual, and the reason is stated before the steps.
The easiest way to get started building X1Plus is in a Docker container. You can probably build it on any old Linux machine, but if you do that and it breaks, the project does not want to hear about it, so you really should just build it in Docker. And you will need the filesystem decryption key from a live printer, running either X1Plus or the official rootable firmware, in order to build X1Plus.
That key requirement is the hard constraint, and it explains the ordering of the instructions. The first step is to copy a `getkey` binary over to the printer, and the second is to retrieve the key and append it to `localconfig.mk`.
On Windows you would need to install the Windows Subsystem for Linux, with `wsl --install` and then `wsl -d Ubuntu`. Then the transfer to the printer is a `scp` of `scripts/getkey` to `/tmp`, and the retrieval is an `ssh` into the printer running `/tmp/getkey` with the output appended to `localconfig.mk`.
The Makefile confirms the shape of the build. It includes `localconfig.mk` if present, exports `UPDATE_KEY_MATERIAL`, and every make invocation is checked for a `REQUIRED_X1PLUS_DOCKER_ENV_VERSION` of 3, with an explicit error if you are building inside Docker with a mismatched environment, telling you to rebuild your Docker environment with `docker build -t x1plus scripts/docker/`. The key material is not optional in the build, it is a required input, and the Makefile version check exists because the Docker environment and the checked out branch have to agree.
So the build is reproducible only for someone with the key, and the Docker image pins the environment version that the branch expects.
Building in Docker, and the Apple Silicon problem
The build sequence is short once the key is in place, and the platform instructions are duplicated deliberately.
You clone down the repository and build the Docker image from the Dockerfile in `scripts/docker`:
$ git clone ...
$ cd X1Plus
$ docker build -t x1plusbuild scripts/docker/
And on ARM or Apple Silicon you need to add the platform flag, which means using `docker buildx build --platform=linux/amd64` instead of `docker build`.
Then the container has to run interactively, because the next step configures git inside it and that has to persist for the session. The reason is stated: in order to `make` on the Docker container a safe directory must be added to the git config, and as that will only persist for one run the container must be run in interactive mode. The run command mounts the working directory at `/work`:
$ docker run -dit -v `pwd`:/work --name x1plusmake x1plusbuildwith the `--platform=linux/amd64` flag prepended for Apple Silicon.
Then you exec in and run the make commands, which differ by platform. On macOS the container runs as root and the safe directory is added with a git config command inside the container, followed by `make scripts` and `make`. On Linux the same commands are run with the user id flag so the files in the mounted directory end up owned by you rather than by root, and the git config command is run directly rather than through an exec into the running container.
The difference in user mapping between the two is the detail that matters most in practice, because a Docker build that writes root-owned files into your working directory is a common and annoying failure.
With some luck you get a `.x1p` file in your working directory, and you find its name with a `docker exec` running `ls /work | grep .x1p`.
Installing the image and the printer menu
The last steps of the install are the ones with the most risk, and the documentation is careful about them.
The `.x1p` file is copied out of the container with `docker cp x1plusmake:/work/<somefilename>.x1p`, and then scp'd to the printer's SD card:
scp <somefilename>.x1p root@<printer’s IP>:/sdcardThe instruction that follows is the one to read twice. Never remove an SD card from a live X1Plus system, you goofball. The SD card is where the installed image lives, so pulling it out of a running system is how you end up with a printer that does not boot.
Then you reboot the printer and install X1Plus from the menu. The setup GUI finds the `.x1p` images on the SD card and asks which one to install.
Finally, the documentation says not to forget to stop your Docker container, with `docker stop x1plusmake`. The build container is not part of the runtime, so leaving it running is just a wasted process, but the reminder exists because it is easy to forget after a long build.
For users rather than developers, the project points to the wiki, which tells you everything you need to know about installing and using X1Plus on your printer, and the rest of the README is described as boring stuff for really big nerds who want to develop X1Plus.
The release history is short and recent. The tags are x1plus/3.0 from June 2025, x1plus/3.1_rc1 from August 2025, and x1plus/3.1 from August 2025, with the last push to the repository on 2026-09-28.
How the boot sequence actually works
The section on how X1Plus works from the printer's perspective is the most technical part of the documentation, and it walks through three stages.
The host-side installer is an Electron app that wraps all the logic to check whether the printer is running a supported version of the base firmware, and that wraps the mechanics of logging into the printer over MQTT, over FTP, and over SSH. The parenthetical about development versions is telling: in development versions of X1Plus that relied on exploits to install, the PC-side installer was somewhat more complicated. So the current design has a normal login path, and the earlier work used a different, more intrusive one.
The installer copies an `.x1p` image to the SD card, along with a small tarball containing the on-printer install GUI stub. It SSHes to the printer, unpacks the tarball into `/userdata` on the printer, and runs a first-stage installer launch script, and then it waits for MQTT messages that indicate the progress of the installation.
The first-stage install scripts, in `installer-clientside/stage1/x1plus/launch.sh`, first shut down the printer's service checker, otherwise the GUI would get restarted, and then shut down the GUI. They drop a marker for the host-side installer to indicate that it has started up, and then relaunch the printer's GUI engine with X1Plus's setup GUI injected into it to replace the normal printer GUI.
The X1Plus setup GUI is the third stage, and the project is careful here, saying the precise mechanism by which code is injected into the GUI is interesting but getting ahead of the discussion. It is implemented in QML, with `bbl_screen-patch/kexec_ui/printerui/qml/Screen.qml` as the initial item, and the C++ native components live in `bbl_screen-patch/interpose.cpp`.
So the chain is an Electron app on your desktop talking over MQTT, FTP, and SSH to a stage 1 script on the printer, which replaces the printer's own GUI with a QML setup screen, which then installs the overlay.
The repository layout backs this up with directories named for each stage: `installer-clientside/`, `installer/`, `bbl_screen-patch/`, `initramfs/`, `internal-fs/`, `fat32-boot-fs/`, `kexec-mod/`, `kexec-tools/`, `boot_logo/`, `sd_watchdog/`, `firmwares/`, `prebuilt/`, and `scripts/`.
Editorial conclusion
X1Plus fits a Bambu Lab X1 owner who wants to run their own firmware on the printer and is prepared to follow a build and install procedure involving a Docker image, an SD card, and a filesystem decryption key pulled from a live printer. It is the wrong choice if you want a supported product with a warranty, and it is the wrong choice if you cannot obtain that key or run the Linux and Docker toolchain. Check three things before you start: that you can extract the filesystem decryption key from a live printer running either X1Plus or the official rootable firmware, since the build needs it, that you are on an x86-64 machine or are prepared to build with the linux/amd64 platform flag, and that you read the warning about UI changes before you pull, because the project says a git pull without understanding the UI work can leave you with a nasty surprise.
Frequently asked questions
What is X1Plus and what kind of firmware is it?
X1Plus is custom firmware for Bambu Lab X1 and X1 Carbon 3D printers. It is an overlay on top of the Bambu Lab firmware, replacing only the parts needed to launch X1Plus, and the project is careful not to redistribute any of Bambu Lab's intellectual property, downloading the vendor binaries directly from their servers and patching them on the printer instead.
What do I need to build X1Plus?
The easiest route is the Docker container built from the Dockerfile in `scripts/docker`, and you will need the filesystem decryption key from a live printer running either X1Plus or the official rootable firmware. On Windows you need the Windows Subsystem for Linux, and on ARM or Apple Silicon you must build with the linux/amd64 platform flag.
How do I install X1Plus on the printer?
You copy the `.x1p` file out of the container, scp it to the printer's SD card, reboot the printer, and install X1Plus from the menu, where the setup GUI finds the available `.x1p` images and asks which to install. The documentation warns never to remove the SD card from a live X1Plus system.
How does the X1Plus installer reach the printer?
The host-side installer is an Electron app that checks the printer's base firmware version and logs in over MQTT, FTP, and SSH. It copies the `.x1p` image to the SD card, unpacks an install GUI stub into `/userdata` on the printer, runs a first-stage launch script that shuts down the service checker and the GUI, and then waits for MQTT messages reporting installation progress.
Official sources
Add this badge to your README
If you maintain this project, the badge below links readers to this analysis and shows its maintenance status from the daily GitHub snapshot. Paste the markdown into your README; add ?metric=license or ?metric=stars to the image URL for a different field.

[](https://hysenlabs.com/projects/x1plus-x1plus)Star history chart for your README
[](https://hysenlabs.com/projects/x1plus-x1plus)Was this useful?