klipper-led_effect puts LED animations on a Klipper printer, with a beta label
LED effects plugin for klipper
At a glance
- What is it?
- This is a standalone Klipper module that runs effects and animations on addressable LEDs such as Neopixels, WS2812 and SK6812. It installs by linking one Python file into the Klipper extras directory, and the author labels it work in progress in beta state.
- Who is it for?
- Adopt klipper-led_effect if you already run Klipper on a printer with addressable LEDs and you want chamber lighting, status indication or bed glow driven by printer state rather than a separate controller. Do not adopt it for a machine where LED behaviour is safety relevant, since the author describes the module as work in progress in beta state and takes no responsibility for damage.
- Can I use it commercially?
- Yes, with conditions. GPL-3.0 is a copyleft licence: if you distribute software that includes it, you must release that software's source code under the same licence. Running it internally without distributing it does not trigger that obligation.
- Is it still maintained?
- Yes. The repository last received commits 161 days ago.
- What is it written in?
- Mainly Python, according to GitHub's language statistics.
Answers come from the project's GitHub data, last synced on November 7, 2026, and from our analysis. They are not legal advice.
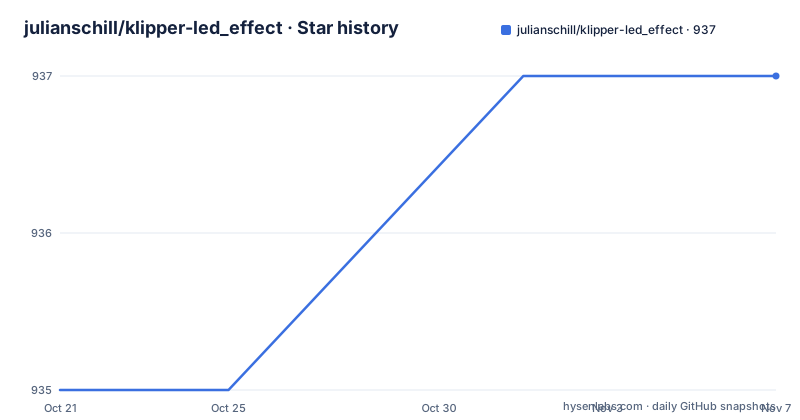
Star history
- julianschill/klipper-led_effect937 ★ · +2
| Repository | 2026-10-21 | 2026-11-07 |
|---|---|---|
| julianschill/klipper-led_effect | 935 | 937 |
2 Stars in the last 17 days, measured from the daily GitHub snapshot. Compare with other projects
Editorial analysis
One Python file linked into Klipper's extras directory
The whole integration point is a single file. The README's manual installation instructs you to stop Klipper, then link the module into the Klipper directory, adjusting the paths as needed.
ln -s klipper-led_effect/src/led_effect.py ~/klipper/klippy/extras/led_effect.pyThat path is the mechanism, not an implementation detail. Klipper loads its extra modules from the klippy/extras directory, so a symbolic link to led_effect.py is all it takes for the printer firmware to pick up the effects. The link rather than a copy is deliberate: it means a git pull in the cloned repository updates the running module without a reinstall step.
The repository is organised around that. The src/ directory holds the module source, install-led_effect.sh is the installer, docs/ holds the configuration documentation at docs/LED_Effect.md, file_templates/ holds the files the installer drops into place, and there is a simulator/ directory for working on the effects away from hardware. The examples/ directory contains a Voron_Stealthburner configuration, which is a case where the LEDs sit on a toolhead rather than in a chamber.
This is a module for a specific piece of firmware, not a general LED driver. Adopting it means adopting Klipper's module conventions, and it only works if your printer already runs Klipper.
Addressable LEDs only: Neopixels, WS2812 and SK6812
The scope of the module is stated in one sentence: it allows Klipper to run effects and animations on addressable LEDs, such as Neopixels, WS2812 or SK6812.
The word addressable is the constraint that matters. An addressable strip has a controllable pixel per data channel, so the software can set colour and brightness independently on each LED and produce animations. The three names in that sentence are the common chip families in the hobbyist market, and the module targets that class of hardware.
That means the module is the wrong tool for a plain analogue strip, a simple backlight, or a printer with LEDs wired as fixed indicators with no data line. There is no PWM dimming path or fixed-colour fallback described anywhere in the documentation. If your printer has a single bi-colour LED for status, this module gives you nothing to work with.
It is also worth being clear about what the module is not. It is not a lighting controller in the sense of a board that runs effects on its own, and it is not a general purpose LED library. The effects are driven by Klipper, which means the state that drives them is printer state: temperatures, print progress, tool activity, and whatever you expose through the configuration. The per-effect definitions live in the configuration you write, and the full list of what you can define is in docs/LED_Effect.md.
The module file name is led_effect.py, which follows Klipper's convention for module files. That single file is where the entire integration lives.
The install script, its three parameters, and why layout matters
There are two installation routes, and the scripted one comes first.
cd ~
git clone https://github.com/julianschill/klipper-led_effect.git
cd klipper-led_effect
./install-led_effect.sh
The script installs the module into an existing Klipper installation. If your directory structure differs from the usual setup, the script takes parameters for the Klipper path, the service name and the configuration path.
./install-led_effect.sh [-k <klipper path>] [-s <klipper service name>] [-c <configuration path>]That parameter list is the clearest statement of how variable Klipper installations are in the wild. A Klipper install can live in a user directory, a system directory or a custom one, the service can be named differently depending on the distribution, and the configuration directory can be elsewhere. A script that assumes the default layout will fail on exactly the machines that need it most.
The scripted route also handles the Moonraker side. The README asks you to add an updater section to moonraker.conf so you receive updates, and to restart moonraker afterwards.
[update_manager led_effect]
type: git_repo
path: ~/klipper-led_effect
origin: https://github.com/julianschill/klipper-led_effect.git
is_system_service: False
The is_system_service: False line matters, because it tells Moonraker that the update is a git repository of files rather than a service it should restart. With that section in place, Moonraker can pull the repository when you change something, and the symbolic link means the running Klipper picks up the new code.
Beta state, and the author's own warning about damage
The README carries a disclaimer section that is worth reading before anything else. It says the project is work in progress and currently in beta state, and it says plainly: I don't take any responsibility for any damage that happens while using this software.
That is unusual to see stated so directly in a project README, and it is a fair description of the risk. An effect module drives current through LEDs on a machine that also has heated beds and hotends. A bug that leaves a strip lit at full brightness, or sets colours on a channel the machine does not expect, is a hardware risk rather than a software one.
The author's expected maintenance level follows from the same disclaimer and from the support section. Questions and support go to the Q&A section on the repository Discussions page, bugs and feature requests go to issues, and the author asks that people who want direct support or want to help by testing or contributing reach out on the Klipper or Voron Discord servers.
The release tags tell their own story. The listed versions are v0.0.19 released on 2026-03-16, v0.0.18 released on 2026-03-16, and v0.0.16 released on 2025-10-25. Version numbers in the zero series, two releases on the same day, and a gap of several months between v0.0.16 and v0.0.18 together suggest a project released as needed rather than on a schedule.
The last push to the repository was on 2026-05-30, and the repository is not archived. So there is recent work in the tree, but the author has not committed to a release cadence.
Removing it cleanly, including the Moonraker section
Uninstalling is documented with the same care as installing, which is unusual for a project this small and suggests the author has dealt with the consequences of a half-removed module.
The order matters. The README says to remove all led_effect definitions in your Klipper configuration and the updater section in the Moonraker configuration first, and only then run the script to remove the link.
cd ~
cd klipper-led_effect
./install-led_effect.sh -u
The same three parameters apply to the uninstall form.
./install-led_effect.sh -u [-k <klipper path>] [-s <klipper service name>] [-c <configuration path>]If that fails, the fallback is to delete the link by hand.
rm ~/klipper/klippy/extras/led_effect.pyFinally the cloned repository itself can go.
cd ~
rm -rf klipper-led_effect
That last step is marked optional in the README, which makes sense given the update manager configuration: if you leave the Moonraker updater section in place but delete the repository, the update check will fail on a path that no longer exists. Removing the configuration first, as instructed, avoids that.
One thing the README does not spell out is what happens to a Klipper install where the file was copied rather than linked, since the manual instructions use a symbolic link and the script's behaviour with an existing file is not described. If you are unsure, check for the link with ls before you remove anything.
Where this module is the wrong choice
Three situations make this the wrong tool, and the first two are about the hardware rather than the software.
If your printer's LEDs are not addressable, there is nothing to drive. The module's entire premise is per-pixel control over Neopixels, WS2812 or SK6812 strips, so a fixed two-colour status LED or a simple backlight is out of scope.
If you are not running Klipper, the module is irrelevant. It loads through Klipper's extras mechanism and it is updated through Moonraker's update manager, so a stock Marlin or OctoPrint setup gets nothing from it. The same applies in reverse: someone who runs Klipper but wants a self-contained lighting controller will find this module always dependent on the printer host.
The third situation is the one the author warns about. In beta state, with an explicit disclaimer about damage, this is not something to wire into a machine where an LED fault has consequences beyond an irritating glow. The project does not describe any failure behaviour, watchdog or current limiting, so there is nothing in the documentation you can point to as a guarantee about what the module does when printer state goes wrong.
A reasonable middle path exists for cautious users, and the repository supports it directly. The simulator/ directory lets you work on effects without hardware, and the examples/ directory, with its Voron_Stealthburner configuration, shows a complete worked case rather than an abstract snippet. Between those two, you can see what an effect does before you attach a strip to a machine that also heats plastic.
How this differs from running an LED controller on its own
The usual alternative to a printer-integrated LED module is a separate controller, either a small microcontroller board running its own effect engine, or a lighting product that cycles on its own schedule. The difference in approach is where the trigger comes from.
A standalone controller owns its own logic and its own timeline. It lights up when it is powered, cycles colours on a timer, and knows nothing about the printer. The result is that an LED bar over the printer glows the same whether the machine is printing, idle, paused or crashed.
klipper-led_effect inverts that. The effects are configured inside Klipper and driven by printer state, so the light can represent what the machine is doing. The examples directory shows a case where the LEDs sit on a Voron toolhead, which is a device where light tied to actual motion and tool activity is the point rather than decoration.
The cost of that inversion is coupling. The module is bound to Klipper's module system, its configuration language and Moonraker's update mechanism, and it lives inside the printer host's Python tree. The benefit is that there is one source of truth for the printer state, so the lighting does not need its own communication channel, its own wiring beyond the data line, or its own configuration format.
There is also a middle option worth naming honestly. The repository's simulator/ directory means effect logic can be developed and previewed outside the printer, which is what makes the Klipper-native approach testable without committing hardware. A standalone controller offers that same independence permanently, at the cost of the state coupling.
Editorial conclusion
Adopt klipper-led_effect if you already run Klipper on a printer with addressable LEDs and you want chamber lighting, status indication or bed glow driven by printer state rather than a separate controller. Do not adopt it for a machine where LED behaviour is safety relevant, since the author describes the module as work in progress in beta state and takes no responsibility for damage. Before installing, read docs/LED_Effect.md for the effect definitions and confirm that your Klipper directory layout matches the paths the install script assumes, because the script accepts -k, -s and -c parameters precisely because layouts vary.
Frequently asked questions
How do I install klipper-led_effect on a Klipper printer?
Clone the repository and run ./install-led_effect.sh from inside the cloned directory. The script accepts -k, -s and -c parameters for the Klipper path, the service name and the configuration path if your layout differs.
What kinds of LEDs does klipper-led_effect support?
It is for addressable LEDs, with Neopixels, WS2812 and SK6812 named in the README. Fixed or analogue strips are not covered by the module.
How do I remove the klipper-led_effect module?
First remove all led_effect definitions from your Klipper configuration and the updater section from moonraker.conf, then run ./install-led_effect.sh -u from the cloned repository. If that fails, delete ~/klipper/klippy/extras/led_effect.py manually.
How do I get updates for klipper-led_effect?
Add the update_manager section to moonraker.conf with type: git_repo, the path to your clone and the origin URL, set is_system_service: False, then restart moonraker.
Is klipper-led_effect suitable for production printers?
The README describes the project as work in progress in beta state and states that the author takes no responsibility for damage while using it. It is best treated as an experiment on hardware you can afford to rewire.
Official sources
Add this badge to your README
If you maintain this project, the badge below links readers to this analysis and shows its maintenance status from the daily GitHub snapshot. Paste the markdown into your README; add ?metric=license or ?metric=stars to the image URL for a different field.

[](https://hysenlabs.com/projects/julianschill-klipper-led-effect)Star history chart for your README
[](https://hysenlabs.com/projects/julianschill-klipper-led-effect)Was this useful?