ensure is hard, encourage is soft, and where filters the quantifier
Create beautiful diagrams just by typing notation in plain text.
At a glance
- What is it?
- Penrose is a diagram language that compiles plain-text Domain, Substance and Style programs into a picture, with a layout solver that takes hard constraints and soft preferences. The set theory example in the README fits on one page and declares three predicates, seven sets and a style block. The repository is an Nx and Lerna monorepo with a Nix flake and a mem-bench directory.
- Who is it for?
- Take Penrose when you want a diagram generated from a description rather than drawn by hand, and you are willing to write three programs instead of moving shapes, because the layout you get is the one the solver found rather than one you placed. Leave it if you need predictable pixel positions, since layer and the canvas size are the only layout controls the README's example shows.
- Can I use it commercially?
- Yes. MIT is a permissive licence: you can use, modify and sell software built on it, as long as you keep its copyright and licence notices.
- Is it still maintained?
- Yes. The repository last received commits 16 days ago.
- What is it written in?
- Mainly TypeScript, according to GitHub's language statistics.
Answers come from the project's GitHub data, last synced on November 21, 2026, and from our analysis. They are not legal advice.
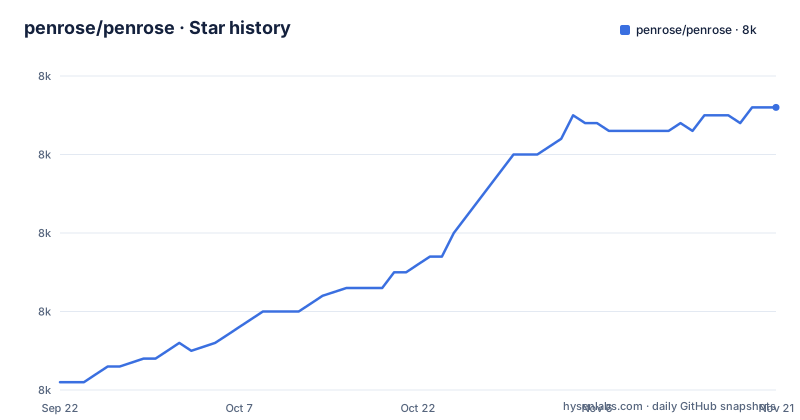
Star history
- penrose/penrose8,016 ★ · +35
| Repository | 2026-09-22 | 2026-11-21 |
|---|---|---|
| penrose/penrose | 8k | 8k |
35 Stars in the last 60 days, measured from the daily GitHub snapshot. Compare with other projects
Editorial analysis
The whole example is three programs, and each one has a job
The README's worked example is a set theory diagram, and the whole thing is three blocks of plain text. The first is called setTheory.domain and it is a type system:
type Set

predicate Disjoint(Set s1, Set s2)
predicate Intersecting(Set s1, Set s2)
predicate Subset(Set s1, Set s2)
One type, three predicates, no data.
The second is called tree.substance and it is the data:
Set A, B, C, D, E, F, G

Subset(B, A)
Subset(C, A)
Subset(D, B)
Subset(E, B)
Subset(F, C)
Subset(G, C)

Disjoint(E, D)
Disjoint(F, G)
Disjoint(B, C)

AutoLabel All
Seven sets, nine relations, and one line that names everything automatically instead of requiring a label per node.
The third is euler.style and it is the drawing.
The split is what makes the language worth learning. Facts live in the substance, vocabulary lives in the domain, and appearance and layout live in the style. You can redraw the same seven sets without touching the substance, and you can add a set without touching the style.
ensure is hard, encourage is soft, and where filters the quantifier
The style block is where the diagram is decided, and it uses four forms of statement.
A forall with a where clause scopes a rule to the pairs that satisfy a predicate:
    ensure disjoint(y.text, x.icon, 10)
    ensure contains(y.icon, x.icon, 5)
    layer x.icon above y.icon
Inside a Subset relation, the parent's icon must contain the child's icon and the parent's text must stay clear of it. Three statements, one predicate in the where clause.
Then there are two kinds of demand. ensure is hard, encourage is soft:
encourage norm(x.text.center - x.icon.center) == 0encourage is soft, and this line says a label would like its centre to sit on its icon's centre. The solver will try, and will accept a worse arrangement rather than fail.
That distinction is the whole design. Hard constraints narrow the space of valid layouts, soft ones pick among what survives, and the layer statement sets z-order explicitly rather than letting overlap decide.
One detail the README leaves open: the example is presented with a variation called MonsoonCaterpillar95943, and nothing on the page explains what a variation selects or how you choose one.
AutoLabel All replaces naming every node by hand
One line in the substance block does more work than it looks.
AutoLabel All tells the system to derive a label for every node rather than requiring one in the source.
The style block shows where labels get their appearance. Inside a forall over every Set, the shape assignments are:
    shape x.icon = Circle { }
    shape x.text = Equation {
      string : x.label
      fontSize : "32px"
    }
So an icon is a Circle and a text is an Equation whose string comes from the node's own label field, at a font size of 32px. And the layout is stated as one containment constraint, one relationship and one layering:
encourage norm(x.text.center - x.icon.center) == 0with the text layered above the icon.
The canvas size is declared the same declarative way, at the top of the style block:
  canvas {
    width = 800
    height = 700
  }
Eight hundred by seven hundred is the entire output configuration in the whole example.
The first thing the README tells you to do requires no installation
The usage section is three links and the first one is the important one.
You can try Penrose in your browser at penrose.cs.cmu.edu/try/index.html, and the README says this needs no installation. For a step by step introduction there are tutorials at penrose.cs.cmu.edu/docs/tutorial/welcome, and for reference-style material there is documentation at penrose.cs.cmu.edu/docs/ref.
So the evaluation path is a URL, not a build. For a language whose cost of adoption is the time it takes to learn, that is the right order: type the three programs in a page, see the picture, and only then decide whether the language is worth a toolchain.
For a project whose stated goal is to make it easy for non-experts to create and explore high quality diagrams and to democratize the process of creating visual intuition, an in-browser trial is the load-bearing part of the design rather than a convenience. The published package on npm is @penrose/core, which is what the badge at the top of the page points at, but the README's own first instruction is not to install anything.
Nx runs the build, Lerna runs the version, and Yarn holds the lockfile
The build tooling in the root package.json is three tools layered on top of each other, and the scripts show which does what.
Nx is the task runner. A build is:
nx run-many --targets=build,bundle --verboseand there are named targets for the pieces: build:roger for the roger package, build:docs-site for the documentation site, build:ide for the editor, and a start script that runs the editor in watch mode. Lint is scoped to two projects rather than the whole tree, and coverage runs only against core.
Lerna is the version tool, and its script is deliberately conservative:
lerna version --conventional-commits --no-git-tag-version --no-pushNo tag and no push, which means the release process is split from the versioning step on purpose. There is also a lerna diff script.
And the workspace is declared twice. There is a packages field listing packages/*, and a workspaces block with the same glob plus a nohoist list:
"nohoist": [
      "**/@types/jest",
      "**/babel-loader",
      "**/webpack"
    ]
Three packages pinned against hoisting. The lockfile at the root is a yarn.lock, so Yarn is what actually installed this; nohoist is a Yarn workspaces option.
A Node 18 or 20 range, vitest 0.31, and Nx 15
The declared floor in the root package.json is a range rather than a minimum:
"engines": {
    "node": "^18.12.0 || >=20.9.0"
  },
So Node 18.12 or anything from 20.9 upwards. That reads as a deliberate accommodation of the Node 18 and 20 divide rather than an oversight, and it is worth checking against your CI image before you clone rather than after.
The test and formatting stack is from the same period. Tests run through vitest at ^0.31.1 with @vitest/coverage-c8 and @vitest/ui, prettier is pinned to exactly 3.0.0 with an organize-imports plugin, and TypeScript is ^5.1.6. The task runner is nx at ^15.4.2 and the version tool is lerna at ^3.22.1.
Two entries outside package.json are worth noticing. flake.nix and flake.lock are at the root, so the repository has a Nix development environment, and .python-version is there too. mem-bench/ is also a top-level directory.
v3.2.0 in 2023, v3.3.0 in 2025, v3.3.1 in 2026
The release history has an unusual shape and it is three dates long.
v3.2.0 was published on 2023-08-08. v3.3.0 came on 2025-09-28, more than two years later. Then v3.3.1, a patch release, was published on 2026-08-30, almost another year after that. The last push to the default branch, main, was on 2026-10-31.
So the pattern is a long gap, a minor release, and then a patch nearly a year afterwards. That reads like a project whose feature work lands in bursts and whose maintenance lands separately.
The licence is MIT, the contributing route is a CONTRIBUTING.md file, and the package is published as @penrose/core on npm. The README itself is short, and the substance of the project lives in the example plus the documentation site, which for a language project is arguably the correct allocation.
Editorial conclusion
Take Penrose when you want a diagram generated from a description rather than drawn by hand, and you are willing to write three programs instead of moving shapes, because the layout you get is the one the solver found rather than one you placed. Leave it if you need predictable pixel positions, since layer and the canvas size are the only layout controls the README's example shows. Verify three things. Open penrose.cs.cmu.edu/try/index.html before anything else, because the README points at a browser version that needs no installation. Read the Style program rather than the Substance one, because the ensure and encourage lines are where the diagram is actually decided. And check your Node range, since the root package.json declares ^18.12.0 or 20.9.0 and later, and the project is at v3.3.1 with the minor release before it landing in September 2025.
Frequently asked questions
What is Penrose?
A platform for creating diagrams by typing notation in plain text. The stated goal is to make it easy for non-experts to create and explore high quality diagrams and get deeper insight into challenging technical concepts. A diagram is specified by a trio of Domain, Substance and Style programs, and there is a browser version at penrose.cs.cmu.edu/try/index.html that needs no installation.
How do I write a Penrose diagram?
Three programs. The Domain declares types and predicates, for example type Set and predicate Subset(Set s1, Set s2). The Substance declares the actual instances and their relations, such as Set A, B, C and the Subset and Disjoint calls between them. The Style declares shapes and constraints, for example shape x.icon = Circle { } and an ensure that one shape contains another.
What is the difference between ensure and encourage in Penrose?
ensure is a hard constraint and encourage is a soft one. The README's style block uses encourage norm(x.text.center - x.icon.center) == 0 to pull a label onto the centre of its icon, while using ensure contains(x.icon, x.text) to require that the text actually fits inside the icon. Hard constraints narrow the valid layouts, soft ones choose among what survives.
What is a variation in Penrose?
The README's set theory example is presented with the variation MonsoonCaterpillar95943, and the README itself does not explain what a variation selects or how to choose one.
How do I build Penrose from source?
The repository is an Nx and Lerna monorepo over packages/*, with a Yarn lockfile at the root. A build runs nx run-many across the build and bundle targets, there are separate targets for the roger package, the documentation site and the editor, and the default start script runs the editor in watch mode. The declared Node range is ^18.12.0 or 20.9.0 and later.
Official sources
Add this badge to your README
If you maintain this project, the badge below links readers to this analysis and shows its maintenance status from the daily GitHub snapshot. Paste the markdown into your README; add ?metric=license or ?metric=stars to the image URL for a different field.

[](https://hysenlabs.com/projects/penrose-penrose)Star history chart for your README
[](https://hysenlabs.com/projects/penrose-penrose)Was this useful?