mousemaster, driving the mouse from the keyboard on Windows and macOS
Mouseless mouse control and advanced keyboard customization for Windows and macOS.
At a glance
- What is it?
- mousemaster is a Java tool that moves the pointer with the keyboard, remaps keys and shows hint overlays, with six ready-made layouts and a properties file for each. It ships as a portable Windows executable, and on macOS it is unsigned, needs Karabiner, and runs as root.
- Who is it for?
- mousemaster suits someone who wants to work without a mouse, has a keyboard-centric workflow already, and is willing to spend an afternoon adapting a layout. It does not suit a user who wants the system pointer to behave normally, and on macOS it is explicitly a new and untested port.
- Can I use it commercially?
- Not without permission. GitHub finds no licence file in the repository, and without a licence all rights are reserved by default: you may read the code but not reuse it. Check the README, or ask the authors, before using it.
- Is it still maintained?
- Yes. The repository received new commits within the last day.
- What is it written in?
- Mainly Java, according to GitHub's language statistics.
Answers come from the project's GitHub data, last synced on November 7, 2026, and from our analysis. They are not legal advice.
Star history
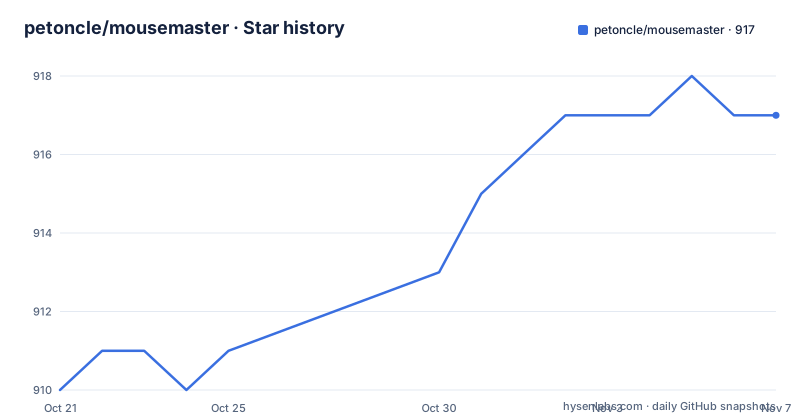
- petoncle/mousemaster917 ★ · +7
| Repository | 2026-10-21 | 2026-11-07 |
|---|---|---|
| petoncle/mousemaster | 910 | 917 |
7 Stars in the last 17 days, measured from the daily GitHub snapshot. Compare with other projects
Editorial analysis
A pointer you drive with the keyboard
mousemaster lets you control your mouse from the keyboard and remap your keys, on Windows and macOS. The project describes itself as mouseless mouse control and advanced keyboard customization, and it lists accessibility and ergonomic topics among its repository tags.
The design is a layered one. You move the pointer with a few keys, and the tool overlays a grid or a set of hints over the screen so you know where the pointer is and what is under it. The demos in the README show a hint grid, a recursive hint grid, UI hints, a recursive grid and continuous mouse movement.
The project says it is heavily inspired by warpd, mouseable, neru and kanata, which is a useful map of the design space: warpd and mouseable are keyboard-driven pointer schemes, neru is a recursive hint approach, and kanata is a keyboard remapping tool. mousemaster combines the pointer control and the remapping in one Java application.
The primary language of the repository is Java, and the tree shows a Maven build with pom.xml, mvnw and mvnw.cmd, plus separate windows/ and macos/ directories for the two platforms, a configuration/ directory for the shipped layouts, and docs/ for the per-layout documentation. Linux is not supported yet, and the README carries a badge asking for help on Linux, which tells you where the remaining work is.
The layout files are the real interface
Six configuration files are published alongside the releases, and choosing one is the first decision you make. Each has its own documentation page in docs/.
neo-mousekeys-ijkl.properties is the recommended one, an IJKL configuration. neru.properties is a recursive hint configuration. neo-mousekeys-wasd.properties is a WASD configuration. warpd.properties and mouseable.properties are both HJKL configurations. author.properties is an IJKL configuration designed to control everything with the right hand only.
The naming tells you the shape of each: the letters are the movement keys, and the suffix distinguishes the layout from the ones it is derived from. Two HJKL files with the same movement keys exist because they come from different projects with different conventions, and the recursive hint configuration is a different interaction model rather than a different key set.
The differences are documented per file rather than assumed, which is the right way round. A layout that assumes you hold a modifier to slow down, one that has a screen-selection mode, and one that is built around recursive hints will feel very different in practice, and reading the key table for the file you picked is faster than learning by trial and error.
Windows is the portable executable and a renamed properties file
The Windows install is five steps and needs no installer. Download mousemaster.exe, a portable executable, from the release page or build it from source. Download one of the existing configuration files from the same release page. Place the executable and the configuration file in the same directory. Rename the configuration file to mousemaster.properties. Run mousemaster.exe.
The rename is the one step that is easy to miss and that stops the tool from starting, since the tool looks for a file with that exact name in the directory it is run from.
There is one privilege note. You should make sure to run it as administrator if you want the mousemaster overlay to be displayed on top of everything else, so the hint grid appears above full-screen applications rather than being hidden behind them.
The README also tells you where to go next if the shipped layouts do not fit. Open a GitHub issue or join the Discord if you need help creating your own configuration, and the maintainer says explicitly that ideas for better configurations are welcome.
The Windows path is the mature one. It is a single portable binary with no driver and no install, which is a much lower bar than the macOS setup.
macOS means an unsigned app, a driver and root
macOS support is new and testers are wanted, and the README asks you to report what does and does not work in an issue. The setup is described as more involved than it should be, for a specific reason: mousemaster is not signed or notarized, because that needs an Apple developer account the maintainer does not have, so macOS treats the app as unidentified and it has to be allowed by hand.
The keyboard is read through the Karabiner virtual HID device, so Karabiner-Elements has to be installed and its system extension allowed, and the app is then run from a terminal as root, because the virtual HID device requires it. The configuration is read from the working directory, so the run command has to change directory first:
cd /Applications && sudo mousemaster.app/Contents/MacOS/mousemasterThe download and quarantine steps are also spelled out:
curl -L -o mousemaster-macos.zip https://github.com/petoncle/mousemaster/releases/latest/download/mousemaster-macos.zip
unzip mousemaster-macos.zip -d /Applications
The README warns that downloading the archive in a browser marks the app as quarantined, and macOS refuses to start a quarantined app that is not notarized, so the quarantine attribute has to be cleared before the first run:
xattr -dr com.apple.quarantine /Applications/mousemaster.appThe alternative is to let macOS refuse the app once and then use the Open Anyway button under System Settings, Privacy & Security, Security. Either way, the gatekeeping is manual.
Permissions are granted to the terminal, which is the detail to plan for
The macOS permission list is short and each entry is conditional. You grant the permissions macOS asks for under System Settings, Privacy & Security, and there is one subtlety: they are granted to the terminal you run mousemaster from rather than to mousemaster itself, so they survive replacing mousemaster.app with a new build. The README tells you to quit and reopen that terminal after granting, then run mousemaster again.
The permissions are Input Monitoring, to read the keys you press, which is always needed. Accessibility is only for UI hints, that is, for the hint.type=ui setting. Screen Recording is only for zoom, that is, for the mode.zoom setting.
That conditional structure is the useful part, because it means a basic pointer-control setup asks for the minimum. Input Monitoring is unavoidable for a keyboard-driven tool, but the two more invasive permissions are tied to optional features.
The consequence for anyone running this on a managed machine is obvious enough to state: an app that reads every key you press, signed by nobody, launched with sudo, is a large ask for a corporate environment, and the tool's value has to justify that to whoever administers it.
Grid, hints and the modes that make pointer control practical
The recommended IJKL layout shows what the interaction model looks like in practice, and it is worth reading the key list in full because the modes are the substance of the tool.
The layout activates with leftalt plus e, or leftalt plus capslock, and deactivates with q or p. Mouse movement uses i for up, j for left, k for down and l for right. The mouse buttons are mapped to semicolon for left, rightshift for middle and the apostrophe for right. Grid mode is on g, hint mode on f, recursive hint mode on r, UI hint mode on leftalt plus semicolon, and screen selection on c.
The four modes are what make keyboard pointer control usable rather than merely possible. Grid mode draws a grid over the screen so you can pick the cell the pointer should enter. Hint mode labels the elements on screen so you can jump straight to one. Recursive hint mode narrows the selection further, which is what the neru-derived configuration is built around. UI hint mode extends hints to interface elements in the application under the pointer, and it is the feature that needs the Accessibility permission. Screen selection is for dragging a region.
The feature list starts with combos and key remapping, where a combo is a key sequence, a chord, a timed hold, a tap, a tap-dance, and more. That part is the kanata-style half of the project and it matters for a different reason: once the keyboard is under program control, remapping is how you adapt the layout to the workflow rather than the other way round.
Editorial conclusion
mousemaster suits someone who wants to work without a mouse, has a keyboard-centric workflow already, and is willing to spend an afternoon adapting a layout. It does not suit a user who wants the system pointer to behave normally, and on macOS it is explicitly a new and untested port. Before you adopt it, read the configuration documentation for the layout you intend to use, since the six shipped files differ in keys and in mode, and check the licensing position, because the repository listing does not include a licence file even though the project asks for code and configuration contributions.
Frequently asked questions
What does mousemaster do on Windows and macOS?
It lets you control the mouse pointer from the keyboard and remap keys, drawing an overlay grid or hints over the screen so you can pick targets, and it runs on Windows and macOS with Linux support marked as help wanted.
How do I install mousemaster on Windows?
Download the portable mousemaster.exe from the release page, download one of the published configuration files, put both in the same directory, rename the configuration file to mousemaster.properties and run mousemaster.exe. Run it as administrator if you want the overlay to display on top of everything else.
What does mousemaster need on macOS?
Karabiner-Elements, because the keyboard is read through the Karabiner virtual HID device, and the app must be run from a terminal as root with the configuration file in the working directory. The app is not signed or notarized, so you either clear the quarantine attribute with xattr or allow it with Open Anyway under Privacy and Security.
Which configurations ship with mousemaster?
Six: neo-mousekeys-ijkl.properties, which is recommended, neru.properties for recursive hints, neo-mousekeys-wasd.properties, warpd.properties, mouseable.properties and author.properties, an IJKL layout for right-hand-only control. Each has its own documentation page under docs/.
Which macOS permissions does mousemaster ask for?
Input Monitoring, to read the keys you press, is always needed. Accessibility is only needed for UI hints with hint.type=ui, and Screen Recording only for zoom with mode.zoom. The permissions are granted to the terminal running mousemaster rather than to the app itself.
Official sources
Add this badge to your README
If you maintain this project, the badge below links readers to this analysis and shows its maintenance status from the daily GitHub snapshot. Paste the markdown into your README; add ?metric=license or ?metric=stars to the image URL for a different field.

[](https://hysenlabs.com/projects/petoncle-mousemaster)Star history chart for your README
[](https://hysenlabs.com/projects/petoncle-mousemaster)Was this useful?