raytracing.github.io: the books are free online, the source is a checking copy
Main Web Site (Online Books)
At a glance
- What is it?
- This repository publishes the three Ray Tracing in One Weekend books as HTML on a CC0 licence, with the finished C++ sources for each book and a CMake project to build them. The source is explicitly not a tutorial, the sample code is not written to be fast or exemplary, and the branch you build from is not the branch the website serves.
- Who is it for?
- Use it as a free, printable copy of the book series and as a reference to diff your own implementation against, not as a code base to extend. Build the release configuration before your final render, since the default build is unoptimized, and remember that ports to other languages are a community-maintained list rather than tested code shipped here.
- Can I use it commercially?
- Yes. CC0-1.0 is a permissive licence: you can use, modify and sell software built on it, as long as you keep its copyright and licence notices.
- Is it still maintained?
- Yes. The repository last received commits 96 days ago.
- What is it written in?
- Mainly HTML, according to GitHub's language statistics.
Answers come from the project's GitHub data, last synced on November 14, 2026, and from our analysis. They are not legal advice.
Star history
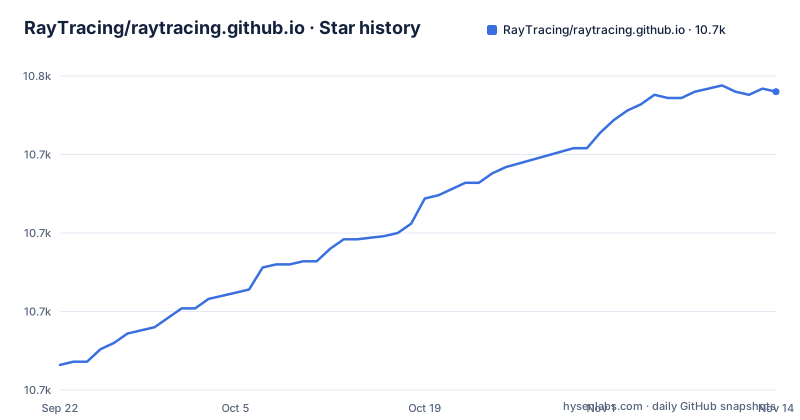
- RayTracing/raytracing.github.io10,745 ★ · +87
| Repository | 2026-09-22 | 2026-11-14 |
|---|---|---|
| RayTracing/raytracing.github.io | 10.7k | 10.7k |
87 Stars in the last 53 days, measured from the daily GitHub snapshot. Compare with other projects
Editorial analysis
The release branch feeds the website, and three dev branches carry the work
The branch model is the first thing to understand, because the branch you clone is not the branch the web site is built from. The release branch contains the latest released and live assets, and it is the branch from which GitHub Pages serves https://raytracing.github.io/. Ongoing development lives on dev-patch, dev-minor and dev-major, split by change level and by the release in progress, and the project states that it tries to keep CHANGELOG.md up to date so you can browse what is new on each development branch. Two caveats follow from that arrangement. The first is that additional development branches may appear from time to time, so the branch list is something to re-check rather than memorize, and the project points contributors at CONTRIBUTING for the current state. The second is that the changelog describes development, not necessarily what is live, so if you are following along with a book and the code in the repository does not match your chapter, checking whether you are on release or on a dev branch is the first diagnostic. The repository default branch is release, which is why a plain clone gives you the published version rather than the newest work. For print and PDF questions, the answer lives in a separate file, PRINTING.md.
cmake -B build compiles every target in debug, and --target narrows it
The build is CMake and the basic sequence is two commands from the root of the project directory:
$ cmake -B build
$ cmake --build build
That produces the debug version of every executable, which is a detail worth pausing on. Debug here means unoptimized and carrying debug symbols, so a program built this way will be slower than the same program built as release, and the difference is large enough to matter when you are rendering an image at the end of a book. There is one build-system habit the README insists on: run cmake -B build again whenever you change your CMakeLists.txt file, for example after adding a new source file, because a stale configuration is a common source of confusion. Selecting a single program is done with the target option:
$ cmake --build build --target inOneWeekendThe names you can pass are inOneWeekend, theNextWeek, theRestOfYourLife, or any of the demonstration programs, and with no target option CMake builds all of them. That naming maps directly to the three book directories under src/, so the target you want is usually the one matching the chapter you are on.
Release and Debug need different command lines on Windows and on Linux
The same two configurations require slightly different invocations depending on your toolchain, and the difference is more than cosmetic. With MSVC on Windows the configuration is chosen at build time with --config, and the binaries land in build\Release and build\Debug:
$ cmake -B build
$ cmake --build build --config Release  # Create release binaries in `build\Release`
$ cmake --build build --config Debug    # Create debug binaries in `build\Debug`
On Linux and macOS with GCC or Clang the configuration is baked in at configure time with a separate build directory per configuration, so release and debug can coexist:
# Configure and build release binaries under `build/Release`
$ cmake -B build/Release -DCMAKE_BUILD_TYPE=Release
$ cmake --build build/Release

# Configure and build debug binaries under `build/Debug`
$ cmake -B build/Debug -DCMAKE_BUILD_TYPE=Debug
$ cmake --build build/Debug
The consequence for scripting is that a build script written on Linux does not port to Windows and the other way round, since the flag name changes from CMAKE_BUILD_TYPE to --config. The recommendation on the use of these two is explicit: build and run the release version, especially before a final render, for the fastest results, unless you need the extra debug information the default debug build gives you. Optimized binaries land under build/Release and debug binaries under build/Debug, which is the path convention to expect when you go looking for the executable.
The repository says outright that its source is not a tutorial
This is the sentence that should shape how you use the project: this repository is not meant to act as its own tutorial. The source is provided so you can compare your work as you progress through the book, and the strong recommendation is to read along and follow the book to understand the code, ideally developing your own implementation as you go in order to deeply understand how a raytracer works. If you skip the book and start from src/<book>/, you get working code with none of the reasoning, which is the opposite of what the project wants. A second caveat sits in the programming language section: the book is written in C++ using some modern features of C++11, and the language and those features were chosen to be broadly understood by the largest collection of programmers. It is explicitly not meant to represent ideal, or optimized, C++ code. So the sources are a correctness reference and a teaching baseline, not a template for production graphics code, and if you need fast rendering you should expect to diverge from them. The images/ directory is there for the same reason and is described as usable to compare your results, which makes a side-by-side diff the intended verification step at the end of each book.
Four directories hold the books, the figures, the styles and the code
The layout is described as meant to be simple and self-evident at a glance, and it is. books/ holds the three raytracing books in HTML plus some supporting files, images/ holds all of the images and figures from the books and doubles as the reference set for comparing results, style/ holds the CSS for both the books and the site, and src/ holds the source, with src/<book>/ containing the final source code for each book. Everything else in the root is project furniture: CMakeLists.txt for the build, CHANGELOG.md, CONTRIBUTING.md, PRINTING.md, COPYING.txt, index.html, favicon.png and a .gitignore. Since the primary language of the repository is HTML, it is worth being clear about what that means for reading: the books are web documents, and they are described as formatted for both screen and print. That dual formatting is deliberate, which is why PRINTING.md exists as a separate guide covering printing your own copies and getting PDFs of the books.
Windows users have an eleven step CMake GUI route through Visual Studio
If you are on Windows and would rather not live in a terminal, the documented route goes through the CMake GUI and ends in Visual Studio. You open the GUI, set the source location to the copied directory, for example C:\Users\Peter\raytracing.github.io, then add a build folder inside that same location, for example C:\Users\Peter\raytracing.github.io\build, and point the binaries location at that new build directory. You click Configure, set the generator to your version of Visual Studio, click Done, click Configure again, then click Generate. From there you open the build directory in File Explorer, double click the newly created .sln project, and build in Visual Studio. Eleven steps. Two details from that flow carry over to everything else. First, the project must be successfully cloned and built before you can print an image to file from the native terminal, so the sequence is not optional. Second, whatever generator you chose is what produces your binaries, which is why the earlier MSVC and GCC or Clang invocations are not interchangeable. If the GUI path feels long, the two-line cmake command does the same work, and the difference in output directories is the only thing to keep track of.
Ports to other languages are a community list, not tested code here
The series has a long history of implementations in other languages and across different operating systems, and those implementations are gathered on a separate implementations page rather than living in this repository. The project invites people to add their own implementation to that list, which makes it a catalogue of community work maintained by additions. Two consequences follow for anyone arriving with a port in mind. First, the list is a pointer to community work, not code shipped here, and the absence of a port for your language of choice says nothing about feasibility. Second, the code you can actually build and trust is the C++ under src/, on the toolchains the CMake files are written for. If you are stuck on a port, the repository routes you to GitHub Discussions, which is described as the place for general questions about raytracing code, problems with your own implementation, and general raytracing ideas, and you can also open an issue or start a discussion directly. Contribution requests are gated the other way: if you want to send a pull request, read the contribution guidelines first. Contact details for the authors are said to be at the head of each book.
Editorial conclusion
Use it as a free, printable copy of the book series and as a reference to diff your own implementation against, not as a code base to extend. Build the release configuration before your final render, since the default build is unoptimized, and remember that ports to other languages are a community-maintained list rather than tested code shipped here. If your code and a book chapter disagree, check whether you are on the release branch or a development branch before you assume the bug is yours.
Frequently asked questions
What does ray tracing actually do?
In this project ray tracing is what the three books teach you to build from scratch in C++, with the finished code for each one in src/ under a directory per book. The repository is the online home of that book series and is not intended to work as a tutorial on its own.
What is ray tracing and how does it work?
The repository presents it as a book series rather than a library: Ray Tracing in One Weekend, Ray Tracing: The Next Week and Ray Tracing: The Rest of Your Life, published free as HTML and also formatted for print. The sources are in C++ using modern C++11 features, and you are meant to write your own implementation and compare against the provided one.
Is ray tracing good on or off?
The performance advice in this repository is about configuration rather than hardware: CMake supports release and debug builds, and the project recommends building and running the release version, especially before the final render, for the fastest results, unless you need the extra debug information the default debug build provides.
Is ray tracing nvidia only?
Nothing here depends on a particular GPU vendor. The provided sources are C++ built with CMake on Windows with MSVC or on Linux and macOS with GCC or Clang, and the README says the C++11 features were chosen to be broadly understood, so the toolchain requirements are an ordinary compiler plus CMake.
Official sources
Add this badge to your README
If you maintain this project, the badge below links readers to this analysis and shows its maintenance status from the daily GitHub snapshot. Paste the markdown into your README; add ?metric=license or ?metric=stars to the image URL for a different field.

[](https://hysenlabs.com/projects/raytracing-raytracing-github-io)Star history chart for your README
[](https://hysenlabs.com/projects/raytracing-raytracing-github-io)Was this useful?