android-emulator-runner boots an Android emulator before your tests run
A GitHub Action for installing, configuring and running hardware-accelerated Android Emulators on macOS virtual machines.
At a glance
- What is it?
- This GitHub Action installs the Android SDK components, creates an AVD, launches a hardware accelerated emulator, waits for the boot, runs your script and shuts the emulator down. The interesting part is the acceleration story, because GPU acceleration and VM acceleration are separate things, and nested virtualisation is what decides whether the fast path is available on your runner at all.
- Who is it for?
- android-emulator-runner is worth adopting if your Android tests are instrumented tests that need a device, because it removes the whole class of workflow where the emulator is installed by hand, the AVD is created by hand, and the job waits on a boot that nobody is watching.
- Can I use it commercially?
- Yes. Apache-2.0 is a permissive licence: you can use, modify and sell software built on it, as long as you keep its copyright and licence notices.
- Is it still maintained?
- Yes. The repository last received commits 74 days ago.
- What is it written in?
- Mainly TypeScript, according to GitHub's language statistics.
Answers come from the project's GitHub data, last synced on November 7, 2026, and from our analysis. They are not legal advice.
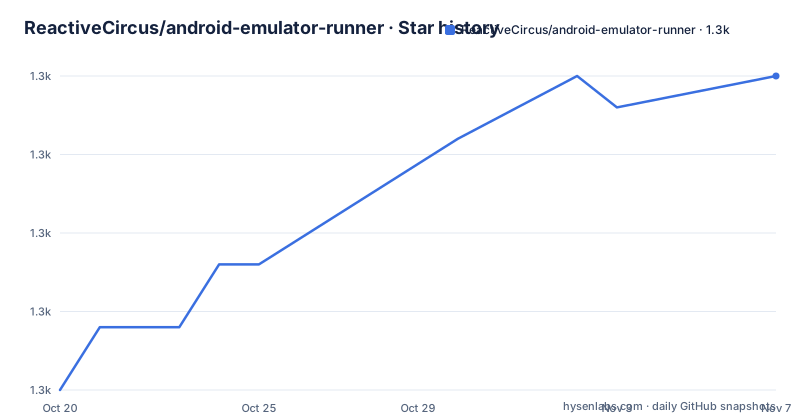
Star history
- ReactiveCircus/android-emulator-runner1,315 ★ · +10
| Repository | 2026-10-20 | 2026-11-07 |
|---|---|---|
| ReactiveCircus/android-emulator-runner | 1.3k | 1.3k |
10 Stars in the last 18 days, measured from the daily GitHub snapshot. Compare with other projects
Editorial analysis
The gap this action fills is the boot wait
The project describes itself as a GitHub Action for installing, configuring and running hardware-accelerated Android emulators on Linux and macOS virtual machines, and the repository topics are android-emulators, ci, github-actions and testing.
The reason such an action exists is that running an Android test on CI is mostly waiting. A GitHub runner starts with no Android SDK, no system image, no AVD, and no emulator. Somebody has to install the right platform and system image for the API level under test, create a virtual device, start the emulator, wait for the boot to finish, run the test, and then clean up. Done by hand in a workflow, that is a page of YAML that breaks in a different way every time the API level changes.
This action takes over the whole sequence. It installs or updates the required Android SDK components, including build-tools, platform-tools, the platform for the required API level, the emulator, and the system images for the required API level. It creates a new AVD instance with the configurations you give it, launches a new emulator with those configurations, waits until the emulator is booted and ready for use, runs the custom script you provided once it is up, and then kills the emulator and finishes the action.
The script is yours, so the action is not tied to a test runner. The examples use ./gradlew connectedCheck, which is the Gradle task for connected instrumented tests, but the contract is simply that your script runs after the device is ready.
The audience is any team whose Android test suite includes instrumented tests, which is to say any team whose confidence in their Android build depends on something more than static analysis and unit tests.
Two accelerations, and the one that is usually missing
The acceleration story is the part to understand, and the documentation splits it in two.
The old ARM-based emulators were slow and are no longer supported by Google. The modern Intel Atom emulators, x86 and x86_64, can be fast, but they rely on two forms of hardware acceleration to reach their peak potential. The first is graphics acceleration, for example emulator -gpu host, and the second is virtual machine acceleration, for example emulator -accel on. The documentation is explicit that GPU and VM acceleration are two different and non-mutually exclusive forms of hardware acceleration, and the reason they are spelled out separately is that they fail separately.
Graphics acceleration needs a GPU path. VM acceleration needs the hypervisor. On a Linux runner with KVM enabled, both are available. On a runner without nested virtualisation, you can still have graphics acceleration and the emulator will run, but the CPU work is not virtualised and the boot is slow.
That is the wall the documentation puts front and centre. Nested virtualisation must be supported by the host VM, which is not the case for most cloud-based CI providers due to infrastructural limits. Running an emulator inside a Docker container on such a runner makes the problem worse, and the documentation says so.
GitHub's larger Linux runners do support hardware accelerated emulators, and the recommendation is to use the Ubuntu, ubuntu-latest, runners, which are two to three times faster than the macOS ones, which are also a lot more expensive.
So the practical decision for a team is not which action to use, it is which runner to pay for. The action makes the setup reproducible; it cannot create a hypervisor that the host does not have.
The KVM permission step is not optional
On Linux, the action needs the KVM device to be usable by the user running the job, and the documentation shows how to do that with a udev rule.
- name: Enable KVM group perms
  run: |
    echo 'KERNEL=="kvm", GROUP="kvm", MODE="0666", OPTIONS+="static_node=kvm"' | sudo tee /etc/udev/rules.d/99-kvm4all.rules
    sudo udevadm control --reload-rules
    sudo udevadm trigger --name-match=kvm
The rule gives the kvm group mode 0666 on the KVM device and pins it to a static node, then the udev rules are reloaded and triggered so the change takes effect without a reboot. The action cannot do this itself, because it needs root and it needs to run before the emulator starts, so the step has to be in the workflow ahead of the action.
That ordering constraint is the thing that catches people. If the KVM step is missing, the emulator starts in software mode and the job becomes a timeout rather than an error, which is a slow and confusing failure. If the KVM step comes after the action, the change lands too late for the emulator that has already booted.
The full workflow shape from the documentation is a checkout, the KVM step, and then the action with its inputs. So the minimum viable job is three steps, and two of them are the same in every example in the readme.
Matrix runs across API levels and targets
The action is designed to be driven by a build matrix, and the documentation gives the shape.
jobs:
  test:
    runs-on: ubuntu-latest
    strategy:
      matrix:
        api-level: [21, 23, 29]
        target: [default, google_apis]
    steps:
      - name: checkout
        uses: actions/checkout@v6

      - name: Enable KVM
        run: |
          echo 'KERNEL=="kvm", GROUP="kvm", MODE="0666", OPTIONS+="static_node=kvm"' | sudo tee /etc/udev/rules.d/99-kvm4all.rules
          sudo udevadm control --reload-rules
          sudo udevadm trigger --name-match=kvm

      - name: run tests
        uses: reactivecircus/android-emulator-runner@v2
        with:
          api-level: ${{ matrix.api-level }}
          target: ${{ matrix.target }}
          arch: x86_64
          profile: pixel_7_pro
          script: ./gradlew connectedCheck
Three API levels crossed with two targets is six jobs, each of which boots a fresh emulator. The arch input pins the CPU architecture to x86_64, and the profile input selects a device profile, pixel_7_pro in this case, which is what decides the screen size and the hardware the emulator presents to the app under test.
The two further examples show the other inputs that matter. One pins the NDK and CMake versions, with ndk 21.0.6113669 and cmake 3.10.2.4988404, for projects that need a specific toolchain to build their native code. The other installs specific SDK extensions for the system image without changing the platform, for the projects that need a particular system image variant.
The action is versioned with the major version tag, @v2, which is the convention GitHub introduced for actions, and the readme's own examples use actions/checkout@v6, so the action's own version pinning is the thing to mirror in your own dependencies.
On macOS, HAXM is not the problem people think it is
There is a section of the readme devoted to VM acceleration on macOS, and its conclusion is a negative one: HAXM is not needed, and installing it is actively discouraged.
The argument starts from the platform documentation. On macOS 10.10 Yosemite and higher, the Android Emulator uses the built-in Hypervisor.Framework by default, and falls back to Intel HAXM if that framework fails to initialise. HAXM is only needed to achieve VM acceleration if the default hypervisor is not available on the machine.
Then there is the practical problem. Manually enabling and downloading HAXM is not recommended because it is redundant, and on macOS 10.13 High Sierra and higher macOS disables the installation of kernel extensions by default, and since Intel HAXM is a kernel extension, that installation would have to be enabled manually on the base runner VM. Worse, manually trying to install HAXM on a GitHub runner brings up a popup, which further hinders tests from running.
So the guidance is: use the built-in hypervisor, do not install HAXM, and expect the popup to mean you did it wrong.
And the broader advice stands, which is that the macOS runners are two to three times slower than the Ubuntu ones and more expensive, so the operating system choice for an emulator job is mostly a budget decision.
Licence metadata, release cadence and a compiled lib directory
There is a small inconsistency worth checking before you ship. The repository metadata for the project lists the licence as Apache-2.0, while the package.json in the repository declares the licence as MIT. The package is marked private, so it is never published to npm, and the package.json licence field describes the action's own source. Whichever applies, the LICENSE file at the root is the place to look.
The release history is steady. v2.36.0 on 2026-03-11, v2.37.0 on 2026-03-14 and v2.38.0 on 2026-07-05, and the repository is not archived with the last push on 2026-08-26. There is a CHANGELOG.md and a RELEASING.md at the root, and a renovate.json, which means the action's own dependencies are kept current by automation rather than by hand.
The repository layout is worth understanding because it explains the TypeScript and the compiled output. There is an action.yml and an action-types.yml for the action definition and its typed inputs, a src directory with the TypeScript sources, and a lib directory, which is the compiled JavaScript that GitHub Actions actually runs. The package.json has main set to lib/main.js, the build script is tsc, and the test script is tsc --noEmit and jest, so the type check is part of the test run rather than a separate step. The __tests__ and test-fixture directories hold the Jest suite and its fixtures, and jest.config.js and .eslintrc.json configure the test and lint tooling.
The dependencies are minimal and deliberate: the GitHub Actions toolkit for core, exec and tool-cache, plus minimist and set-value. The tool-cache entry is the important one, because it is how the action installs and caches the SDK components and the emulator, which is the difference between a job that downloads a gigabyte every run and one that does not.
The engine requirement is node >=24, and the .nvmrc file at the root records the same for local development.
Editorial conclusion
android-emulator-runner is worth adopting if your Android tests are instrumented tests that need a device, because it removes the whole class of workflow where the emulator is installed by hand, the AVD is created by hand, and the job waits on a boot that nobody is watching. It is the wrong choice for unit and Robolectric style tests, where a device is not needed at all, and it is the wrong choice on a hosted runner without nested virtualisation, where the emulator will run but slowly. Before you adopt it, check that your runner supports the acceleration you need, note that the documentation recommends the Ubuntu runners over the macOS ones as two to three times faster, and remember that the repository was pushed to on 2026-08-26 with the newest release v2.38.0 from 2026-07-05.
Frequently asked questions
What does the android-emulator-runner action do?
It installs or updates the Android SDK components for the API level under test, creates an AVD with the given configurations, launches the emulator, waits until it is booted and ready, runs the script you provide, for example ./gradlew connectedCheck, and then kills the emulator and finishes the action.
Do I need to enable KVM before running the action on Linux?
Yes. The documentation shows a step that writes a udev rule giving the kvm group mode 0666 on the KVM device and then reloads and triggers the udev rules. It has to run before the action, otherwise the emulator falls back to software emulation and the job usually fails as a timeout rather than an error.
Why does android-emulator-runner recommend ubuntu-latest over macOS runners?
GitHub's larger Linux runners support hardware accelerated emulators, and the documentation describes the Ubuntu runners as two to three times faster than the macOS ones, which are also a lot more expensive. The underlying constraint is nested virtualisation, which most cloud based CI providers do not support because of infrastructural limits.
Do I need to install Intel HAXM for android-emulator-runner on macOS?
No. On macOS 10.10 and higher the emulator uses the built-in Hypervisor.Framework by default and only falls back to HAXM if that fails, and the documentation advises against manually enabling or downloading HAXM, noting that macOS 10.13 and higher blocks kernel extension installation by default and that the manual route raises a popup on a GitHub runner.
Can android-emulator-runner test several API levels at once?
Yes, through a GitHub Actions build matrix. The documented example crosses api-level values of 21, 23 and 29 with targets of default and google_apis, and passes additional inputs such as arch x86_64, profile pixel_7_pro, and pinned ndk and cmake versions when the project needs a specific native toolchain.
Official sources
Add this badge to your README
If you maintain this project, the badge below links readers to this analysis and shows its maintenance status from the daily GitHub snapshot. Paste the markdown into your README; add ?metric=license or ?metric=stars to the image URL for a different field.

[](https://hysenlabs.com/projects/reactivecircus-android-emulator-runner)Star history chart for your README
[](https://hysenlabs.com/projects/reactivecircus-android-emulator-runner)Was this useful?