DreamUV for Blender: Viewport UV Editing and Hotspotting
DreamUV - 3D viewport UV editing tools for Blender
At a glance
- What is it?
- DreamUV adds UV transformation, transfer, unwrapping, and atlas placement tools to Blender's 3D viewport. It targets artists using tiling textures, trim sheets, and custom atlases, with documented gaps in releases and licensing.
- Who is it for?
- Blender artists whose placement work involves tiling textures, trim sheets, or custom atlas meshes should test DreamUV, starting with UV Transfer and Hotspot. Artists who need versioned releases, a confirmed license, or a broad set of unwrap modes should resolve those gaps first.
- Can I use it commercially?
- Not without permission. GitHub finds no licence file in the repository, and without a licence all rights are reserved by default: you may read the code but not reuse it. Check the README, or ask the authors, before using it.
- Is it still maintained?
- Activity is slowing. The repository last received commits 6 months ago.
- What is it written in?
- Mainly Python, according to GitHub's language statistics.
Answers come from the project's GitHub data, last synced on November 7, 2026, and from our analysis. They are not legal advice.
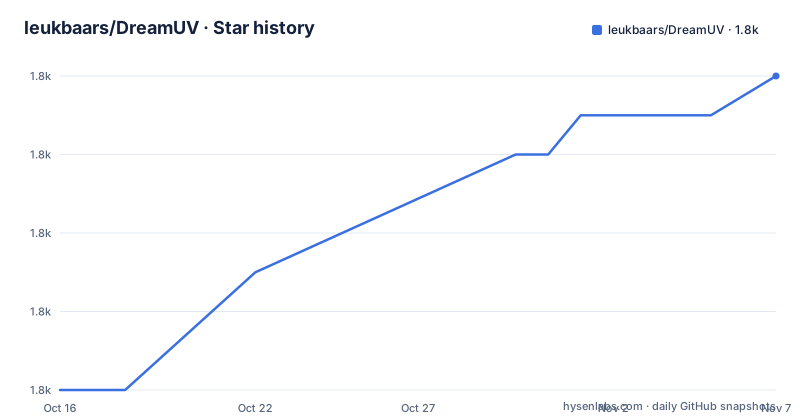
Star history
- leukbaars/DreamUV1,808 ★ · +8
| Repository | 2026-10-16 | 2026-11-07 |
|---|---|---|
| leukbaars/DreamUV | 1.8k | 1.8k |
8 Stars in the last 22 days, measured from the daily GitHub snapshot. Compare with other projects
Editorial analysis
DreamUV's Problem Space in Blender Texture Workflows
DreamUV addresses the interruption caused by adjusting UV coordinates in a different Blender view from the mesh being inspected. According to the README, the add-on lets users manipulate UVs directly in the 3D viewport while retaining visual context for the selected geometry. That is particularly relevant when material design depends on reusable textures, including tiling textures, trimsheets, and texture atlases.
The toolset is aimed at Blender users who already understand UV islands, seams, texture boundaries, and rectangular texture regions. It does not introduce those concepts or provide a separate texturing application. Instead, DreamUV adds commands that treat UV data as something that can be moved, scaled, rotated, stitched, copied, and fitted while the mesh remains visible.
Several operations target common assembly problems. Extend attaches selected faces to the active face after unwrapping them. Stitch joins the UVs of two selected faces along their shared edge. Move to UV Edge sends an entire UV arrangement to the outer 0 to 1 boundary. UV Transfer acts like a coordinate clipboard, while Hotspot attempts to place selected geometry into a rectangle from a custom atlas mesh.
This makes DreamUV more relevant to a texture artist arranging reusable regions than to a user seeking a complete texture-painting suite. The README does not document texture painting, baking, UDIM handling, material assignment workflows, or image export through the add-on. Its documented scope is narrower: UV operations executed from Blender's viewport toolbar in Edit mode.
Viewport Transforms, Boundaries, and Face Relationships
DreamUV's Move, Scale, and Rotate tools transform UVs in a way that the README compares with Blender's default mesh transforms. The intent is direct control while the artist sees the associated mesh. Each transform also has buttons for changing UVs by discrete steps, with configurable snap sizes.
The controls follow familiar modifier conventions. X constrains translation or scaling to the x-axis, while Y applies the same restriction to the y-axis. Holding the middle mouse button while dragging constrains movement along one axis, and releasing it locks the constraint. Shift selects precision mode, Ctrl selects stepped movement, and Ctrl+Shift uses smaller intervals.
Other tools focus on local UV structure. Cycle rotates a selected face's UVs by 90 degrees while confining the result to the face's boundaries. Mirror mirrors selected UVs under the same kind of confinement. These boundary constraints are important for texture assembly because UV coordinates extending beyond a face can interfere with neighboring regions. They are still procedural operations, and the README does not explain conflict handling when existing UVs already overlap.
Extend and Stitch act across faces. Extend unwraps selected faces and attaches them to the active face. Stitch joins the UVs of two selected faces on their shared edge. These commands can reduce manual island assembly, but the README does not document which edges are selected, how nonmanifold topology is treated, or whether the operation preserves existing seams. Users should therefore verify those cases on a disposable mesh rather than assume Blender's standard unwrap behavior.
Move to UV Edge performs a more specialized operation by moving an entire UV to the 0 to 1 UV boundary. The README identifies texture-edge alignment as its main use. This is distinct from Cycle or Mirror because it targets the outer UV boundary rather than preserving placement inside a selected face.
DreamUV Transfer and Atlas Hotspotting Data Flow
The UV Transfer Tool uses a small set of coordinates as a temporary UV clipboard. According to the README, the top row displays those coordinates. Users can type values manually or use the documented grab action to save the UV boundary of a selection. Selecting another geometry and using the transfer action maps the saved arrangement to that selection.
This workflow is useful when several objects need the same relative arrangement, although the README does not specify whether destinations must have matching topology, identical vertex counts, or a particular orientation. It also does not explain how overlapping selections or partially selected faces are handled. The mechanism is documented, but its constraints are not. An artist can make the first test with simple matching geometry before applying it to an irregular mesh.
Hotspotting adds a second data source: an atlas represented by a Blender mesh. The atlas consists of differently sized rectangles. DreamUV attempts to locate a suitably sized rectangle and fit the selected mesh geometry to it. Clicking the hotspot button repeatedly cycles through placement variations.
The README says the resulting mesh is divided into multiple UV islands, with hard edges and seams. It recommends manually placing extra seams to guide the operation and dividing geometry into rectangular patches. The atlas should be scaled close to the desired UV scale on the final mesh. Its object scale should also be set to 1 so rectangle sizes transfer correctly.
The important distinction is that DreamUV does not import a predefined atlas file. It expects the artist to create the atlas as a mesh. The documentation gives no behavior for an atlas without a suitable rectangle, so successful placement cannot be assumed for every selection. Object scale, patch shape, and seam placement are practical acceptance conditions for this feature.
Installing DreamUV and Performing a First Edit-Mode Operation
DreamUV documents a GUI installation rather than a package-manager workflow. Download the repository as a ZIP file. In Blender, open user Preferences and the Add-ons area, then choose `Install from File...`. After the archive is installed, DreamUV should appear in the add-ons list under the UV category. Enable it there.
Once enabled, enter Edit mode in the 3D viewport. The README says the DreamUV toolset will appear in that toolbar. For the first check, select editable faces and use Move, Scale, or Rotate. The transform controls should expose the documented axis constraints, modifier behavior, and snap-size buttons. This confirms that the add-on loaded and that its operators appear in the expected editing context.
A second useful check is Move to UV Edge. Select a UV arrangement and invoke the command to move it to the outer 0 to 1 boundary. That operation tests a concrete README use case rather than merely confirming that a menu opened. If the add-on installs but the toolbar entry is absent, check that Blender is in Edit mode and that DreamUV is enabled in the UV category.
The repository also contains `__init__.py` and separate `DUV_*.py` modules. The README does not state a supported Blender version range or identify the exact archive layout expected by `Install from File...`. For a first installation, follow the documented ZIP path and do not add an undocumented compatibility claim. Installation success can be confirmed through the Edit-mode toolbar and a reversible UV operation on an unsaved test mesh.
DreamUV Unwrap Coverage and Adoption Boundaries
DreamUV includes two documented unwrap choices. Square Fit Unwrap attempts to unwrap a selection into a square, which the README associates with patches and pipes. Blender Unwrap opens or exposes Blender's standard unwrap tool. The add-on therefore complements Blender's existing unwrap operation rather than replacing all unwrap behavior.
The documented feature set has a clear boundary. Planar and box mapping options are described as planned, so they should not be presented as available through the documented interface. The top-level repository includes `DUV_UVBoxmap.py` and `DUV_UVBoxwrap.py`, but file names alone do not establish which controls are active, how they are registered, or how they behave. The README is the relevant source for user-facing availability.
DreamUV is the wrong tool when the requirement is a full unwrap pipeline with documented projection modes, consistent packing, or automation outside interactive Edit mode. It is also unsuitable when the atlas is supplied only as an external image, because Hotspotting expects a mesh containing rectangles. Artists who need repeatable batch processing would find no documented CLI, background job, or batch API in the README.
It fits a narrower use case: an artist repeatedly moving or matching UV arrangements and placing rectangular patches into a custom atlas. That workflow gains from immediate viewport context, snap-based transforms, and a transfer buffer. The trade-off is dependence on manual atlas construction and seam guidance. Evaluate it on representative geometry, especially pipes, patches, and assets with tightly packed texture regions, before deciding whether its placement rules match the asset pipeline.
DreamUV Releases, License, and Upgrade Boundaries
The repository is not archived, and its last push was on 2026-04-17. The repository has no GitHub releases. The README documents downloading a ZIP and installing it from Blender's add-on interface, but it does not provide a versioned installation command, release notes, upgrade policy, or compatibility matrix.
That absence affects upgrade planning. There is no documented release identifier to pin in an automated Blender environment. A user replacing the add-on must compare repository files and check whether local changes overlap with `DUV_*.py` modules. The README also does not state whether the old installation should be removed before installing a new ZIP. This is a maintenance constraint, not a claim that upgrades are unsafe.
The license is listed as unknown, and the README does not identify one. Users therefore do not have a confirmed license statement from these sources. Confirm the authoritative repository license metadata or license file before redistributing the add-on or including it in a packaged toolchain. This is a verification step, not legal advice.
The repository layout still offers useful inspection points. Python functionality is divided across named modules for translation, rotation, scale, stitching, hotspotting, unwrapping, projection, transfer, and utility support. When checking an upgrade, compare those files with the installed copy and verify the Edit-mode toolbar after replacement. With no GitHub releases, the absence of release notes remains a concrete adoption boundary.
Editorial conclusion
Blender artists whose placement work involves tiling textures, trim sheets, or custom atlas meshes should test DreamUV, starting with UV Transfer and Hotspot. Artists who need versioned releases, a confirmed license, or a broad set of unwrap modes should resolve those gaps first. The immediate decision is project-specific: install the repository ZIP, enable it in Blender, and confirm that UV transfer and a small atlas produce the expected geometry before applying the add-on to production assets.
Frequently asked questions
How do I install DreamUV in Blender?
Download the repository as a ZIP, open Blender's user Preferences and Add-ons area, and use `Install from File...`. Enable DreamUV under the UV category, then enter Edit mode to find the toolset in the 3D viewport toolbar.
What does DreamUV do with texture atlases?
Its Hotspot tool searches a mesh-based atlas for a suitably sized rectangle and fits selected geometry to it. The atlas should contain varied rectangles, be scaled similarly to the target mesh, and have object scale set to 1.
Can DreamUV unwrap geometry without leaving the 3D viewport?
The README says the tools appear in the viewport toolbar in Edit mode and include Square Fit Unwrap and Blender Unwrap. It also documents Extend, Stitch, Move to UV Edge, and other UV operations in that interface.
What is DreamUV's license?
The repository information identifies the license as unknown, and the README does not state one. Confirm the authoritative repository metadata or license file before redistribution or integration into another distribution.
Official sources
Add this badge to your README
If you maintain this project, the badge below links readers to this analysis and shows its maintenance status from the daily GitHub snapshot. Paste the markdown into your README; add ?metric=license or ?metric=stars to the image URL for a different field.

[](https://hysenlabs.com/projects/leukbaars-dreamuv)Star history chart for your README
[](https://hysenlabs.com/projects/leukbaars-dreamuv)Was this useful?