App Store screenshot generator that hands back a Next.js editor you keep
end to end app store screenshot creation using AI
At a glance
- What is it?
- app-store-screenshots is a skill for AI coding agents, not a web app: it tells the agent to scaffold a Next.js screenshot editor with a connected canvas, device frames and a zip export sorted by device, resolution and locale. The trade is that you end up maintaining a small web project to make your store images.
- Who is it for?
- Adopt app-store-screenshots if you ship on several platforms or in several locales, or if you are done re-cropping device frames by hand, and accept that what installs is an agent skill plus a Next.js app you will run and keep. Skip it for a one-off five image upload, and skip it if you need a pinned version, because with no GitHub releases and the last push on 2026-10-16, whatever npx skills add ParthJadhav/app-store-screenshots fetches is whatever main holds that day.
- Can I use it commercially?
- Yes. MIT is a permissive licence: you can use, modify and sell software built on it, as long as you keep its copyright and licence notices.
- Is it still maintained?
- Yes. The repository last received commits 7 days ago.
- What is it written in?
- Mainly TypeScript, according to GitHub's language statistics.
Answers come from the project's GitHub data, last synced on November 13, 2026, and from our analysis. They are not legal advice.
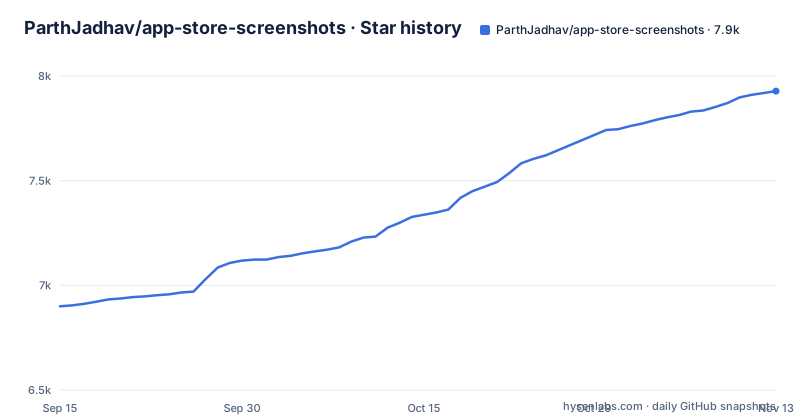
Star history
- ParthJadhav/app-store-screenshots7,928 ★ · +1,028
| Repository | 2026-09-15 | 2026-11-13 |
|---|---|---|
| ParthJadhav/app-store-screenshots | 6.9k | 7.9k |
1,028 Stars in the last 59 days, measured from the daily GitHub snapshot. Compare with other projects
Editorial analysis
The skill scaffolds a Next.js project, not a folder of PNGs
What lands on disk is the reason to care here. Ask an agent to build store screenshots and you get a Next.js project, not finished images. The tree it creates puts `mockup.png` and `app-icon.png` under `public/`, a `screenshots/` directory split into `apple/` and `android/`, and one state file called `app-store-screenshots.json` at the project root.
That JSON file is the whole deck. Because it is the single source of truth, the project is git-trackable and resumable: commit it, and a teammate or the same agent in a fresh session can pick the work up where it stopped. Screenshots you pick inside the editor are copied to `public/screenshots/uploaded/<hash>.png`. Locale is a directory level rather than a string inside a filename, which is why the English and German exports of one deck never overwrite each other.
project/
├── public/
│   ├── mockup.png
│   ├── app-icon.png
│   └── screenshots/
├── app-store-screenshots.json
Nothing here is published as a package you depend on at runtime. The repository is TypeScript under the MIT licence, main is the default branch, and what you install is instructions for an agent plus a template the agent copies into your folder.
Connected crops and isolated mode do not produce the same image
Every element sits on one strip, and the mode you pick decides what a single exported PNG contains. In connected mode you see the whole screenshot strip at once, you can drag a phone frame, a caption or a decoration across a screen boundary, and the export cuts each screen out of that shared strip as a precise crop. Store art often needs this, because one sentence running across two frames is hard to fake inside separate artboards.
Isolated mode exists to contain a specific failure. A deck built back when each screen was its own page can hold elements positioned partly offscreen. In connected mode those leftovers bleed into the neighbouring export, so older projects stay on isolated export until you opt in. The consequence for you is that switching a legacy deck to connected crops is a visual change rather than a metadata flag. Recheck every slide afterwards, because a caption that looked right alone can now show up clipped in two files.
Autosave posts to /api/project and holds back when disk is newer
Persistence goes through a Next.js API route rather than a file the editor writes directly. Autosave posts to `/api/project`, mirrors the same deck into `localStorage`, then checks whether disk has already moved on before overwriting anything. If another tab, or another agent in the same folder, has written a newer revision, the save is held back. Failed saves can be retried from the editor, and leaving the page with unsaved edits raises a warning.
One cost follows from that. Saving is not something you can do on a static host: persistence depends on the dev server that serves `/api/project`, so a build directory you copied elsewhere keeps the interface and loses the ability to write.
Style Lab and Scene Playground restyle every screen at once
Style Lab shows four complete looks side by side, each a palette plus type plus layout rhythm plus scene. You keep the parts you want with Colors, Type, Layout and Scene locks and shuffle the rest, apply a look as one undoable edit, save favourites, and export a comparison image so the four can be judged outside the editor. Scene Playground works on the whole deck: backdrops (gradient, solid, aurora, spotlight, grid, dots, ruled) that can flow across the strip instead of restarting on each screen, plus decorations, device shadow, glow, 3D tilt, and headline weight, case and alignment.
The Magnifier is smaller and easier to miss. It puts a loupe on any screen, aimed at one detail of that screen's screenshot, with zoom and shape under your control, so a claim made in the headline can be pointed at rather than described.
Copy comes from a separate place than design. There are 18 named visual styles with deep specs, a headline copy library, and a Copy ideas menu beside the headline field that drops in a formula for the agent to rewrite.
Installing the skill and asking an agent for the first deck
Installation is a skills command, because this is a skill for coding agents. Install it for the current project with:
npx skills add ParthJadhav/app-store-screenshotsAdd `-g` to install globally:
npx skills add ParthJadhav/app-store-screenshots -gOr name one agent, here Claude Code:
npx skills add ParthJadhav/app-store-screenshots -a claude-codeThe README states this works with Claude Code, Cursor, Windsurf, OpenCode, Codex and other agents supported by skills. The manual path is also documented, and it hardcodes the Claude skills directory, which is the clearest sign that the agent is the runtime and this repository is not:
git clone https://github.com/ParthJadhav/app-store-screenshots ~/.claude/skills/app-store-screenshotsFirst use is a sentence to the agent rather than a command. The README's own example prompt shows the shape worth copying, because everything in it is something the agent will otherwise have to ask you for:
Generate App Store screenshots for my personal finance app.
The main strengths are fast expense capture, clear monthly trends, and shared budgets.
I want a sharp modern style with high contrast and 7 slides.
Give the agent your app in one line, your top features in priority order, the platforms and slide count, and any locales, before it starts.
The editor needs captures you already took and a dev server you leave running
The workflow opens with images the editor did not make: capture real app screenshots from a simulator, emulator or device. The one concrete tip given is that the 6.1-inch iPhone simulator is usually the easiest starting point, because it reduces the manual image adjustment you would otherwise do inside the frames. Everything after that, scaffolding or migrating the project, running the dev server, reordering screens in the sidebar, editing copy and layout in the inspector, choosing connected or isolated mode, is work in a browser.
Figma is the honest alternative, and the difference is where the work sits. In Figma you place frames yourself, bring your own device mockups, and export by selecting artboards, and the deck stays a design file a human maintains. Here the deck is a JSON file plus an app, the frames come from a device selector (iPhone, iPad, Apple TV, Apple Watch and CarPlay under iOS, Android phone and tablets plus the feature graphic under Android, and one 16:10 deck for Mac), and the export bundle is a zip organised by platform, device, resolution and locale. You trade a familiar canvas for a project you have to install, run and keep.
Two things the README does not settle. RTL support is described as copy and layout guidance, and its example asks for Arabic slides that feel RTL-native rather than translated, which describes what the agent should aim for rather than a mirrored layout engine that guarantees it. And the export is called an exact PNG bundle for all required App Store, Mac App Store and Play Store sizes; check the bundle against your own store requirements before uploading.
No GitHub releases, so there is no version to pin
Upgrades have nothing to hold on to. The repository publishes no GitHub releases, and the documented installer uses the repository without specifying a revision; its last push was on 2026-10-16. That is tolerable when the output is a project you then own, and it bites when a migration runs over a deck you already shipped: there is no release changelog to read first, although Git history can be compared with `git diff` between commits.
Two paths are worth knowing. The README refers to a separate template README, which is the file to read before changing anything the top-level README only summarises. The top level also carries `BUG_BASH.md`, `CONTRIBUTING.md`, `docs/` and `scripts/`, which keeps the agent-facing skill separate from the repository's own contribution process. The MIT licence covers both the skill and the template it copies into your project.
Editorial conclusion
Adopt app-store-screenshots if you ship on several platforms or in several locales, or if you are done re-cropping device frames by hand, and accept that what installs is an agent skill plus a Next.js app you will run and keep. Skip it for a one-off five image upload, and skip it if you need a pinned version, because with no GitHub releases and the last push on 2026-10-16, whatever npx skills add ParthJadhav/app-store-screenshots fetches is whatever main holds that day. Before trusting the output, open the exported zip and check one image per device family against the sizes your own store requires.
Frequently asked questions
How do I create App Store screenshots with app-store-screenshots?
Install it with npx skills add ParthJadhav/app-store-screenshots, then ask your coding agent to build store screenshots for your app. The agent is meant to ask for your app context, source screenshots, platforms, locales, visual direction and slide count before it scaffolds the editor project.
How do I take the source screenshots app-store-screenshots needs?
You capture them yourself from a simulator, emulator or device before opening the editor. The README says the 6.1-inch iPhone simulator is usually the easiest starting point, because it reduces the manual image adjustment you would otherwise do inside the frames.
How does app-store-screenshots help with designing store screenshots?
Style Lab shows four complete looks side by side and lets you lock Colors, Type, Layout or Scene while shuffling the rest, and Scene Playground restyles every screen at once with backdrops, decorations, device shadow, glow, 3D tilt and headline settings. There are also 18 named visual styles and a Copy ideas menu beside the headline field.
How do I update the screenshots in an app-store-screenshots project?
Every deck is saved to app-store-screenshots.json at the project root, which makes it git-trackable and resumable, and the skill supports in-place project migration. Autosave writes to disk through /api/project, mirrors to localStorage, and checks for newer disk revisions before overwriting work from another tab or agent.
Official sources
Add this badge to your README
If you maintain this project, the badge below links readers to this analysis and shows its maintenance status from the daily GitHub snapshot. Paste the markdown into your README; add ?metric=license or ?metric=stars to the image URL for a different field.

[](https://hysenlabs.com/projects/parthjadhav-app-store-screenshots)Star history chart for your README
[](https://hysenlabs.com/projects/parthjadhav-app-store-screenshots)Was this useful?