leaves draws a disk treemap into a character grid
A text-mode disk usage visualization utility
At a glance
- What is it?
- leaves is a Rust terminal treemap for finding what fills a disk, built on ratatui and crossterm and aimed squarely at the machine with no desktop. It honours .gitignore, summarizes deep subtrees, and trades pixel accuracy for the ability to run over SSH.
- Who is it for?
- leaves fits the remote box, the container and the laptop where opening a graphical disk analyzer is the bigger problem. It does not fit a machine where you need exact byte accounting, because every rectangle border costs two characters and nested items lose area.
- Can I use it commercially?
- Yes, with conditions. MPL-2.0 is a weak copyleft licence: you can use it inside commercial and closed-source software, but if you distribute changes to its own files, you must publish those changes under the same licence.
- Is it still maintained?
- Yes. The repository last received commits 109 days ago.
- What is it written in?
- Mainly Rust, according to GitHub's language statistics.
Answers come from the project's GitHub data, last synced on November 14, 2026, and from our analysis. They are not legal advice.
Star history
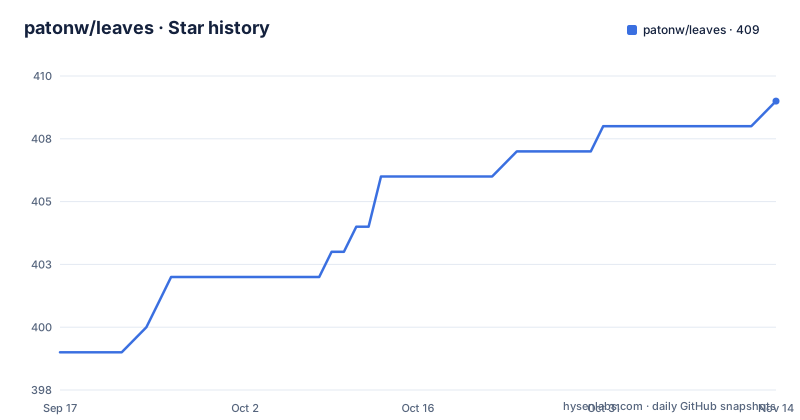
- patonw/leaves409 ★ · +10
| Repository | 2026-09-17 | 2026-11-14 |
|---|---|---|
| patonw/leaves | 399 | 409 |
10 Stars in the last 58 days, measured from the daily GitHub snapshot. Compare with other projects
Editorial analysis
A treemap in block characters, where every border costs two cells
leaves renders files and directories as nested rectangles whose area tracks disk size. The README makes the case with its own arithmetic: a 200 MB file draws twice the area of its 100 MB sibling, and the parent directory ends up with about three times the area of the smaller file. That property is the whole point, because the answer to "what is filling this disk" is usually a shape you can see rather than a ranked list you have to read down.
The coarseness is stated rather than hidden. A character grid is a bad canvas, and the README compares it directly to a graphical tool where a rectangle can be any number of pixels. The structural problem is borders: each one takes two characters wide or tall at minimum, so a deeply nested item draws visibly smaller than a similar top-level one and area stops being a clean function of size. What you gain is named in the same paragraph, which is that this works over a remote shell connection where a desktop environment is unavailable or impractical.
The inspirations are WinDirStat and QDirStat, and the difference from both is the surface they draw on. Those paint a canvas. leaves paints into a grid that crossterm drives on a terminal, so the result is something you can look at in an SSH session on a server with no display attached. What you give up is every clean edge and every exact proportional reading. What you get is that a recursive listing turns into a picture on a machine that could never draw one.
Ignore rules apply before anything is drawn, and -A throws them all away
The scan filters before it measures. Hidden directories are skipped by default, and anything matching patterns in `.gitignore` or `.ignore` files found in the hierarchy is left uncounted. That is the right default for a developer tool, since the largest directories on a working machine are usually `target`, `node_modules` or `.venv`, and none of them are interesting in a disk audit.
`-A`, spelled `--include-all` in the option list, disables every ignore rule at once. The help output also mentions further options that selectively disable specific ignore sources, but the page cuts off in the middle of the `--include-all` description, so which sources can be turned off individually is not stated where a reader can see it. The practical consequence is that `-A` is the only ignore control whose exact behaviour you can confirm from the documentation.
Selection can also be refined from the command line without touching files. After the optional path, leaves takes `[OVERRIDES]`, described as git-style override globs where a `!` prefix negates the glob. So a scan can exclude a build directory by pattern and then re-admit one specific subtree underneath it, in the order the shell hands the arguments over.
Everything else about the invocation is thin on the page. The path argument defaults to `.`, so a bare `leaves` scans the working directory, and a target such as `leaves ~/Documents` scans that tree. The scan root also becomes a wall you cannot move past once the view is up, which the focus section comes back to.
max-depth defaults to 5 and bounds memory, not how deep the scan goes
`-d`, or `--max-depth`, defaults to 5 and is described as the maximum depth of tree to keep in memory. Below that depth, subtrees are replaced with summary nodes, and the help text is explicit that this does not affect scan depth. The distinction matters: leaves still walks and measures everything below the cut, it just stops materializing the shape of it.
A summary node groups files of the same extension into a single rectangle whose area is proportional to their cumulative size, so a directory holding 4,000 `.rs` files becomes one block instead of 4,000 slivers. The stated reason is a resolution problem rather than a performance one. With each file represented by a handful of characters, millions of files across thousands of directories produce a view where little relevant information survives, and the tree becomes visually overwhelming.
The depth is adjustable while the program runs. The `+` and `-` keys move the runtime depth up and down. `e` expands the selected directory, which rescans its contents and shows more detailed children up to that runtime depth, and `d` deflates it, replacing the child rectangles with file type summaries again. So the launch value is only the starting point: expand the branch you care about, deflate the branch that is not, and keep the rest of the tree folded into blocks.
One consequence of rescan-on-expand is worth expecting. Expanding a directory does work at the moment you press the key, against whatever depth you have set, rather than pulling from a tree that was already complete at launch.
Directories get color by name, files by extension, and both can be swapped
Two palettes do the work. Files are colored by extension in a yellow, orange and brown scheme, and directories are colored by name with viridis, the colormap of blues and greens that comes from the colorgrad crate with its preset feature enabled. Coloring by name is the part that pays off in a hierarchy: debug sits next to release, src next to test, and you can tell two projects apart without reading a single path. Coloring files by extension does the same job across directories, which is how a scatter of `.lock` or `.json` files becomes visible at a glance.
The palettes share yellow, and the README notes that directory colors tend toward more saturated shades where the two meet. `LEAVES_COLORS=swap` exchanges both, so a terminal with a light background is a matter of one environment variable rather than a patch.
Everything else about the display is ratatui and crossterm work. The title bar carries the path of the current view with its total size and file count, the bottom row holds the shortcut keys, and the sidebar is a collapsible explorer tree built on tui-tree-widget with the details of the selected file or directory in a box underneath it. Arrow keys move that tree, space opens and closes the selected directory, and the mouse works on the same widget. Selection is synchronized with the treemap in both directions: picking a file in the explorer thickens its border in the map, and picking a rectangle in the map moves the tree.
Focus view will not let you walk above the directory you launched on
Enter focuses the selected directory, replacing both the explorer contents and the treemap with that directory's own children. Backspace goes back to the parent, and the directory you were looking at stays selected on the way up, which is the behaviour that makes climbing a hierarchy with the keyboard tolerable.
The limit is absolute. You cannot climb past the initial target directory the application was launched with. To see anything outside that tree you quit the program and start it again with a new path. That is a real constraint on a tool whose whole purpose is wandering around a filesystem, and it is a deliberate one: focus view is scoped so that Backspace always has a meaning instead of eventually landing you at a filesystem root with a treemap of the entire disk.
The same boundary shapes the selection model. The selected item and its ancestors are highlighted by thicker borders, so the path back up is always visible in the map itself rather than only in the sidebar. Combined with the bidirectional sync, the two panels act as one view of the same hierarchy, with the explorer giving you names and sizes and the map giving you proportion.
Sizes are formatted for reading rather than for parsing: humansize 2.1.3 and thousands 0.2.0 are both dependencies, which is what puts readable units in the title bar and grouped thousands in the per-file details. If you need exact bytes for a report, this is the wrong tool to read them from.
X-ray mode partitions by file type and locks out the parent directory
Normally the top level of the view is partitioned by directory. X-ray mode inverts that. Files are grouped by type at the top level, and each group is then split into directories, so the first thing you see is the extension landscape of the whole tree instead of the folder landscape. The help text describes it exactly that way, as grouping files by type at the top level and then splitting each region by directory, and `-x`, or `--xray`, starts the program in that mode.
The `x` key enters it from any view and leaves it the same way, and Enter and Backspace still focus and unfocus, so a group can be opened and inspected like any other directory. X-ray is the answer to the question a directory treemap cannot answer: a disk that is 60 percent images and 25 percent video does not look like that when the top level is sorted by folder.
The cost is a navigation restriction the README flags as important rather than incidental. Inside x-ray mode you cannot get to the parent of the x-rayed directory until you return to normal mode. Since a type group has no meaningful parent in the directory hierarchy, the program makes you pay the mode switch rather than inventing a parent that does not exist.
That is the second mode-specific boundary in this tool, after the launch-root wall in focus view. Both are defensible as designs, and both will surprise you once if you have spent time in tools that let you climb to `/` and keep going.
Building needs a Rust toolchain, and nix-shell carries the environment
A pre-built binary exists for a select number of platforms on the releases page, and the fallback is a source build that needs a Rust toolchain. The README offers two ways to get one. rustup is the standard route:
curl --proto '=https' --tlsv1.2 -sSf https://sh.rustup.rs | shIt also notes that you will need curl and the basic build tools, gcc, make and ld, which on most distributions arrive with the build-essential or base-devel metapackage. The second route is nix, described as an independent package manager and build tool focused on repeatable, declarative builds:
curl --proto '=https' --tlsv1.2 -L https://nixos.org/nix/install | sh -s -- --daemonFrom the project directory, nix-shell loads the build environment:
$ cd leaves
$ nix-shell
The repository carries the nix side of that promise as `shell.nix`, `default.nix`, `package.nix`, `flake.nix` and `flake.lock`, so the reproducible path is the one wired into the source tree rather than a set of instructions.
Compiling is the usual cargo invocation, and installing puts a binary in your user directory:
$ cargo build --release$ cargo install --path .The README attaches a caveat to the second one: you have to make sure your environment is configured to discover executables under the installation destination, which in practice means adjusting PATH yourself. To run without installing at all, cargo takes the flags and the target directly:
$ cargo run --release -- [option flags] DIR_TO_SCANEvery example in the help output is the same shape, `$ leaves --help`, so the flag set is small enough to read in one screen.
The settings file is named on the page, its keys are not
leaves reads from `$USER_CONFIG_DIR/leaves/setings.toml`, and the README stops at exactly that line. The Configuration section is the last heading in the page and it is cut off mid-section, so the settings keys, their defaults and their types are not documented where a reader can see them. Anyone planning to persist colors, depth or key bindings has to read the source under `src/` instead, and `docs/` is the other place to look.
`Cargo.toml` says more about the implementation than the prose does. The crate is edition 2024, version 0.2.0, and the dependency list maps closely onto the feature set: ratatui 0.30.2 and crossterm 0.29.0 for the terminal interface, clap 4.6.1 with derive for the argument parser, ignore 0.4.26 for the gitignore-aware walk, tui-tree-widget 0.24.0 for the sidebar, humansize and thousands for the numbers, either 1.16.0 for the two-or-branches the depth logic needs, and toml with preserve_order for the settings file. eyre and color-eyre handle errors, tracing and tracing-subscriber with json and env-filter features handle logging, and ouroboros is there for self-referential data structures, which a tree built bottom-up needs.
The clipboard is a feature flag, not a hard dependency. `default = ["clipboard"]` pulls in arboard 3.6.1 with wayland-data-control enabled, so a Wayland user can copy a path out of the app and a build with `--no-default-features` drops the whole dependency.
There is also a `[profile.perf]` that inherits release but sets `debug = true` and `strip = false`, which keeps full symbols and is meant for profiling a scan rather than for shipping it. The releases are v0.1.1 on 2026-07-07, v0.2.0 on 2026-07-10, and v0.2.0-cross on 2026-07-15. The repository is not archived and the last push was on 2026-07-28. The license is MPL-2.0.
Editorial conclusion
leaves fits the remote box, the container and the laptop where opening a graphical disk analyzer is the bigger problem. It does not fit a machine where you need exact byte accounting, because every rectangle border costs two characters and nested items lose area. Build it with cargo build --release, run it on one directory, and check the first thing: whether your own .gitignore is hiding the build output you were trying to find.
Frequently asked questions
What does leaves ignore when it scans a directory?
Hidden directories are skipped by default, and anything matching patterns in .gitignore or .ignore files in the hierarchy is left uncounted. Passing -A disables all ignore rules, and other options selectively disable specific ignore sources.
How do I build leaves from source?
A Rust toolchain is required. cargo build --release compiles the binary and cargo install --path . installs it for your user, though you must configure your environment to find the installation destination. nix-shell from the project directory loads the build environment instead.
What does --max-depth change in leaves?
It sets how deep the tree is kept in memory, and it defaults to 5. Subtrees below that depth are replaced with summary nodes that group files of the same extension into one rectangle. It does not affect how deep the scan goes.
Can leaves show me files outside the directory I started it on?
No. Focus view with Enter and Backspace stays inside the hierarchy leaves was launched with. To look at another part of the filesystem, quit and restart it with a new target path.
How do I change the colors leaves uses?
Files are colored by extension in a yellow, orange and brown scheme and directories by name with viridis, mostly blues and greens. Setting LEAVES_COLORS=swap exchanges both palettes.
Official sources
Add this badge to your README
If you maintain this project, the badge below links readers to this analysis and shows its maintenance status from the daily GitHub snapshot. Paste the markdown into your README; add ?metric=license or ?metric=stars to the image URL for a different field.

[](https://hysenlabs.com/projects/patonw-leaves)Star history chart for your README
[](https://hysenlabs.com/projects/patonw-leaves)Was this useful?