radioconda: a conda distribution with GNU Radio and SDR device libraries
Software radio distribution and installer for conda
At a glance
- What is it?
- radioconda packages Digital RF, GNU Radio, gqrx and inspectrum into a conda distribution with cross-platform installers for Linux, macOS and Windows, and covers a wide range of SDR hardware through libraries such as UHD, rtl-sdr, Lime Suite and SoapySDR front ends. The installers are dated releases while the repository itself keeps changing.
- Who is it for?
- Adopt radioconda if you are setting up a software radio workstation and want GNU Radio, Digital RF and the common SDR device libraries in one environment that you can extend with conda or mamba afterwards. Skip it if you already have a working conda environment with the packages you need, since the installer mainly saves setup time on a new machine, or if your hardware needs a device library outside the supported list.
- Can I use it commercially?
- Check first. The repository uses a licence we do not classify automatically, so read its LICENSE file before any commercial use.
- Is it still maintained?
- Yes. The repository last received commits 36 days ago.
- What is it written in?
- Mainly Go Template, according to GitHub's language statistics.
Answers come from the project's GitHub data, last synced on November 7, 2026, and from our analysis. They are not legal advice.
Star history
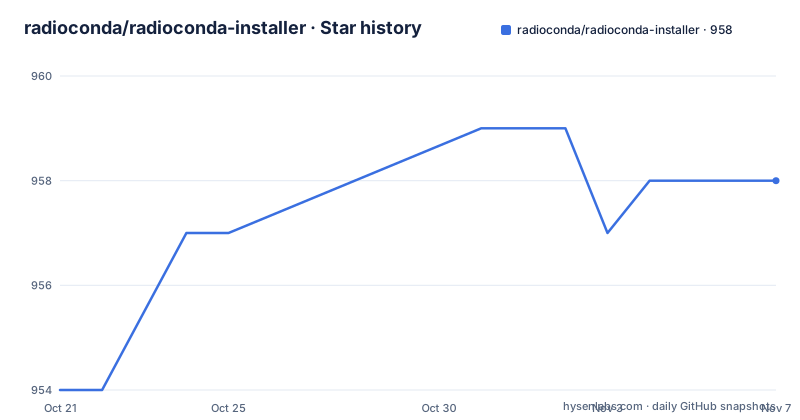
- radioconda/radioconda-installer958 ★ · +4
| Repository | 2026-10-21 | 2026-11-07 |
|---|---|---|
| radioconda/radioconda-installer | 954 | 958 |
4 Stars in the last 17 days, measured from the daily GitHub snapshot. Compare with other projects
Editorial analysis
A conda distribution with a radio stack already inside it
radioconda holds cross-platform installers for a collection of open source software radio packages bundled with the conda package manager. The packages it ships include Digital RF, GNU Radio, including an increasing list of out-of-tree modules, gqrx and inspectrum.
The pitch is about the first hour on a new machine. Installing a software radio stack by hand means resolving a chain of native dependencies, which is exactly the problem conda was built to solve, and radioconda applies that approach to a domain where the dependency chain is long and the failure modes are cryptic. A missing libiio or a mismatched UHD produces errors that do not point at the package that needs fixing.
Once installed, you have what the README calls a fully functional conda distribution and environment. That phrase does the important work. It is not a sealed application with a single entry point. You use the conda or mamba commands to install additional packages, if they are available through conda-forge, or to upgrade to the latest versions.
The project positions itself as an alternative to Anaconda or Miniforge, but specialized for software radio. That is the right mental model for the trade-off. Anaconda and Miniforge give you a general purpose Python environment and leave the radio stack to you; radioconda gives you a general purpose Python environment that already contains the radio stack, which is the part that is tedious to get right.
The audience is anyone standing up a software radio development or analysis machine: a student with an RTL-SDR dongle, an engineer with a USRP, a researcher who wants Digital RF tooling next to GNU Radio in one place.
The device matrix decides whether radioconda helps you
The README pairs each supported radio with the library that drives it, and this table is the real feature list.
The ADALM-Pluto is supported through libiio. Airspy R2, Mini and HF+ are supported through airspy and airspyhf. BladeRF has its own bladeRF library. Ettus USRPs go through UHD. Funcube Dongle Pro and Pro+ use SoapyFCDPP or gr-funcube. HackRF is supported through HackRF, and LimeSDR through Lime Suite.
Further down, the Mirics MSi001 and MSi2500 SDR devices use libmirisdr, Red Pitaya uses SoapyRedPitaya, and the RFSpace, NetSDR and CloudSDR line uses SoapyNetSDR. RTL-SDR uses rtl-sdr. Sound card and audio devices are handled by SoapyAudio, which is the one entry that is not a radio at all and is the reason a generic SDR package needs a generic audio front end.
Two patterns are visible. Several of the Soapy entries, SoapyFCDPP, SoapyRedPitaya and SoapyNetSDR, suggest a SoapySDR style abstraction across heterogeneous hardware, which is the direction the ecosystem has moved in. And for the entries with a setup link in the table, the device support is not automatic. The README points to additional installation steps for particular software radio devices, and each row of the table carries its own setup anchor for that device.
So the honest reading is that radioconda covers a wide range of hardware, but that getting a specific dongle working may still involve a device-specific step beyond the base install.
Where the package list lives and how new software gets in
The complete list of packages is not in the README. It is kept in a file called radioconda.yaml at the root of the repository, which is the place to look when you want to know exactly what is inside a build.
That file is also part of the design. The repository contains build_metapackage.py and build_installer.py, plus a buildenv.yaml and a radioconda_installer.yaml, and the repository is written largely in Go Template, which is what the constructor and installer_specs directories use to render the installer for each target.
Two contribution routes are offered, and both go through the issue tracker rather than a pull request. You can suggest additional software to include by filing an issue, and if you have built additional software from source on top of radioconda, you can document your results in an issue to help others and to help the maintainer in packaging it.
That second route is unusual and worth noting. Rather than asking people to open pull requests against a build system, radioconda asks for a written description of what worked. It suggests the packaging work itself is the bottleneck, which is consistent with the general shape of conda-forge, where new packages usually start as recipes contributed elsewhere.
There is also a routing rule for problems. Radioconda is built from packages maintained by the conda-forge project, so if you have questions or issues that are specific to the conda installation of a particular package, the README asks you to report them at the corresponding feedstock repository.
Practically, that means a bug in the GNU Radio conda package is not a radioconda bug, and filing it in the wrong place will cost you a round trip.
Installer downloads: what ships for which platform
The installers are published on the project's releases page, and the README lays out a matrix of operating system, architecture, installer type and download.
For Linux there are command-line installers for x86_64 (amd64), aarch64 (arm64) and ppc64le (POWER8/9). The presence of ppc64le is a good sign for a project that cares about servers and embedded-adjacent hardware, since a radio data pipeline often runs on something other than a laptop.
macOS is covered for both x86_64 (Intel) and arm64 (Apple Silicon), and each has a command-line installer and a graphical one, the graphical version being a .pkg file. Windows has a single x86_64 graphical installer as an .exe file.
So the platform coverage is wide, but the installer types are not uniform. Windows has no command-line installer in this table, and that difference shows up later in the non-interactive instructions, where the Windows path is a silent installer invocation rather than a shell script with flags.
The download links in the README point at a hosted location with a pattern rather than direct per-version files, and the project asks for suggestions and reports through GitHub issues. For a team that pins its environment, the practical consequence is that the release page is the place to look for which build you are actually running.
Three ways to install: script, graphical package, or conda create
There are three installation paths, and the third one is the one that fits an existing setup.
For a command-line install on a Unix platform, you download the installer and run it:
bash radioconda-*-Linux-x86_64.sh # or similar for other installers for unix platformsFor a graphical install, you download the installer and double-click it, which is the route for the macOS .pkg files and the Windows .exe.
If you already have conda or mamba, the README says you can skip the installer entirely and create a new environment with all of the radioconda packages:
conda create -n radioconda -c conda-forge -c ryanvolz --only-deps radiocondaThat command is worth reading carefully rather than copying blindly. It names the environment, points at two channels, conda-forge and ryanvolz, and uses --only-deps, which installs the dependencies of the radioconda metapackage without installing the metapackage itself. The environment is named radioconda, and the two channels are where the underlying packages come from.
The presence of a second channel is not cosmetic. It means the environment pulls from a conda-forge feedstock plus a personal channel, and if that personal channel becomes unavailable, environment creation is the first thing that breaks. That is a fair thing to check before standardising on it in a build script.
The alternative installer route has a different property: it is self-contained, so it does not depend on the channels remaining reachable at creation time.
Non-interactive installs and the Windows silent flags
Automation is documented separately from the interactive flow, which is the right way round for a tool that ends up in provisioning scripts.
On Unix platforms, the options of the shell installer are found by running it with the help flag:
bash radioconda-*-Linux-x86_64.sh -h # or similar for other installers for unix platformsOn Windows, the equivalent is a silent install invocation with an explicit set of parameters:
start /wait "" build/radioconda-<VERSION>-Windows-x86_64.exe /InstallationType=JustMe /RegisterPython=0 /S /D=%UserProfile%\radiocondaEach parameter carries meaning. /InstallationType=JustMe restricts the installation to the current user rather than the machine. /RegisterPython=0 stops the installer from registering its Python with the system, which matters on a managed workstation where a global Python registration can interfere with other tooling. /S selects the silent mode. /D sets the destination directory, and the example puts it under the user profile.
The /RegisterPython=0 choice is the one to keep in mind if you follow this path on a corporate machine. The default behaviour of installers that register Python is to change what a bare python command resolves to, and that is rarely something you want silently applied on someone else's machine.
Once installed, the README points to further device-specific installation steps for particular software radio devices, which is where the per-hardware setup referenced in the device table lives.
Using it: a radioconda Prompt on Windows, a shell elsewhere
The README is explicit that you will mostly use radioconda through the command line, although on Windows some applications will install shortcuts to the Start menu.
On Windows, the entry point is a command prompt called radioconda Prompt, found in the Start menu under the radioconda directory. From that command line you can run mamba to install and upgrade packages, or run any of the applications installed with radioconda. Some applications can also be launched through shortcuts added to the Start menu.
That prompt is not decoration. It is an environment that has the radioconda binaries and libraries on the path, and the software radio applications depend on exactly those libraries at run time. Launching the same application from an unrelated shell is a common way to get a missing library error that looks like a broken installation.
On Linux and macOS the equivalent is launching the shell that the installer configured, with the radioconda environment activated. The README's Linux and macOS section is truncated in the copy available here, so the precise activation step is not spelled out, but the same principle applies: use the environment the installer set up.
The important part of daily use is the same on every platform. Because the result is a working conda environment rather than a closed application, mamba or conda remains available for adding packages and upgrading, and the software radio tools sit inside that environment alongside everything else.
Licensing, release dates and the gap between tags and commits
The licence is recorded as a custom licence that GitHub cannot classify, with the terms in the LICENSE file at the repository root, so the file is the reference rather than the summary.
The release history is where the interesting wrinkle sits. Three releases are listed: 2025.03.14 on 2025-03-14, 2024.05.29 on 2024-05-29 and 2024.01.26 on 2024-01-26. The version strings are dates, which is a sensible convention for a distribution that is expected to track a moving upstream.
The last push to the repository was on 2026-10-03, which is well after the most recent release tag. So the repository is being worked on while the published installers are older than the source. That gap is normal for a repository that builds installers through a pipeline, but it means the installer you download from the releases page is not necessarily built from the current state of the tree.
The repository layout supports that reading. There is a constructor directory, installer_specs, static assets, the build scripts, and a rerender.py, which is the kind of arrangement where the installer definitions are source and the release artefacts are generated from them.
For a workstation that gets installed once and used for months, the release cadence barely matters. For an image you rebuild in CI, it matters a lot: pin the version, record it in the image, and expect to re-pin when a new dated release appears, because a fresh build from the current tree is not the same thing as the published installer.
Editorial conclusion
Adopt radioconda if you are setting up a software radio workstation and want GNU Radio, Digital RF and the common SDR device libraries in one environment that you can extend with conda or mamba afterwards. Skip it if you already have a working conda environment with the packages you need, since the installer mainly saves setup time on a new machine, or if your hardware needs a device library outside the supported list. Before installing, check the download table for a build matching your operating system and architecture, and file device-specific issues at the conda-forge feedstock repository rather than here, since that is where the underlying packages are maintained.
Frequently asked questions
What is radioconda and which software radio packages does it include?
radioconda holds cross-platform installers for a collection of open source software radio packages bundled with conda. The packages named in the README are Digital RF, GNU Radio including an increasing list of out-of-tree modules, gqrx and inspectrum, and the complete list lives in radioconda.yaml.
How do I install radioconda if I already have conda or mamba?
You can skip the installer and create an environment directly with conda create -n radioconda -c conda-forge -c ryanvolz --only-deps radioconda. Once it exists you can use conda or mamba to install further packages from conda-forge or to upgrade to the latest versions.
Which SDR hardware does radioconda support?
The README pairs devices with their libraries: ADALM-Pluto with libiio, Airspy R2, Mini and HF+ with airspy and airspyhf, BladeRF with bladeRF, Ettus USRPs with UHD, Funcube Dongle Pro and Pro+ with SoapyFCDPP or gr-funcube, HackRF with HackRF, LimeSDR with Lime Suite, Mirics devices with libmirisdr, Red Pitaya with SoapyRedPitaya, RFSpace, NetSDR and CloudSDR with SoapyNetSDR, RTL-SDR with rtl-sdr, and sound card devices with SoapyAudio.
How do I install radioconda without any interaction on Windows?
Run the installer silently with start /wait "" build/radioconda-<VERSION>-Windows-x86_64.exe /InstallationType=JustMe /RegisterPython=0 /S /D=%UserProfile%\radioconda, which installs for the current user, skips registering Python with the system, runs silently and sets the destination directory. On Unix platforms the shell installer exposes its options with the -h flag.
Where should I report a problem with a specific package inside radioconda?
Report it at the corresponding conda-forge feedstock repository. Radioconda is built from packages maintained by the conda-forge project, so the README asks that questions specific to the conda installation of a particular package go to that package's feedstock rather than to the installer repository.
Official sources
Add this badge to your README
If you maintain this project, the badge below links readers to this analysis and shows its maintenance status from the daily GitHub snapshot. Paste the markdown into your README; add ?metric=license or ?metric=stars to the image URL for a different field.

[](https://hysenlabs.com/projects/radioconda-radioconda-installer)Star history chart for your README
[](https://hysenlabs.com/projects/radioconda-radioconda-installer)Was this useful?