perfect-freehand: getStroke, the nine options, and what it does not do
Draw perfect pressure-sensitive freehand lines.
At a glance
- What is it?
- perfect-freehand is a small TypeScript library that converts recorded pointer points into a pressure sensitive stroke polygon. It is built around one function, getStroke, and nine options, and everything around that function, rendering, pointer capture, storage and the SVG path helper, is yours to write.
- Who is it for?
- Use perfect-freehand when you are building a drawing surface and want good looking tapered strokes without writing the geometry yourself, and when you can accept that pressure is simulated unless you switch it off. Skip it if you need input capture, persistence, undo or a ready made path helper, since none of that is in the package.
- Can I use it commercially?
- Yes. MIT is a permissive licence: you can use, modify and sell software built on it, as long as you keep its copyright and licence notices.
- Is it still maintained?
- Activity is slowing. The repository last received commits 7 months ago.
- What is it written in?
- Mainly HTML, according to GitHub's language statistics.
Answers come from the project's GitHub data, last synced on November 15, 2026, and from our analysis. They are not legal advice.
Star history
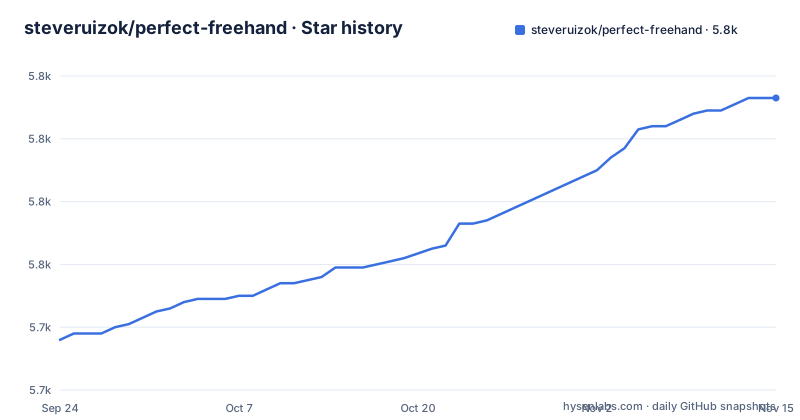
- steveruizok/perfect-freehand5,813 ★ · +77
| Repository | 2026-09-24 | 2026-11-15 |
|---|---|---|
| steveruizok/perfect-freehand | 5.7k | 5.8k |
77 Stars in the last 52 days, measured from the daily GitHub snapshot. Compare with other projects
Editorial analysis
getStroke returns a polygon and never draws anything
The package exports a function named getStroke, and you hand it an array of input points, the kind recorded from mouse or pointer movement. What comes back is a new array of outline points that surround those inputs, forming a polygon the project calls a stroke.
import { getStroke } from 'perfect-freehand'

const inputPoints = [
  [0, 0],
  [10, 5],
  [20, 8],
  // ...
]

const outlinePoints = getStroke(inputPoints)
Internally the work is two passes. A set of spline points is created from the input points, and then outline points are derived from those splines. The project illustrates exactly that with three colours: input points in grey, spline points in red, the outline in blue. Keeping that picture in your head explains why the result is a closed shape and why the raw input path is nowhere in the output. Rendering is left to you, and the docs point at SVG and HTML Canvas examples rather than shipping a renderer. Drawing with this library therefore always means three pieces of your own code: capture points, call getStroke, paint the polygon.
simulatePressure is on by default and it overrules your stylus
By default the library does not trust the pressure your hardware reports. With simulatePressure set to true, getStroke generates pressure for you. The options table describes that as simulating pressure based on velocity, while the introduction describes it as simulating pressure based on the distance between input points. If you want genuine pen or stylus values, supply the pressure as the third number for each point and set simulatePressure to false.
const inputPoints = [
  [0, 0, 0.5],
  [10, 5, 0.7],
  [20, 8, 0.8],
  // ...
]

const outlinePoints = getStroke(inputPoints, {
  simulatePressure: false,
})
The pressure value is optional in every input form, and a point with no pressure number is read as .5.
Nine options, all optional, each carrying a default
The options object is optional and so is every property inside it, which means getStroke(myPoints) is a valid call that returns default shaped strokes. The defaults are worth writing down before tuning anything: `size` 8 as the base diameter of the stroke, `thinning` .5 for the effect of pressure on size, `smoothing` .5 for how much the edges are softened, `streamline` .5 for how much the stroke is smoothed along its length, `simulatePressure` true, `easing` as t => t applied to each point's pressure, `start` and `end` as empty objects, and `last` set to true. Because size is a diameter rather than a radius, size 32 is a wide mark.
const stroke = getStroke(myPoints, {
  size: 32,
  thinning: 0.7,
})
The last flag has a visible consequence. When last is true the line's end is drawn at the last input point, rather than slightly behind it. Set it to false while a stroke is still being drawn and the tail pulls back from the pointer, which is how you render an unfinished mark.
cap stops working the moment taper rises above zero
The start and end options each take an object with the same three properties. cap is a boolean that defaults to true and decides whether to draw a cap. taper is a number or a boolean that defaults to 0 and sets the distance to taper, with the useful trick that setting taper to true makes the taper the total length of the stroke, so a short gesture gets a long fade. easing is a function that defaults to t => t and shapes the tapering effect itself. The trap is stated plainly in the docs: the cap property has no effect when taper is more than zero. A stroke that fades to nothing does not need a cap, but a stroke with a flat cap and taper 0 does, and when both are set the taper applies and the cap is ignored. Each end is configured separately, so a call can fade the tail while leaving the head blunt, or taper both ends, or cap one and fade the other. That asymmetry is where most of the useful control lives, and it is also where a bad combination silently loses the cap.
Object points are rewritten as arrays, and the docs warn about it
Points may be given as an array of arrays or as an array of objects, and the object form is the friendlier one to type.
const inputPoints = [
  { x: 0, y: 0, pressure: 0.5 },
  { x: 10, y: 5, pressure: 0.7 },
  { x: 20, y: 8, pressure: 0.8 },
  // ...
]

const outlinePoints = getStroke(inputPoints, {
  simulatePressure: false,
})
The caveat is stated by the project rather than discovered by users. Internally, getStroke converts object points to array points, which has an effect on performance, and the advice for ambitious use is to modify getStrokeOutlinePoints to use the object syntax directly, replacing all [0] with .x, [1] with .y, and [2] with .pressure. In other words the readable form is a convenience layer over the fast form, not the other way round. If your input stream is long, such as a scribble stored and re rendered, you are told to patch the source rather than to expect the library to switch.
One install line, and the other language ports are other people's work
Installing the library is one command, in either of the two package managers the docs show.
npm install perfect-freehandor
yarn add perfect-freehandThe library is written in TypeScript, and the ports to other languages are community work rather than first party releases. The docs name a dart version on pub.dev, an odin version, a python version, and a rust version on crates.io, and invite pull requests for further ports. That list matters when you pick a language: only the TypeScript package is covered by the option table and the examples, and a port is a port, so guidance in the TypeScript docs, such as the getStrokeOutlinePoints performance advice, is not guaranteed to apply to a port. Two other entry points exist outside the code: a hosted demo for trying the result, and a Figma plugin for people working in a design tool. Neither is a substitute for the code path you will run in production.
A yarn workspace on Node 20 with husky and commitlint in the way
The published package is built from a monorepo, and the root manifest describes the tooling rather than the API. It is marked private, named perfect-freehand-repo, and it declares [email protected] as its packageManager, node >=20.0.0 in engines, and packages/* as its workspaces. The scripts show the whole contributor path: test runs vitest run, bench runs vitest bench, build:packages runs node build.mjs then builds packages/perfect-freehand, build also builds packages/dev, publish:patch publishes ./packages/perfect-freehand, format runs prettier --write ., and prepare runs husky. A lint-staged block runs eslint --fix and prettier on JavaScript and TypeScript files, and prettier alone on json, md, yml, yaml, css and html.
The rest of that machinery sits in the tree as .husky/, commitlint.config.js, eslint.config.mjs, .prettierrc, .prettierignore, .nvmrc, .yarnrc.yml, lazy.config.js, vitest.config.ts, setupTests.ts, tsconfig.json, tsconfig.base.json and yarn.lock. The repository is not archived, the default branch is main, the last push landed on 13 April 2026, and the published tag v1.2.3 is dated 1 February 2026.
No pointer capture, no storage, no undo, and no path helper
The docs are clear that the package exports getStroke and that the rest is yours. The React example in the documentation shows input handling, and it is your code: setPointerCapture on pointer down, an e.pressure value stored with the coordinates, a guard that returns when e.buttons is not 1 during pointer move, and points held in component state. Then it calls getStroke with `size` 16, `thinning` .5, `smoothing` .5 and `streamline` .5. The same example imports getSvgPathFromStroke from a local utils file, which is the honest detail to notice: the path helper is not an export of the package, it lives with the example. So the helper that turns outline points into an SVG path string is a snippet you copy, not a function you import. Nothing in the library stores a stroke, names it, undoes it or transmits it. The docs also send TypeScript users to the example project included in the repository for a fuller setup. Read perfect-freehand as one geometry function in the middle of a drawing application you are going to write yourself.
Editorial conclusion
Use perfect-freehand when you are building a drawing surface and want good looking tapered strokes without writing the geometry yourself, and when you can accept that pressure is simulated unless you switch it off. Skip it if you need input capture, persistence, undo or a ready made path helper, since none of that is in the package. Before you commit, if you plan to build from the repository, check your Node version against the root engines field, note that the published tag v1.2.3 and the workspace root version 1.1.0 are different numbers, and read the object points performance note if your input is verbose.
Frequently asked questions
What does it mean to draw freehand in perfect-freehand?
In this project it means generating a pressure sensitive outline from an array of input points. getStroke turns your input points into spline points and then into outline points, and you render the resulting polygon with any technology you prefer.
What are the two main types of freehand drawing for perfect-freehand?
The docs do not define drawing categories. What they do define is where pressure comes from: simulated pressure is the default, and real pressure is used when you pass a third value per point and set simulatePressure to false.
Does freehand mean no reference in perfect-freehand?
getStroke always works from a reference, which is your input points. The outline points it returns surround those inputs, so the shape of the polygon is driven by the pointer path you recorded.
What is the meaning of free hand for perfect-freehand?
A stroke here is the polygon returned by getStroke from an array of input points, rendered however you like. Its look is then shaped by `size`, `thinning`, `smoothing`, `streamline`, the easing function and the start and end taper settings.
Official sources
Where developers are discussing it
Posts on Hacker News, dev.to and Lobsters that link to this repository, found by our scan of those communities. 1 in the last 30 days; newest first.
- Laser pointer for Obsidian: how my messy tldraw canvas during midsems became a plugindev.to · Oct 27, 2026 · 2 points · 1 comments
Add this badge to your README
If you maintain this project, the badge below links readers to this analysis and shows its maintenance status from the daily GitHub snapshot. Paste the markdown into your README; add ?metric=license or ?metric=stars to the image URL for a different field.

[](https://hysenlabs.com/projects/steveruizok-perfect-freehand)Star history chart for your README
[](https://hysenlabs.com/projects/steveruizok-perfect-freehand)Was this useful?