textbee's self-hosting path still needs a Firebase project
open-source sms-gateway. turn any android phone into an sms gateway
At a glance
- What is it?
- textbee turns an ordinary Android phone into an SMS gateway, with a dashboard, a REST API and an MCP server for agents. The comparison table against hosted providers does not survive contact with the rest of the page, and the self-hosting instructions require a Google cloud project, a search and replace of the hosted domain, and a compose file whose defaults publish a database and an admin interface.
- Who is it for?
- textbee suits someone who already has a spare Android phone and a carrier plan, and who wants message delivery without a per-message provider. Three things to know before you commit.
- Can I use it commercially?
- Yes, with strict conditions. AGPL-3.0 is a network copyleft licence: if people use a modified version over a network, for example as a hosted service, you must offer them its source code under the same licence.
- Is it still maintained?
- Yes. The repository received new commits within the last day.
- What is it written in?
- Mainly TypeScript, according to GitHub's language statistics.
Answers come from the project's GitHub data, last synced on November 15, 2026, and from our analysis. They are not legal advice.
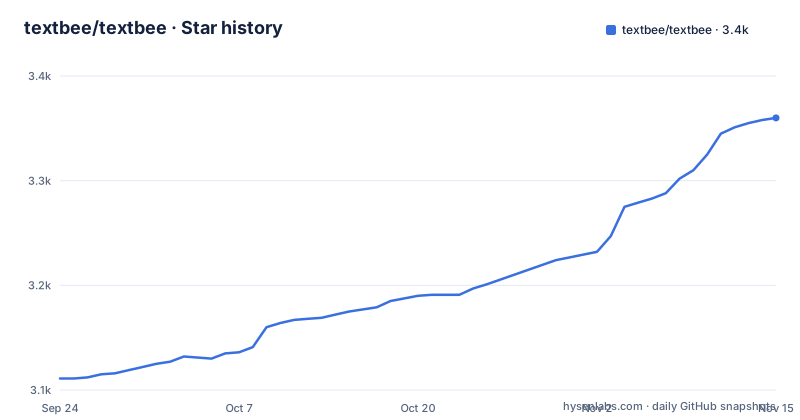
Star history
- textbee/textbee3,360 ★ · +249
| Repository | 2026-09-24 | 2026-11-15 |
|---|---|---|
| textbee/textbee | 3.1k | 3.4k |
249 Stars in the last 52 days, measured from the daily GitHub snapshot. Compare with other projects
Editorial analysis
The comparison table sets a plan against a meter
The page opens its case with a five-row table against hosted providers, and two of the rows hold up while the headline one does not.
The rows that hold up are the structural ones. The phone number is your own SIM rather than a number rented from a provider, self-hosting is available rather than not, and the code is open rather than closed. Those are facts you can verify from the repository.
The cost row is the one the page leads with, and it compares two different things. One side is your carrier plan, described as often free or unlimited; the other is a per-message price of a fraction of a cent. A plan's marginal cost per message is zero only if you would have bought the plan anyway, and the carrier's own charges for a business SIM may not be zero at all. So the row compares a subscription against a meter, which is the comparison that makes this kind of gateway attractive and also the one that stops being true the moment you are already paying for a phone.
The setup row is the one to read with care too. Two minutes is a fair description of registering an account, granting permissions and scanning a code. Against that, the right-hand column lists account approval and compliance forms, which is a real difference for a business, but it is also the step that would apply to this project if you used a hosted provider instead.
Messages go out through whichever device beat most recently
The routing rule for outbound messages is one sentence and it is worth sitting with.
Messages go out through your default device. Failing that, they go through the enabled device with the most recent heartbeat. A request can name a device explicitly by passing an identifier in the body, and the older per-device route still works but is marked as deprecated.
So the default is a liveness election: the phone that checked in last wins. That is a sensible default when you have two or three handsets plugged in and none of them is special, and it removes the need to configure a primary.
The request shape is the other half of the contract. The documented call is a post to a versioned send route with the key in a header, the recipients as an array and the message as a string:
const API_KEY = 'YOUR_API_KEY';

await axios.post('https://api.textbee.dev/api/v1/gateway/send-sms', {
  recipients: [ '+12025550123' ],
  message: 'Hello World!',
}, {
  headers: { 'x-api-key': API_KEY },
});
The same call is repeated for Python and for the command line in collapsed blocks on the page, which is a reasonable amount of repetition for a gateway whose users are often writing their first request against it.
Now the failure mode the page does not discuss. A phone that drops off the network does not relinquish anything: it simply stops beating, so it stays the most recent until another device beats it. If the sending phone goes offline, messages continue to be routed to it and fail there, rather than failing over to the one still connected. That is what the explicit identifier is for, and it is why the deprecated route is still documented rather than removed.
Receiving is account-level, sending is device-level
The asymmetry between the two directions is deliberate and the page states both halves.
For receiving, you enable receiving in the mobile app, then read incoming messages through the API, the dashboard, or webhooks delivered to a URL you choose. Message history is account-level: one call covers every device and no device identifier is needed.
For sending, the identifier matters, because delivery depends on which phone actually transmits.
That is the right split. History belongs to the account, since it is a record of what arrived; delivery belongs to a device, since it is a property of hardware with a carrier plan behind it. A bulk send that needed one identifier per historical message would be unusable, and a send with no device concept would be unable to express the multi-device throughput the feature list advertises.
The bulk path is a comma-separated file upload, and the feature list pairs it with multi-device support for higher throughput. So the intended high-volume configuration is several phones and a file of recipients, which is also the configuration where the heartbeat election above starts to matter.
The quick start is written against the hosted service
The six-step getting started is a hosted-service walkthrough, and it is worth being explicit about that because the page does not say so.
The first step is to go to the vendor's site and register or log in. The second is to install the app on your phone from the vendor's download page. The third is to grant the messaging permissions. The fourth is to open the dashboard and use the register-device control to generate an API key. The fifth is to scan a QR code with the app or type the key in. The sixth is to send.
So four of the six steps involve the vendor's own service, and only the last two are about your own integration.
Self-hosting has its own section further down, covering the database, the cloud messaging project, the Android build and the web build. A self-hoster therefore does not follow the quick start at all, and the two paths meet only at the point where an API key is generated and paired with the app.
That is a reasonable structure for a project with a hosted tier, and it does mean the part of the page most readers will read first is not the part they will use.
Self-hosting needs a database, a Google cloud project, and a find and replace
The self-hosting section is where the real dependencies appear.
The database is the easy half: install it on your own server following its guide, or use the free tier of the hosted database service instead.
The cloud messaging half is not optional. You create a project with a hosted push service, enable its messaging capability, and obtain credentials for two consumers, one for the backend and one for the Android app. So an installation that advertises no cloud dependency still talks to Google's infrastructure for device messaging.
Then there is the unglamorous step that tells you how self-hosted this project really is: update every occurrence of the vendor's domain with your own across the project, before building. That is a search and replace through the source rather than a configuration value, which means it has to be redone on every upgrade.
The builds are separate and both are documented: a Gradle wrapper invocation producing a release build for the app, and a step in the web directory to copy the example environment file. The stated stack is ten technologies long, from the front-end framework through the API framework and the database to the Android side, and it ends with a Java entry explicitly labelled as legacy.
The compose file publishes a database with credentials in the repository
The container file is the part to read before the first start, and it starts with the defaults.
The database service sets its initial root username to a default and its initial root password to a default, both literally in the file, and then publishes its port on the host on a non-default port with an overridable default.
Next to it sits an optional admin interface for the database, which is published on a host port of its own and configured with the same two default credentials. So out of the box the file publishes a database and a database administration interface, both reachable from the host, both protected by a password that is written in a public repository.
The rest of the file is better behaved. Every service restarts unless stopped, both application services wait for the database to report healthy, the database has its own health check against a ping command, and there is a named volume for the data directory. The API is given its environment from a file in its own directory rather than from inline values.
Both application services also carry a commented-out line pulling a prebuilt image from a registry, sitting directly above the active line that builds from the local directory. So the published container images exist, and the self-host path chooses not to use them.
The API's environment also names a Redis service in its connection string, so the stack expects one alongside the database.
The agent integration is three tools and a key in your client config
The MCP section is the shortest path from this project to an agent, and it is worth reading carefully.
The server lives in a separate repository and is described as the official one, letting several named desktop and command-line clients plus any compatible client send and read messages through your account.
The configuration is a JSON block naming the server, the command to run it with, and your API key in that command's environment. So the key lives in your client's configuration file on your own machine, which is what the page means when it says the key stays with you. The page also notes that plan limits apply server-side exactly as they do to any other send, which is the honest caveat for an agent that can send messages.
Three tools are exposed: one to send to one or many recipients, one to read replies and verification codes and check delivery status, and one to list devices. That last one is the interesting one for an agent, because it exposes the device election described earlier as something a model can inspect before deciding.
Self-hosted installations work with a base URL override, so the same client configuration points at your own deployment rather than the hosted one.
The page puts the carrier and the law on the user, twice
Two of the four question-and-answer entries are about responsibility rather than about the software, and both put the burden on you.
The first asks whether your carrier will block your number for sending too many messages. The answer is that carriers apply their own rate limits and anti-spam policies which vary by country and plan, that this is rarely an issue for personal or low-volume use, that higher throughput means using several devices and keeping sending rates reasonable, and finally that you are responsible for staying within your carrier's terms.
The second asks whether it is legal to send marketing messages this way. The answer names the regulation: telemarketing and messaging rules in the United States, and data protection and electronic communications rules in the European Union. Then the sentence that matters: this project is a tool, and you are responsible for obtaining consent and complying with the laws that apply to you and your recipients.
The remaining two are operational: the phone must stay powered on with the app running and connected to the internet, and a spare phone on a charger works as a dedicated gateway. Limits on the hosted version live on the pricing page, with self-hosting named as the way around them.
So the page is explicit that consent, carrier terms and uptime are your problem, and the tool is only the part that moves bytes.
Editorial conclusion
textbee suits someone who already has a spare Android phone and a carrier plan, and who wants message delivery without a per-message provider. Three things to know before you commit. Self-hosting is not fully independent, since the Android app depends on Google's cloud messaging service. The compose file's defaults publish a database and its admin interface with credentials printed in the repository, so change them before the first start. And the page itself puts the carrier and the legal burden on you, including consent for marketing messages, which no amount of tooling discharges.
Frequently asked questions
Can I use my Android phone as an SMS gateway?
That is the project's premise. You install its app on an Android phone, grant the messaging permissions, register the device from the dashboard to generate an API key, and pair the app with the key by scanning a QR code or typing it. The phone then sends and receives messages through a REST API, a dashboard and an MCP server.
how to use textbee
The page's six steps are written against the hosted service: register an account, install the app from the download page, grant the messaging permissions, use the dashboard's register-device control to generate an API key, pair the app with the key by QR code or by hand, then send from the dashboard or your own code with the key in a request header.
Does textbee need my phone to stay on?
Yes. Messages are transmitted through your phone, so it has to be powered on with the app running and connected to the internet. The page suggests a spare Android phone plugged into a charger as a dedicated gateway.
Is it legal to send marketing SMS with textbee?
The page says messaging marketing is regulated in most countries, naming United States telemarketing rules and European data protection and electronic communications rules, and states that the project is a tool while obtaining consent and complying with applicable law is your responsibility.
What does self-hosting textbee require?
A database, either installed on your server or taken from a free hosted tier; a project with a hosted push messaging service enabled and credentials obtained for both the backend and the Android app; a replacement of every occurrence of the vendor's domain with your own across the project; and separate builds for the Android app and the web front end. The stated stack names ten technologies and ends with a Java component marked as legacy.
What does the textbee container file expose by default?
A database and a separate database administration interface, both published on host ports, with the initial administrator username and password set to literal default values written in the file. The two application services wait for the database to report healthy, and the API's environment also names a Redis service.
Official sources
Add this badge to your README
If you maintain this project, the badge below links readers to this analysis and shows its maintenance status from the daily GitHub snapshot. Paste the markdown into your README; add ?metric=license or ?metric=stars to the image URL for a different field.

[](https://hysenlabs.com/projects/textbee-textbee)Star history chart for your README
[](https://hysenlabs.com/projects/textbee-textbee)Was this useful?