Timeframe: an e-paper family dashboard for Home Assistant
An e-paper calendar, weather, and smart home family dashboard for Home Assistant
At a glance
- What is it?
- Timeframe is a Ruby on Rails application that renders a calendar, weather and smart home dashboard for e-paper panels, installable as a Home Assistant add-on or as a standalone Docker container. It keeps its state in a bundled Postgres database on a persistent volume and takes almost all of its configuration from Home Assistant sensors.
- Who is it for?
- Timeframe fits a household that has committed to an e-paper panel and wants one shared view of the calendar, the weather and the home state without building a frontend.
- Can I use it commercially?
- Check first. The repository uses a licence we do not classify automatically, so read its LICENSE file before any commercial use.
- Is it still maintained?
- Yes. The repository last received commits 1 day ago.
- What is it written in?
- Mainly Ruby, according to GitHub's language statistics.
Answers come from the project's GitHub data, last synced on November 7, 2026, and from our analysis. They are not legal advice.
Star history
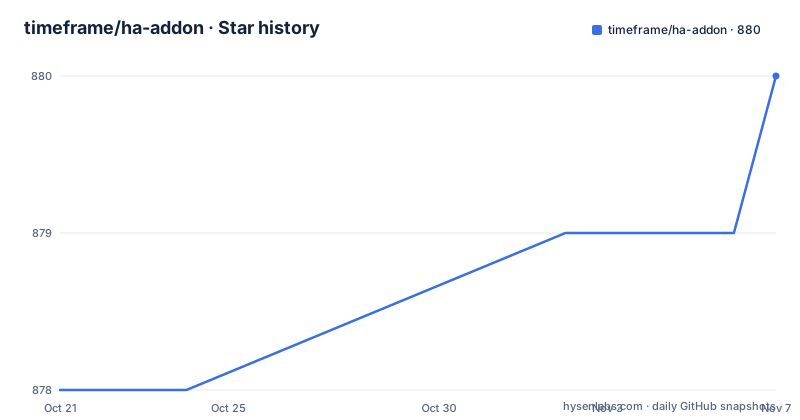
- timeframe/ha-addon880 ★ · +2
| Repository | 2026-10-21 | 2026-11-07 |
|---|---|---|
| timeframe/ha-addon | 878 | 880 |
2 Stars in the last 17 days, measured from the daily GitHub snapshot. Compare with other projects
Editorial analysis
A single screen for the calendar, the weather and the house
Timeframe is described as an e-paper calendar, weather and smart home family dashboard for Home Assistant. The intent is narrow and readable on an e-paper panel: a household schedule, a forecast, and a handful of status lines, refreshed on a schedule rather than interacted with like a phone.
The implementation is a Ruby on Rails application. The repository root shows the shape of it: app/, config/, db/, engine/, lib/, public/, a Procfile, a config.ru, a Rakefile and a Gemfile, plus a config.json and a repository.json that describe the Home Assistant add-on packaging. There is also a CHANGELOG.md and a test/ directory, so the project is laid out as a normal Rails application that happens to be packaged as an add-on rather than a script bolted onto Home Assistant.
The reader for this project is a Home Assistant user with an e-paper panel on a wall or a shelf, who wants the family calendar and the home status on it without keeping a phone in hand. The panel is the display, not the input, and that constraint shapes almost every decision described below.
Two update models, one set of supported panels
The supported display list is short and specific, and it matters because the refresh behaviour differs by device.
Visionect Place & Play 13 and Joan 13 Pro are listed as designed for a 10 minute update interval, and the Boox Mira Pro 25.3 and Boox Mira 13.3 are listed as offering real-time updates via WebSocket. TRMNL in its OG and X variants, the reTerminal E1001 7.5 inch and the reTerminal E1003 10.3 inch complete the list.
The distinction between the two groups is the main technical fact about the display layer. A panel that can be pushed updates over a WebSocket can show a change the moment Home Assistant reports it, while a panel built around a 10 minute interval is polled and refreshed on its own clock. Everything else in the project, from the sensor configuration to the unit choices, feeds the same rendering, but the moment a change appears on the glass is a property of the hardware, not of the application.
The repository topics are epaper, epaper-displays and visionect, so the panel support is the centre of the project rather than a side feature. A display that is not on that list is outside what the project claims to handle.
Installing through the Home Assistant add-on store
The add-on path is the shortest route and it is the one the project documents first. In Home Assistant, open Settings, then Add-ons, then the Add-on Store. Use the three-dot menu to reach Repositories, add the repository URL https://github.com/timeframe/ha-addon, then find Timeframe in the store and install it. Starting the add-on and opening the app completes the setup.
The application is then reachable at port 8099, for example at http://homeassistant.local:8099.
What makes this mode work without any environment variables is stated in the documentation: when installed as a Home Assistant add-on, Timeframe authenticates automatically through the Supervisor, and it reads its unit options from the add-on configuration interface. There is no token to paste and no URL to set, which removes the two configuration mistakes that would otherwise be the first failure a new user hits.
The add-on also brings the Supervisor's lifecycle handling, so the service starts and stops with Home Assistant instead of being a container you have to remember to restart.
Standalone Docker, where the token and the units move to the environment
The second route is a regular Docker container, independent of the add-on system, and it is the one to pick if Home Assistant is remote rather than on the same network. All configuration then comes from environment variables, and the container can point at any reachable Home Assistant instance. It needs a Home Assistant long-lived access token, created in Home Assistant under the profile, then Security, then Long-Lived Access Tokens.
A compose file is included in the repository and builds the image, publishes the port and mounts a named volume for the data directory:
services:
  timeframe:
    build: .
    restart: unless-stopped
    ports:
      - "8099:8099"
    volumes:
      - timeframe-data:/data
With the environment variables set, the start command is:
docker compose up -d --buildThe dashboard is then at http://localhost:8099. The docker run form spells out the same arrangement, including the volume mount and the two required variables:
docker build -t timeframe .

docker run -d \
  --name timeframe \
  -p 8099:8099 \
  -v timeframe-data:/data \
  -e TIMEFRAME_HOME_ASSISTANT_URL="http://192.168.1.50:8123" \
  -e TIMEFRAME_HOME_ASSISTANT_TOKEN="your_long_lived_access_token" \
  timeframe
The optional variables cover units: TIMEFRAME_TEMPERATURE_UNIT takes F or C, TIMEFRAME_SPEED_UNIT takes mph or kph, and TIMEFRAME_PRECIPITATION_UNIT takes in, mm or cm. PORT sets the listening port inside the container and defaults to 8099. SECRET_KEY_BASE encrypts sessions and stored data; if it is left unset, a random key is generated on first run and persisted to the /data volume.
The /data volume holds Postgres and the generated secret
The stateful part of the deployment is one directory, and it carries more than the obvious.
The documentation is explicit that the /data volume holds the bundled Postgres database and the generated secret key, and that it should be kept across restarts. The Dockerfile confirms the arrangement: it installs postgresql and postgresql-client alongside build tools, chromium and imagemagick, sets RAILS_ENV=production, precompiles assets with bundle exec rails assets:precompile, creates /data, and starts the app through ./script/docker-start.
Two consequences follow. First, losing the volume loses more than cached data, because the secret key lives in it, and sessions and stored data are encrypted with that key. The compose file therefore names a volume, timeframe-data, and the run example mounts it under the same name, so a container that is recreated keeps its database.
Second, the image is heavier than a typical dashboard would need, since it carries a database server and a browser alongside the Rails application. That cost is the price of a single self-contained container, and it is worth weighing against running the same application against an external database, which the project documentation does not describe.
Layout is configured with Home Assistant sensors, not a UI
The customisation model is unusual enough to be worth understanding before installing. Timeframe does not ask you to design a layout in its own interface. Instead, you create entities in Home Assistant and the application reads their state to decide what appears where.
Corner items come from sensors named sensor.timeframe_top_right_* and sensor.timeframe_top_left_*, and the state format is icon,label(optional),rotation(optional), for example door-open,Front Door. Icons use MDI names without the mdi- prefix, labels written in snake case are humanised automatically, and newlines in the state return several items for one sensor. The rotation field is a degree value, which the documentation gives as an example for wind direction. Weather status lines use sensor.timeframe_weather_status_*, and all-day calendar entries are added to the timeline through sensor.timeframe_daily_event_*.
Two entities pick the source data rather than the display. sensor.timeframe_media_player_entity_id defaults to the first media_player.* entity and controls which player's now-playing information is shown, and sensor.timeframe_weather_entity_id defaults to the first weather.* entity and decides which one provides the forecast. A third, sensor.timeframe_weather_feels_like_entity_id, overrides the feels-like temperature, which otherwise comes from the apparent_temperature attribute of the weather entity.
The documentation supplies Jinja template helpers that build those states from Home Assistant's own state machine, including a filter for entities that have been unavailable for more than 15 minutes and one for battery level sensors at or below 10 percent. The result is that most of the layout work is done in Home Assistant templates, which suits people who already write automations and would rather not learn a second configuration format.
Release and licensing gaps to check before you commit
Two things are worth checking before a long-term deployment, and neither is resolved by the documentation.
The repository has no GitHub releases, so there is no tagged version to pin in a compose file or a Dockerfile, and no published changelog entries to read through a release page. The last push was on 2026-09-24, so the code is being changed, but a deployment has to track whatever the current main branch holds, and a rollback means rebuilding from a commit rather than pulling a version. The CHANGELOG.md file in the repository is the only other history, and the documentation does not describe its format.
The licence is also unusual. The project is marked as Other, a custom licence that GitHub cannot classify, with the LICENSE file in the repository as the source of truth. A custom licence means the usual assumptions about a permissive open source licence do not apply automatically, and the file is where the actual terms live. The project is written in Ruby and depends on a Gemfile, so the dependency picture is conventional, but the terms of use for a deployment that persists household data and reads a Home Assistant instance are not settled by anything other than that file.
Nothing in the documentation describes authentication for the dashboard itself, so anyone who can reach port 8099 on the network may be able to read it. On a LAN that is usually fine; on a port forwarded to the internet it is not, and the documentation does not say to put a reverse proxy in front.
Editorial conclusion
Timeframe fits a household that has committed to an e-paper panel and wants one shared view of the calendar, the weather and the home state without building a frontend. It does not fit a request for a general dashboard, a multi-user console, or a deployment where a long-lived Home Assistant access token cannot be issued, and the licensing question has to be answered by reading LICENSE.md before you ship it anywhere, because the project uses a custom licence rather than a standard one. Verify first that the panel you own appears in the supported display list, that the /data volume survives container restarts, and that SECRET_KEY_BASE is set explicitly if you intend to move the volume between hosts.
Frequently asked questions
How do I install Timeframe in Home Assistant?
Open Settings, then Add-ons, then the Add-on Store, use the three-dot menu to reach Repositories and add https://github.com/timeframe/ha-addon, then find Timeframe in the store, install it and start it. The app is then available at port 8099, for example http://homeassistant.local:8099.
Which e-paper displays does Timeframe support?
The listed displays are Visionect Place & Play 13, Joan 13 Pro, Boox Mira Pro 25.3 and Boox Mira 13.3, TRMNL OG and X, and the reTerminal E1001 7.5 inch and reTerminal E1003 10.3 inch. The Visionect and Joan panels are designed for a 10 minute update interval, while the Boox panels are described as offering real-time updates via WebSocket.
Can Timeframe run without the Home Assistant add-on system?
Yes. It can run as a regular Docker container configured entirely through environment variables, and it can point at any reachable Home Assistant instance, local or remote. In that mode a Home Assistant long-lived access token is required, and the dashboard is served on port 8099.
What does the /data volume in Timeframe hold?
The documentation states that it holds the bundled Postgres database and the generated secret key, and that it should be kept across restarts. The secret key is used to encrypt sessions and stored data, and a random one is generated and persisted to the volume on first run if SECRET_KEY_BASE is not set.
How do I change the temperature and speed units in Timeframe?
When running standalone, set TIMEFRAME_TEMPERATURE_UNIT to F or C, TIMEFRAME_SPEED_UNIT to mph or kph, and TIMEFRAME_PRECIPITATION_UNIT to in, mm or cm. As a Home Assistant add-on the same unit options are read from the add-on configuration interface instead.
What licence is Timeframe released under?
The project is published with a custom licence that GitHub cannot classify as one of the standard ones, so its terms are set by the LICENSE file in the repository rather than by a recognised licence name. That file is the place to read the actual conditions before deploying it.
Official sources
Add this badge to your README
If you maintain this project, the badge below links readers to this analysis and shows its maintenance status from the daily GitHub snapshot. Paste the markdown into your README; add ?metric=license or ?metric=stars to the image URL for a different field.

[](https://hysenlabs.com/projects/timeframe-ha-addon)Star history chart for your README
[](https://hysenlabs.com/projects/timeframe-ha-addon)Was this useful?