jnv: a Rust terminal JSON viewer that runs jq filters through the embedded jaq engine, not your jq binary
Interactive JSON filter using jq
At a glance
- What is it?
- ynqa/jnv is an MIT-licensed interactive JSON viewer and jq filter editor for the terminal. It evaluates filters with jaq, so jq does not need to be installed, and it keeps its settings in a TOML file whose syntax changed in v0.7.0 without a migration tool.
- Who is it for?
- jnv suits developers who explore JSON from files or pipes and want to build a filter by typing and watching the result update, without installing jq. It is a weaker fit when you need exact jq behaviour, rich auto-completion beyond simple paths, or stability of configuration across versions.
- Can I use it commercially?
- Yes. MIT is a permissive licence: you can use, modify and sell software built on it, as long as you keep its copyright and licence notices.
- Is it still maintained?
- Yes. The repository last received commits 21 days ago.
- What is it written in?
- Mainly Rust, according to GitHub's language statistics.
Answers come from the project's GitHub data, last synced on November 16, 2026, and from our analysis. They are not legal advice.
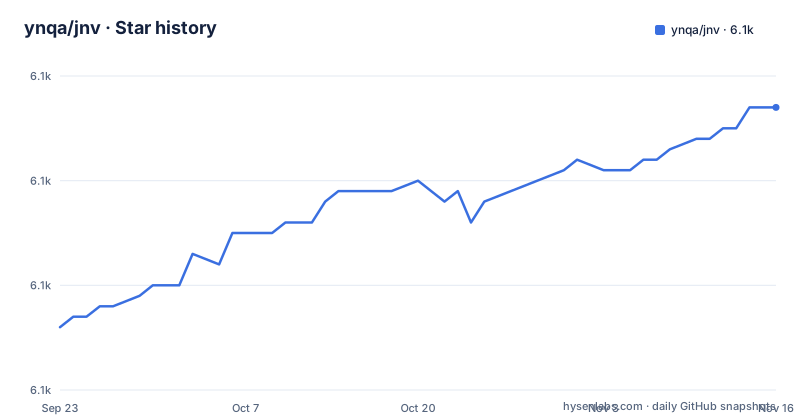
Star history
- ynqa/jnv6,137 ★ · +21
| Repository | 2026-09-23 | 2026-11-16 |
|---|---|---|
| ynqa/jnv | 6.1k | 6.1k |
21 Stars in the last 54 days, measured from the daily GitHub snapshot. Compare with other projects
Editorial analysis
Filters run in jaq, so jnv works without jq but may not match jq exactly
jnv is an interactive JSON viewer and jq filter editor. For applying filters it uses jaq, which the README says eliminates the need for users to prepare jq on their own. The Cargo manifest shows the jaq-core, jaq-json and jaq-std crates among the dependencies.
The benefit is a self-contained binary: install jnv and you can filter. The caution is that the engine evaluating your expression is jaq, not the jq program you may use in scripts. A filter that behaves one way in jnv should be re-checked in jq before you paste it into a pipeline, because the two are separate implementations. The README does not claim identical behaviour, so treat jnv as the place to explore and shape a filter, and confirm the final version with the tool that will run it.
Auto-completion only covers identity, object keys and array indexes
The filter editor offers auto-completion, and the README is specific that it only supports the identity filter, the object identifier-index and the array index. Those are the basic path-building pieces of jq syntax, such as a dot, a key name and a bracketed index.
The consequence is that completion helps you walk down into a structure but will not suggest functions, pipes or operators. You will type those yourself. The Tab key enters a suggestion, Tab or the down arrow selects the next one, and the up arrow selects the previous. Pressing any other key returns you to the editor. A hint message that helps evaluate the filter is also displayed, and it can be switched off in the configuration with the no_hint setting.
Input is a file or stdin, including streams of several JSON values
Input can come from a file or from standard input. The data can be a single JSON document or multiple JSON structures that can be deserialized with serde_json's StreamDeserializer, such as JSON Lines. The usage text says the optional input argument is a path to a JSON file, and if it is missing or given as a dash, jnv reads standard input.
The examples show both forms and the option to write the current result when you leave:
cat data.json | jnv

# or
jnv data.json

# or write current result to stdout on exit (UNIX only)
cat data.json | jnv --write-to-stdout | some-command
# and also output to file
cat data.json | jnv --write-to-stdout > result.json
The write-to-stdout option is marked UNIX only. That makes jnv usable as an interactive stage in the middle of a pipeline, with the caveat that it does not apply on Windows.
Two modes with separate key bindings, and some terminals will not render everything
jnv has an editor mode, which is the default, and a JSON viewer mode, and Shift with the up or down arrow switches between them. Ctrl+C exits, Ctrl+Q copies the jq filter to the clipboard and Ctrl+O copies the JSON. In the editor, Ctrl+A and Ctrl+E jump to line start and end, Ctrl+U clears the line, and Alt+B, Alt+F, Ctrl+W and Alt+D move or erase by the nearest word-break characters, which default to the dot, pipe, parentheses and brackets. In the viewer, the arrow keys or Ctrl+K and Ctrl+J move, Enter toggles a fold, Ctrl+P expands all and Ctrl+N collapses all.
The README warns that depending on the terminal and environment, characters and styles may not display properly, and specific key bindings and decorative characters may not work in certain terminal emulators. If a binding does nothing, test in another terminal before assuming a bug, or rebind it through the keybind settings.
Configuration is a TOML file, created on first run, and v0.7.0 broke the old syntax
Settings live in a TOML file loaded first from the path given with -c or --config and otherwise from the default location, which follows the dirs crate: ~/.config/jnv/config.toml on Linux, ~/Library/Application Support/jnv/config.toml on macOS and the Roaming AppData folder on Windows. If the file does not exist, it is created on first run.
An important notice says the syntax of the TOML configuration, like default.toml, was revamped in v0.7.0, and that no migration tool is provided. You must manually replace or update your local config.toml to match the new format. If you upgraded from an older version and your settings seem ignored or the program reports a configuration error, compare your file with default.toml in the repository. The configurable areas include hint messages, UI reactivity such as debounce times and animation speed, editor behaviour, viewer styling, completion display and keybinds.
Installation is through many package managers, and the Docker image is built locally
The simplest routes are Homebrew and Cargo:
brew install jnvcargo install jnvOther options are a Homebrew tap, MacPorts, Nix with nix-shell, and conda-forge through pixi or conda. For Docker, the README says that in the near future the image will be available on a registry, which means you build it yourself today with docker build -t jnv . and then mount your file:
docker run -it --rm -v $(pwd)/debug.json:/jnv/debug.json jnv /jnv/debug.jsonThe Dockerfile builds with a Rust slim image in a first stage and copies the binary into a slim Debian image. The path in that command is an example and must be changed to your own file.
The latest release is from April 2026, and the author points to vy for tree browsing
The recent releases are v0.7.1 on 2026-04-01, v0.7.0 on 2026-03-25 and v0.6.2 on 2026-02-20, with the last push on 2026-10-26. The package version in Cargo.toml is 0.7.1, and the project is not archived. Development continues on main after the last tag, so the repository may contain changes not yet in a release.
A tip at the top of the README suggests trying vy, another terminal tool by the same author, for JSON and YAML tree browsing, subtree exploration and side-by-side query results. That tip is the author's own pointer for those cases, and the jnv description covers JSON only. The project says it was inspired by jid and jiq, two earlier interactive filter tools.
Editorial conclusion
jnv suits developers who explore JSON from files or pipes and want to build a filter by typing and watching the result update, without installing jq. It is a weaker fit when you need exact jq behaviour, rich auto-completion beyond simple paths, or stability of configuration across versions. Before relying on it, test your filters against real jq, keep a copy of your config.toml, and check how your terminal renders its characters and key bindings.
Frequently asked questions
Does jnv need jq installed?
No. jnv uses jaq to apply jq filters, so users do not need to prepare jq on their own. Filters are evaluated by jaq, which is a separate implementation.
Where is the jnv configuration file?
On Linux it is ~/.config/jnv/config.toml, on macOS ~/Library/Application Support/jnv/config.toml, and on Windows C:\Users\{Username}\AppData\Roaming\jnv\config.toml. It is created automatically on first run.
How do I install jnv?
Use brew install jnv or cargo install jnv. It is also packaged for MacPorts, Nix, and conda-forge through pixi or conda, and a Dockerfile is provided for building an image locally.
Official sources
Add this badge to your README
If you maintain this project, the badge below links readers to this analysis and shows its maintenance status from the daily GitHub snapshot. Paste the markdown into your README; add ?metric=license or ?metric=stars to the image URL for a different field.

[](https://hysenlabs.com/projects/ynqa-jnv)Star history chart for your README
[](https://hysenlabs.com/projects/ynqa-jnv)Was this useful?