image-optimizer: private, local compression for JPEG, PNG, GIF and SVG
A tool for optimizing images and vector graphics.
At a glance
- What is it?
- Image Optimizer is an Electron desktop app that batches raster and vector files through the same compressors professionals use, mozjpeg, pngquant, gifsicle, SVGO and cwebp, without uploading anything. It also ships an imgopt command line tool with the same bundled optimizers, so the same pipeline works in a terminal or in CI.
- Who is it for?
- image-optimizer fits developers and designers who want to shrink images and vector files on their own machine, who care that the files never leave the computer, and who need the same behaviour in a script as in the GUI. It does not fit teams that need a hosted or browser-based optimiser, and on macOS the build side is heavier than the user side suggests because the compressors are built from pinned sources.
- Can I use it commercially?
- Yes. MIT is a permissive licence: you can use, modify and sell software built on it, as long as you keep its copyright and licence notices.
- Is it still maintained?
- Yes. The repository last received commits 24 days ago.
- What is it written in?
- Mainly TypeScript, according to GitHub's language statistics.
Answers come from the project's GitHub data, last synced on November 7, 2026, and from our analysis. They are not legal advice.
Star history
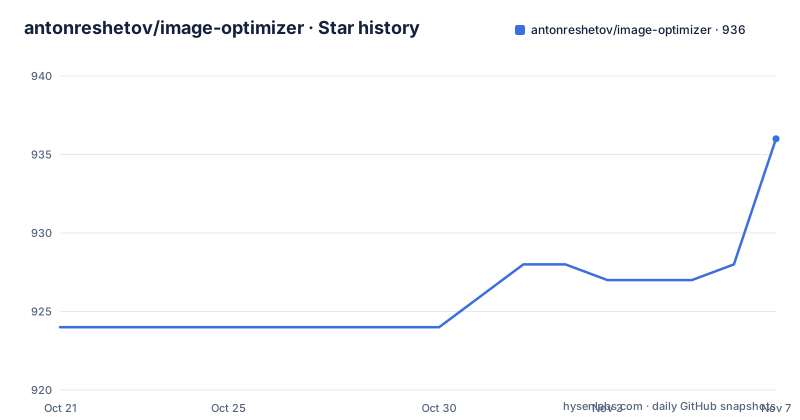
- antonreshetov/image-optimizer936 ★ · +12
| Repository | 2026-10-21 | 2026-11-07 |
|---|---|---|
| antonreshetov/image-optimizer | 924 | 936 |
12 Stars in the last 17 days, measured from the daily GitHub snapshot. Compare with other projects
Editorial analysis
A desktop app that never sends files anywhere
The positioning sentence in the README is short: a fast, private desktop image optimizer, a free and open source desktop app for compressing raster images and optimizing vector graphics, with files processed locally on your computer. That last clause is the product decision. Image compression tools that upload to a web service create a compliance question for anyone handling unreleased design assets, customer photography or screenshots of internal applications, and this project removes that question by doing the work on the machine. The application is built as an Electron app with Vue 3, TypeScript, Vite, Tailwind CSS and shadcn-vue, with Vitest for tests, and the repository contains the usual Electron packaging machinery, `electron-builder.json`, `components.json`, `scripts/`, `resources/` and `build/`. The audience is a working designer or front-end developer who has a folder of assets to shrink and does not want to sign up for a web service to do it.
Each format goes to the compressor specialists use
The format table in the README is the substance of the project, because it names a dedicated optimizer per input type rather than a single generic encoder. JPEG and JPG are handled by mozjpeg and can be written out as JPEG or WebP. PNG goes through pngquant with PNG or WebP as output. GIF is processed by gifsicle and stays GIF, and SVG is optimized with SVGO and stays SVG. WebP conversion in both directions is powered by cwebp. The split has consequences. SVGO is a vector optimizer, so it rewrites path data and metadata rather than resampling pixels, and gifsicle handles animated GIF behaviour, so neither is interchangeable with a raster compressor. The application also offers what the underlying tools expose: adjustable JPEG and PNG quality before a job runs, metadata stripping, and a choice of where the output goes, a configurable output folder, a `.min` suffix, or replacing the source file in place. A before and after preview lets you check that the visual result is still acceptable, which matters when a lossy pass is applied to an image that was already compressed once.
imgopt is the same engine without the window
The app ships an `imgopt` command that uses the same bundled optimizers, which is the part of this project most likely to matter for a build pipeline. On macOS you link it into `/usr/local/bin` through the Image Optimizer menu, Install Command Line Tool, and on Windows the installer adds `resources\bin` from the install directory to your user `PATH`, with a new terminal needed after installation and the entry removed on uninstall. The documented invocations cover the common cases:
imgopt                          # asks what to optimize and how
imgopt ./images                 # writes to ./images/minified
imgopt photo.jpg --webp -s      # writes minified/photo.min.webp
imgopt ./assets --in-place -s   # logo.min.png next to logo.png
imgopt ./images --json          # machine-readable report
imgopt ./assets --in-place -y   # overwrite originals without asking
Run without paths, the tool walks you through the options interactively and prints the equivalent command at the end, which is a convenient way to learn the interface and to copy a working command into a script. In a terminal it shows a progress bar and asks before overwriting originals. In scripts and CI, paths are required and overwriting needs `--yes`.
Exit codes are the CI contract
The CLI defines a small, explicit failure contract, which is what separates it from a GUI wrapper bolted onto a shell script. The exit code is `1` when any file fails, `2` on invalid arguments and `130` when you decline to overwrite. In other words a build step that calls `imgopt` can distinguish a processing failure from a usage mistake from a user saying no, and can act differently on each. Combined with the `--json` flag for a machine-readable report, that is enough to wire the tool into a pipeline that fails a build when an image cannot be processed. The interactive behaviour is deliberately different from the scripted one: without paths the tool is a guided session, and with paths in a script it refuses to guess. The full option list is behind `imgopt --help`, so the README points there rather than duplicating the reference.
The compressors are built from pinned sources on macOS
The development requirements reveal more about the project than the feature list does. Node.js 24 and pnpm 10 are required, and on macOS you need the Xcode Command Line Tools, installed with `xcode-select --install`, plus CMake to build universal JPEG and WebP compressors. Preparation runs automatically before development and production builds and is reused until dependencies are reinstalled. The first WebP build downloads pinned WebP and libpng sources and verifies their SHA-256 checksums. The important line is the reassurance that follows: installed apps need neither build tools nor network access for optimization. In other words the checksum verification and the native toolchain are a build-time concern for developers, and the shipped application is self contained. That design choice also means the compressors are versioned with the app rather than being whatever happens to be on the user's machine, which is the difference between a reproducible result and a different output on every workstation.
Checks, compressors tests and three platform packages
The contributor workflow is short enough to reproduce. Installing dependencies and starting the Electron app with hot reload is:
pnpm install --frozen-lockfile
pnpm dev
The same checks that CI runs are available locally:
pnpm check
pnpm format:check
pnpm build
`pnpm check` runs ESLint, TypeScript checks and the Vitest suite. Beyond that, `pnpm prepare:compressors && pnpm test:compressors` exercises real JPEG, PNG, GIF and SVG optimization and JPEG and PNG conversion to WebP, and CI runs those checks on both Apple Silicon and Intel Macs, with macOS releases running them again before packaging. Packaging is done with `pnpm package` for an unpacked directory, `pnpm package:mac`, `pnpm package:win` and `pnpm package:linux` for platform specific packages, and `pnpm package:mac:local` for an unsigned, non-notarized macOS build suitable for local testing, with generated packages written to `dist`. The `package.json` pins `[email protected]` and requires Node `24.x`.
Downloads, licence and the shape of the limit
The published artefacts are installers, not a library, and that is the main constraint on adoption. Downloads come from GitHub Releases: DMG and ZIP builds for macOS on both Apple Silicon and Intel, an NSIS installer for Windows and a Snap package for Linux. There is no npm package for other teams to embed, no server mode and no browser build, so a web service that wants to optimise uploaded images on the backend has to use the underlying tools directly. That is also the honest alternative. Running mozjpeg, pngquant, gifsicle, SVGO and cwebp yourself gives full control over the pipeline and no Electron dependency, but you get no unified interface, no before and after preview, and none of the output naming or quality controls the application adds. On licensing, the README states MIT and the `LICENSE` file is in the repository root, copyright Anton Reshetov. Release activity is high, with v2.0.1 on 2026-10-05, v2.0.2 on 2026-10-14 and v2.1.0 on 2026-10-15, and the last push was on 2026-10-15.
Editorial conclusion
image-optimizer fits developers and designers who want to shrink images and vector files on their own machine, who care that the files never leave the computer, and who need the same behaviour in a script as in the GUI. It does not fit teams that need a hosted or browser-based optimiser, and on macOS the build side is heavier than the user side suggests because the compressors are built from pinned sources. Before adopting it, check the download format for your platform, since macOS uses DMG and ZIP, Windows uses an NSIS installer and Linux uses a Snap, and run imgopt --help to confirm the flags your script needs, then verify the exit codes 1, 2 and 130 behave the way your CI expects.
Frequently asked questions
Which formats can image-optimizer handle?
JPEG and JPG through mozjpeg, PNG through pngquant, GIF through gifsicle and SVG through SVGO, with WebP output for JPEG and PNG handled by cwebp. GIF and SVG are written back in their original format.
How do I install the imgopt command line tool?
On macOS, choose Image Optimizer, Install Command Line Tool, which links imgopt into /usr/local/bin. On Windows the installer adds resources\bin from the install directory to your user PATH, and you should open a new terminal afterwards.
What exit codes does imgopt return?
The exit code is 1 when any file fails, 2 on invalid arguments and 130 when you decline to overwrite. In scripts paths are required, and overwriting originals needs the --yes flag.
Do I need to install any compressors myself?
No. The app bundles the optimizers, and the README states that installed apps need neither build tools nor network access for optimization. Build tools are needed only on macOS for developers, because the JPEG and WebP compressors are built from pinned sources.
Official sources
Add this badge to your README
If you maintain this project, the badge below links readers to this analysis and shows its maintenance status from the daily GitHub snapshot. Paste the markdown into your README; add ?metric=license or ?metric=stars to the image URL for a different field.

[](https://hysenlabs.com/projects/antonreshetov-image-optimizer)Star history chart for your README
[](https://hysenlabs.com/projects/antonreshetov-image-optimizer)Was this useful?