uiautomator2 and the two wait clocks that trip up Android test scripts
Android Uiautomator2 Python Wrapper
At a glance
- What is it?
- uiautomator2 is a Python client for an HTTP service running on the phone, built for people automating real Android apps. It gives you XPath and UiAutomator selectors with predictable timeouts, and it leaves you with a device requirement and a derived version number to handle.
- Who is it for?
- Take uiautomator2 when your target is Android 4.4 or newer and you want element-level control from Python, and step aside if you need iOS, because the device side is an Android jar served over HTTP. Before you pin anything in a requirements file, run uiautomator2 version against the build you actually installed: the version field in pyproject.toml still reads 3.2.0 while the releases reach 3.7.1.
- Can I use it commercially?
- Yes. MIT is a permissive licence: you can use, modify and sell software built on it, as long as you keep its copyright and licence notices.
- Is it still maintained?
- Yes. The repository last received commits 1 day ago.
- What is it written in?
- Mainly Python, according to GitHub's language statistics.
Answers come from the project's GitHub data, last synced on November 14, 2026, and from our analysis. They are not legal advice.
Star history
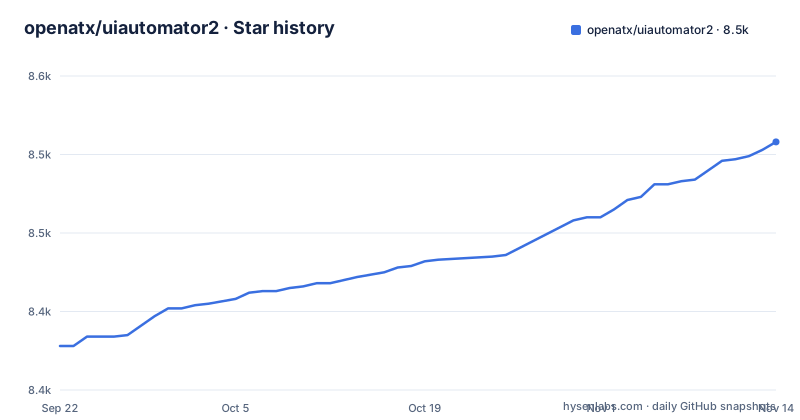
- openatx/uiautomator28,508 ★ · +130
| Repository | 2026-09-22 | 2026-11-14 |
|---|---|---|
| openatx/uiautomator2 | 8.4k | 8.5k |
130 Stars in the last 53 days, measured from the daily GitHub snapshot. Compare with other projects
Editorial analysis
An HTTP service in a jar, and Python on the other end
An Android device runs an HTTP service built on UiAutomator, and the Python client calls that service over HTTP. The split is what keeps your test process free of Android code, so a script written against this API reads like ordinary Python. The device side is a jar file, and it is open source in its own repository at github.com/openatx/android-uiautomator-server-jar, which means the behaviour on the phone can be read rather than guessed at.
The dependency floor is stated plainly: Android 4.4 or newer, Python 3.8 or newer. The client packages lean on requests, lxml, Pillow and click, and adbutils is pinned to the 2.x line at 2.11.0 or higher and below 3. That pin deserves attention, because adbutils is not optional decoration. It is how the library reaches the device in the first place.
Install is one line, pip install uiautomator2, and running uiautomator2 version afterwards tells you what actually landed.
Three ways to name the device, and only one needs adbutils
Naming the device has three documented routes, and they differ in what you must have installed. The first passes the serial number adb already printed, and connecting that way is described as an alias for u2.connect_usb. If the server is not on the default port of 9008, the same call accepts port=9009. The second route needs no code change at all: export ANDROID_SERIAL before starting Python, and a bare u2.connect() picks it up.
The third route is the one that needs another library. adb devices -l prints a transport_id, and adbutils turns that id into a device object you can hand to connect:
import adbutils # Requires version >=2.9.1
import uiautomator2 as u2
dev = adbutils.device(transport_id=6)
d = u2.connect(dev)
The repository contradicts itself slightly here. That comment asks for adbutils 2.9.1 or newer, while pyproject.toml requires 2.11.0 or newer and below 3. Follow the constraint in pyproject.toml, because that is what pip resolves on install, and adbutils 2.10 satisfies the comment but not pyproject.toml.
Two wait mechanisms that throw two different exceptions
Two independent timeout mechanisms sit in this API, and they fail differently. The UiAutomator-side wait is set with implicitly_wait and defaults to 20 seconds. It also reads from settings, so d.settings['wait_timeout'] = 10.0 sets the same thing, and calling implicitly_wait() with no argument returns the current value:
d.implicitly_wait(10.0) # Can also be modified via d.settings['wait_timeout'] = 10.0
print("wait timeout", d.implicitly_wait()) # get default implicit wait

# Throws UiObjectNotFoundError if "Settings" does not appear in 10s
d(text="Settings").click()
That wait covers six calls only: click, long_click, drag_to, get_text, set_text and clear_text. Everything outside that list does not inherit it.
The XPath layer keeps its own clock. A selector's click takes a timeout and raises XPathElementNotFoundError when the element is absent, while click_exists returns whether the click worked instead of raising, and wait defaults to 10 seconds:
sl.click(timeout=10) # Specify timeout, throws XPathElementNotFoundError if not found
sl.click_exists() # Click if exists, returns whether click was successful
el = sl.wait()
Mix both layers in one script and you have two budgets running at once, which is how a slow screen turns into an exception at a line nobody suspected.
@personal-fm is shorthand for a resource-id XPath
The XPath entry point collapses the resource-id case into one character. This line is rewritten internally to the full predicate on the right:
d.xpath('@personal-fm') # Equivalent to d.xpath('//*[@resource-id="personal-fm"]')Longer queries go through the ordinary path, and d.xpath hands back an XPathSelector object rather than the element itself, which is where the timeout behaviour lives:
sl = d.xpath("@com.example:id/home_searchedit") # sl is an XPathSelector objectThe syntax is the standard set. / selects from the root node, // from any position starting at the current node,. is the current node, .. its parent, @ selects attributes, and [] filters with a predicate expression. XPATH.md at the repository root holds the interface reference, with a Chinese version beside it. What the library cannot do is author the query for you: UIAutoDev generates these strings, and it is a separate project.
d.info, d.device_info and window_size read three different sources
Three accessors report on the device, and each one comes from a different place. d.info comes from UiAutomator and reports currentPackageName, displayWidth, displayHeight, displaySizeDpX, displaySizeDpY, displayRotation, screenOn, sdkInt, productName and naturalOrientation. d.device_info never touches UiAutomator: it runs adb shell getprop and returns arch, brand, model, sdk, serial and version. window_size() runs adb shell wm size and returns a tuple that flips with orientation, (1080, 1920) when upright.
The two d.info samples do not agree, and that is the useful part. The quick start shows a OnePlus5 with sdkInt 27 and displayWidth 1080, while the reference section shows an ELE-AL00 with sdkInt 29 and displayWidth 720. Neither is wrong. The fields you branch on, screen size and sdkInt, move with the hardware rather than with the library, so any assertion built on a hardcoded 1080 is a bet on the device.
The element inspector is another project with three install paths
Authoring XPath by hand is optional if you install the element inspection tool, which the documentation calls optional but highly recommended. That tool is UIAutoDev, and it lives outside this repository. Three paths are given. With Node.js present, launch it through npx and the browser opens itself:
npx uiautodev -openWithout Node.js, the documentation points at a standalone binary for your platform from get.uiauto.dev that you run directly. Or install the Python version:
pip install uiautodev
uiautodev
# or: python -m uiautodev
Two older tools are named as alternatives for the same job, uiautomatorviewer and Appium Inspector. That comparison is the extent of it: the project makes no claim about how the scripting sides compare, only about inspecting elements. For a team standardising on uiautomator2, the consequence is that your selectors depend on a tool with its own release cadence, and nothing in this repository pins a version of it.
The version in pyproject.toml lags the release feed
Versioning here is derived rather than typed, which matters to anyone pinning a dependency. pyproject.toml carries version = 3.2.0, while published releases are numbered 3.6.0, 3.7.0 and 3.7.1. Both statements are true at once: poetry-dynamic-versioning is enabled, reads the version out of the git tag with a numeric pattern, and substitutes it into uiautomator2/version.py at build time. The literal in pyproject.toml is not the current release.
Two commands tell you what you have. The install section says to run uiautomator2 version, or python -m uiautomator2 version, and that it normally outputs the library version. That is the only reliable check, because a requirements line cannot be matched against the checked-in field.
There is a major version jump to plan for as well. Users still on 2.x.x are sent to docs/2to3.md before upgrading to 3.x.x, with the upgrade described as highly recommended.
One test target needs a phone, the other needs a borrowed APK
The Makefile splits the tests by what they require. The test target runs pytest against mobile_tests/, which needs a real device because those tests drive one. The covtest target runs the demo_tests and tests directories with coverage instead. The demo half depends on a single APK the repository does not ship: the init target downloads ApiDemos-debug.apk from the appium project's repository when the file is absent, then installs it through adbutils.
poetry run python -m adbutils -i ./ApiDemos-debug.apkA contributor without hardware can still run part of the suite, but the device-backed half goes unverified locally. The build target shows the same pattern of external dependencies: it adds the poetry-dynamic-versioning plugin, runs uiautomator2/assets/sync.sh, removes dist and builds.
One boundary beyond the code. The webview plugin is not in this repository; it lives at github.com/YuYoungG/uiautomator2-webview, and the project says future plugins will be integrated as third-party libraries to keep the core simple. Webview handling comes with its own maintenance schedule.
Editorial conclusion
Take uiautomator2 when your target is Android 4.4 or newer and you want element-level control from Python, and step aside if you need iOS, because the device side is an Android jar served over HTTP. Before you pin anything in a requirements file, run uiautomator2 version against the build you actually installed: the version field in pyproject.toml still reads 3.2.0 while the releases reach 3.7.1.
Frequently asked questions
What is uiautomator2?
A Python library for automating Android through UiAutomator. It has two halves: a device side HTTP service built on a UiAutomator jar, and a client that calls it over HTTP.
How do I install uiautomator2?
Run pip install uiautomator2, then confirm with uiautomator2 version or python -m uiautomator2 version. The library needs Python 3.8 or newer and a device running Android 4.4 or newer.
How do I use uiautomator2?
Enable Developer options on the phone, connect it to the computer, and check that adb devices lists it. Then call u2.connect() in a Python interactive window and print d.info to confirm the connection.
How do I install uiautomator2 on macOS?
The install section gives one command for every platform, pip install uiautomator2 followed by uiautomator2 version. No macOS-specific step is documented, and no virtualenv or Homebrew path is described.
How do I install a specific version of uiautomator2?
Version numbers are derived from git tags by poetry-dynamic-versioning and substituted into uiautomator2/version.py, so the field in pyproject.toml is not a reliable indicator. Run uiautomator2 version against the installed build instead.
uiautomator2 vs Appium?
The project names Appium Inspector only as an alternative element inspector alongside uiautomatorviewer, both for inspecting elements rather than for driving a session. A comparison of the two automation drivers is not given.
Official sources
Add this badge to your README
If you maintain this project, the badge below links readers to this analysis and shows its maintenance status from the daily GitHub snapshot. Paste the markdown into your README; add ?metric=license or ?metric=stars to the image URL for a different field.

[](https://hysenlabs.com/projects/openatx-uiautomator2)Star history chart for your README
[](https://hysenlabs.com/projects/openatx-uiautomator2)Was this useful?