coreml-cli: a Swift command line tool that runs, benchmarks and serves Core ML models on macOS without Xcode or Python
A native command-line interface for working with Apple Core ML models on macOS
At a glance
- What is it?
- schappim/coreml-cli is an MIT-licensed native macOS tool for inspecting, running, benchmarking, compiling and serving Core ML models. Its serve command turns a model into a local HTTP endpoint, with guards against network exposure and DNS rebinding.
- Who is it for?
- coreml-cli is a good fit for a Mac developer who already has a Core ML model and wants to inspect it, time it, or put it behind a local HTTP endpoint without opening Xcode or writing Python. It does nothing for models that are not yet in Core ML format and runs on macOS only.
- Can I use it commercially?
- Yes. MIT is a permissive licence: you can use, modify and sell software built on it, as long as you keep its copyright and licence notices.
- Is it still maintained?
- Yes. The repository last received commits 72 days ago.
- What is it written in?
- Mainly Swift, according to GitHub's language statistics.
Answers come from the project's GitHub data, last synced on November 15, 2026, and from our analysis. They are not legal advice.
Star history
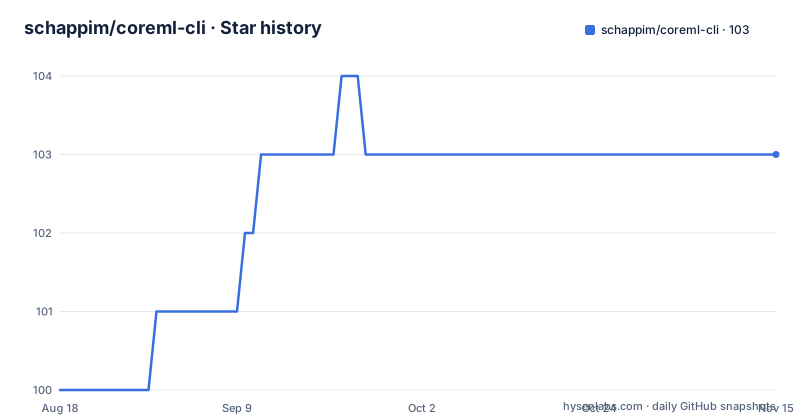
- schappim/coreml-cli103 ★ · +3
| Repository | 2026-08-18 | 2026-11-15 |
|---|---|---|
| schappim/coreml-cli | 100 | 103 |
3 Stars in the last 89 days, measured from the daily GitHub snapshot. Compare with other projects
Editorial analysis
serve keeps the model loaded, while predict pays the loading cost on every call
The README is explicit about the difference between the two ways to run a model. The serve command compiles and loads the model once at startup and keeps it warm, so requests skip the model-loading cost that a fresh coreml predict pays every time. Starting it takes one line:
coreml serve MobileNetV2.mlmodelThe startup banner prints the address, 127.0.0.1:8080, the device setting all, a concurrency of 4 and a maximum body of 32 MB, followed by the four routes and a ready-made curl line generated from the model's own input type. That means the first request is a copy and paste. The server also exposes GET routes: the root path lists endpoints, input names and output names, /health reports liveness, uptime and request, prediction and error counters, and /v1/info returns the same JSON that coreml inspect with the json flag prints.
The consequence is that predict is for one-off checks and serve is for anything you call repeatedly. Timing a model through predict in a loop measures the load cost as well as the inference, which is the wrong number if you care about steady-state latency.
Models with several inputs can only be driven over HTTP
The coreml predict command feeds one file to the model, so models with several inputs can only be driven through serve. Each input is named in a JSON object under inputs:
curl -X POST -H "Content-Type: application/json" \
  -d '{"inputs": {"sepal_length": 5.1, "sepal_width": 3.5, "petal_length": 1.4, "petal_width": 0.2}}' \
  http://127.0.0.1:8080/v1/predict
Values follow each input's declared type. Image inputs take a base64 string, multi-array inputs take a possibly nested numeric array, and string, double and int64 inputs take their JSON counterparts. A bare input key works when the model has exactly one input. If you leave one out, the error names it, for example a 422 saying Missing value for model input sepal_width, followed by the list of model inputs. A tabular model such as the iris example is therefore a job for HTTP, not for the plain predict command.
The server binds to localhost, and widening it requires a key
By default serve binds 127.0.0.1, so a model is never exposed to the network by accident. To reach it from another machine, you bind wider and require an API key:
coreml serve MobileNetV2.mlmodel --host 0.0.0.0 --api-key "$COREML_API_KEY"The key is accepted as either an X-API-Key header or an Authorization Bearer header, and --cors allows calls from a browser page. Without the key flag, widening the bind exposes the endpoint, and the README's pairing of the two options is the intended use.
The examples all use http:// URLs, so a key sent across a network travels over plain HTTP unless you put something that terminates TLS in front of the server. Keep the default loopback binding unless you have a reason to leave it.
A DNS rebinding guard rejects unfamiliar Host headers on loopback binds
On a loopback bind the server only answers requests whose Host is a literal IP address or localhost. The reason given is DNS rebinding: a web page that points a domain it controls at 127.0.0.1 cannot drive your model, because its requests carry the wrong Host value.
The side effect is that a loopback-bound server reached through a name in /etc/hosts is refused until you list the name:
coreml serve MobileNetV2.mlmodel --allowed-host myapp.localIf a local script works against 127.0.0.1 but fails when you use a hostname, this guard is the first place to look. The option is a deliberate allowlist, not a bypass, so add only the names you control.
Device selection lets you force the Neural Engine, the GPU or the CPU
For predict, the device is chosen with --device, and the three explicit values are ane for the Apple Neural Engine, gpu and cpu for CPU only:
coreml predict MobileNetV2.mlmodel --input photo.jpg --device ane  # Apple Neural Engine
coreml predict MobileNetV2.mlmodel --input photo.jpg --device gpu  # GPU
coreml predict MobileNetV2.mlmodel --input photo.jpg --device cpu  # CPU only
The serve command takes the same option with cpu, gpu, ane or all, and all is the default. The option table also lists a default port of 8080, a concurrency of 4 predictions at once and a maximum body size of 32 MB set by --max-body-mb. Forcing a device is useful for comparing latency across compute units on one machine. The sample outputs in the README, such as 1.66 ms for a MobileNetV2 prediction, are single illustrations, so measure on your own Mac.
Installing is Homebrew, a release tarball or a Swift build, and macOS 13 is the floor
The recommended route is Homebrew:
brew tap schappim/coreml-cli
brew install coreml-cli
The alternative is the release tarball, which you download with curl, unpack with tar and move into /usr/local/bin with sudo. Building from source requires macOS 13 or newer and Swift 5.9 or newer:
git clone https://github.com/schappim/coreml-cli.git
cd coreml-cli
swift build -c release
sudo cp .build/release/coreml /usr/local/bin/
Afterwards coreml --version should print 1.1.0. The tool is macOS only, because it is built on Core ML itself. Plan any Linux or Windows deployment around something else.
It handles models already in Core ML format and says nothing about converting from other frameworks
The feature list is inspect, predict, serve, batch, benchmark, compile and metadata. Compile converts a .mlmodel file into the optimized .mlmodelc format. That is the only conversion on offer. Predict accepts images, text or JSON data, and batch processes multiple files with concurrent execution.
There is no feature for turning a PyTorch or TensorFlow model into Core ML, so that step has to happen elsewhere before this tool is useful. The two releases are v1.1.0 on 2026-09-04 and v1.0.0 on 2026-01-21, and the last push was on 2026-09-04, the same day as the latest release. The tests directory and a CHANGELOG.md are in the repository, and the Package.swift manifest defines the build. The inspect command also prints the model size, whether it is compiled, its inputs and outputs, and author and description metadata, and it accepts a json flag for scripting.
Editorial conclusion
coreml-cli is a good fit for a Mac developer who already has a Core ML model and wants to inspect it, time it, or put it behind a local HTTP endpoint without opening Xcode or writing Python. It does nothing for models that are not yet in Core ML format and runs on macOS only. Before relying on it, check that your model's inputs fit the predict command or its serve API, and keep the default localhost binding unless you set an API key.
Frequently asked questions
What is Core ML and what does it do?
Core ML is Apple's model format and runtime that coreml-cli works with. The tool inspects, runs, benchmarks, compiles and serves Core ML models on macOS, without needing Xcode or Python.
How do I convert a PyTorch model to Core ML?
coreml-cli does not do that. Its compile feature only converts a .mlmodel file to the optimized .mlmodelc format, so a PyTorch model has to be converted to Core ML by other means first.
Does coreml-cli work on Linux or Windows?
No. It is a native macOS tool, and building from source requires macOS 13 or newer and Swift 5.9 or newer.
Official sources
Add this badge to your README
If you maintain this project, the badge below links readers to this analysis and shows its maintenance status from the daily GitHub snapshot. Paste the markdown into your README; add ?metric=license or ?metric=stars to the image URL for a different field.

[](https://hysenlabs.com/projects/schappim-coreml-cli)Star history chart for your README
[](https://hysenlabs.com/projects/schappim-coreml-cli)Was this useful?