Genjustsu: a mask-gated video character replacement workflow built on Seedance
Open-source AI video replacement workflow by TEIN. Combine depth maps, SAM segmentation, face meshes, and audio processing to replace characters and objects with Seedance. Includes a local web UI to prepare inputs, review masks, preview generations, and export with original audio.
At a glance
- What is it?
- Genjustsu is a local Python workflow that swaps characters in a video by combining colored depth maps, SAM 3 masks and the Seedance model through Enhancor, with a mandatory human approval gate on the mask and a 1080p pass after the draft. Everything heavy runs on hosted APIs, so the local install is mostly plumbing.
- Who is it for?
- Genjustsu fits an editor who already has licensed source footage and character references and wants a repeatable replacement pipeline instead of hand driven per shot work, and it does not fit a team that cannot send its footage to third party APIs, since every mask, composite and prompt is uploaded to Enhancor, Replicate and Hugging Face, or a team that wants a local model, because the README states no local weights or GPU are needed for the hosted setup.
- Can I use it commercially?
- Yes. MIT is a permissive licence: you can use, modify and sell software built on it, as long as you keep its copyright and licence notices.
- Is it still maintained?
- Yes. The repository last received commits 30 days ago.
- What is it written in?
- Mainly Python, according to GitHub's language statistics.
Answers come from the project's GitHub data, last synced on November 7, 2026, and from our analysis. They are not legal advice.
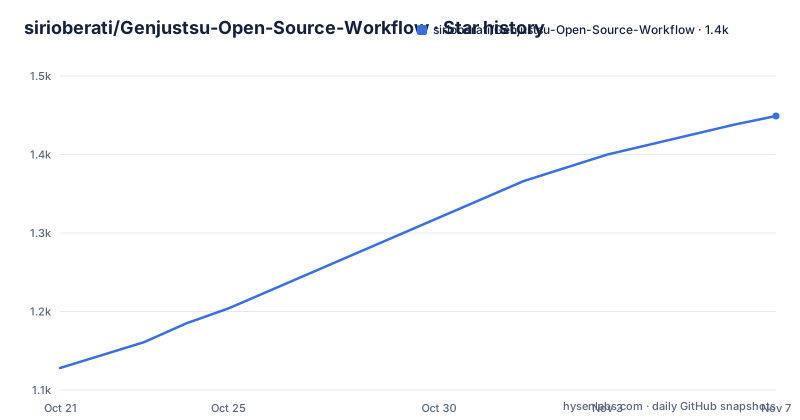
Star history
- sirioberati/Genjustsu-Open-Source-Workflow1,449 ★ · +321
| Repository | 2026-10-21 | 2026-11-07 |
|---|---|---|
| sirioberati/Genjustsu-Open-Source-Workflow | 1.1k | 1.4k |
321 Stars in the last 17 days, measured from the daily GitHub snapshot. Compare with other projects
Editorial analysis
The workflow replaces a character, but the audio stays untouched
Genjustsu is a local web UI and agent-assisted workflow for replacing video subjects. The project description says it combines depth maps, SAM segmentation, face meshes and audio processing to replace characters and objects with Seedance, and the README makes one promise very explicit: the final export restores the entire original source audio, not generated audio.
That single design decision shapes the rest of the pipeline. Because the model output is treated as a silent video track, the generated footage only has to look right, while the sound comes from the original file untouched. The pipeline even separates the original audio into vocals and music with Demucs on Replicate, pitches the isolated vocals up three semitones with Rubber Band while keeping the duration, and then re-embeds the pitched vocals into the composite video so the character you insert has a different voice.
The other headline feature is the approval gate. A mandatory full-clip visual mask review stands between preparation and generation, and approval is bound to hashes of the current artifacts. Change the mask and the approval no longer applies, which is what stops an approved mask from being silently swapped for a different one before a paid generation runs.
The project ships under the MIT license with a THIRD-PARTY.md and SHA256SUMS.txt at the root, and the README states plainly that no API keys, signed media URLs or old jobs are included.
Depth first, then SAM 3, and the masks are checked by eye
The generation path is a specific chain of tools, and the order is the point. The working video is normalized to 24 fps and up to 960 pixels, then colored depth is obtained with lucataco/depth-anything-video, and the README insists that the returned colors be preserved. Depth is not used as the mask itself. It is used as the prompt for segmentation.
SAM 3 then produces raw PNG masks from the depth image, and the README tells the operator to check three things on the result: alignment, coverage and background spill. An agent can retry the segmentation against the original RGB frames if depth loses detail, which is the escape hatch when the depth map flattens a thin subject such as hair or a translucent garment.
Once the mask is right, the depth subject is composited over the original background, and that composite is what gets sent for generation. Every mask in the clip is reviewed before anything is sent, not a sampled subset. This is the slowest and most tedious part of the workflow, and the README treats it as a feature rather than friction.
The repository layout mirrors the stages. raw_masks.py, mask_review.py, pipeline.py, workflow.py and audio_workflow.py are separate modules, face_mesh.py and mesh_worker.py handle the face mesh modes, and seedance_bridge.py is the boundary to the generation provider.
Two tiers of generation, because a draft and a final cost very different amounts
The generation side is two-tiered by design. A draft is produced by default, and only an explicit HD approval upgrades the accepted draft to 1080p. The completed draft and the HD result are kept separate, and both final previews use the source audio.
The model routing is described as well. Seedance Edit handles image references, and Seedance Omni or multi_reference handles a video identity reference. The Enhancor integration is called out as supporting human faces through pass_faces: true, along with draft previews and approved 1080p generation. A draft that is accepted is then completed at full resolution against the same approved mask.
A note on where the money goes is worth repeating from the project itself. The setup instructions for the coding agent end with an instruction not to submit paid generations, and the agent is told that if keys are missing it should launch the UI and say clearly that generation is waiting for them. In other words, the intended workflow is that a human reviews masks and prompts before any billable call.
The audio handling in the final assembly is the part that is easy to miss. After generation the result is polled for completion and downloaded, its own audio is discarded, and the complete original soundtrack is copied into the final MP4. That applies again after the HD pass, so the soundtrack is restored twice, once for the draft and once for the final.
The install path is a local app plus a callback tunnel to the provider
Two setup routes are documented. The easy one hands the job to a coding agent: extract the ZIP, open the folder in Codex or another agent with terminal and file access, and paste the prompt that instructs it to read docs/SETUP-AGENT.md and follow it end to end. The manual route is the setup script.
The manual route needs Python 3.12 or newer, with the development runtime being Python 3.14, plus the Rubber Band CLI and cloudflared unless you already have a public HTTPS webhook receiver. On macOS the packages are:
brew install rubberband cloudflaredOn Ubuntu, Debian or WSL:
sudo apt install rubberband-cli python3-venvThen the project directory is prepared with a single script that creates an isolated .venv, installs requirements.txt, creates a blank .env and checks dependencies:
bash setup.shThe face mesh modes need their own step, and the README is specific about it. You install Python 3.12 and run setup-face-mesh.sh, and on macOS you install the worker interpreter with brew install [email protected] if it is missing. After that you can run the diagnostic:
bash setup-face-mesh.sh.venv/bin/python doctor.py --meshThe dependencies themselves are modest and pinned: gradio_client, fastapi, uvicorn, python-multipart, av, numpy, Pillow, requests, opencv-python-headless and scipy. The web app is a FastAPI service with uvicorn behind it, and the Gradio client is how the workflow talks to the hosted models.
The tunnel is the piece to understand before you install. When no custom webhook is configured, the launcher starts a callback only Quick Tunnel through cloudflared, and the README says the UI and the media stay on localhost while only the callback is exposed. The app and the tunnel have to stay running for the duration of a job.
The .env file decides where your footage physically lives
The environment file is short and it tells you the entire data path of the project. Three keys are read, and the media hosting defaults are the part worth reading twice:
ENHANCOR_API_KEY=
REPLICATE_API_TOKEN=
HF_TOKEN=
ENHANCOR_BASE_URL=https://apireq.enhancor.ai/api/seedance2.5/v1
ENHANCOR_WEBHOOK_URL=
MEDIA_HOST=tmpfiles
ENHANCOR_API_KEY and REPLICATE_API_TOKEN are required, and HF_TOKEN is optional, needed only for the Hugging Face depth alternative. ENHANCOR_BASE_URL points at the Seedance 2.5 endpoint by default.
MEDIA_HOST defaults to tmpfiles, which is temporary hosting, with catbox listed as a public persistent fallback:
MEDIA_HOST_FALLBACKS=catbox
CATBOX_USERHASH=
That default is a meaningful operational detail. Temporary hosting means the URL the provider fetches your composite video from can expire, so a long job can fail at the moment of generation for a reason that has nothing to do with your mask. The fallback is public and persistent, which trades expiry risk for permanent public hosting of your prepared video.
ENHANCOR_WEBHOOK_URL is required by Enhancor and is left blank in the default file so the automatic cloudflared tunnel supplies one. You can set it yourself if you already have a public HTTPS receiver.
Running the app is a single command, and the port is fixed in the instructions:
./start.commandThe UI is then at http://127.0.0.1:8770, and a second port is available if that one is taken. There is also a stricter diagnostic that fails when the keys are missing:
PORT=8771 bash start.command.venv/bin/python doctor.py --require-keysWhat this workflow cannot do
Several things are outside the design, and a couple of them are hard limits rather than omissions.
There is no local inference path in the documented setup. The README states that no local model weights or GPU are needed for the default hosted setup, and every heavy step, depth, segmentation, vocal separation, generation, runs on a hosted service. That is a genuine advantage on a laptop with no GPU, and it is also a hard dependency on three paid services and on the network for the whole pipeline.
The audio treatment is opinionated in a way that may not suit every piece. Isolated vocals are pitched up three semitones with duration preserved. For footage of a speaking character that is a deliberate transformation, but for a project where the original voice should remain, there is no documented way to skip the pitch step.
The mask gate is also a throughput limit. Every mask in the clip must be reviewed and approved by a person, and approval is bound to artifact hashes, so any change invalidates it. On a long clip with many shots, that review is the dominant cost in wall clock time.
What is missing from the documentation is worth noting too. The repository has no GitHub releases, so there is no version history to consult beyond the commit log, and the README does not document how to migrate an existing project when the pipeline changes. The .agents directory and AGENTS.md point to an agent skills file, and the README states that no particular agent vendor or model is required, but only that the agent must be able to inspect video and files.
Against a single pass video model, the difference is the review loop
The usual alternative is to hand a clip to a hosted video model with a prompt and accept the result. The difference here is not the model, which is Seedance either way, but what happens before the call.
A single pass approach treats the source footage as an input and the model output as an answer. Genjustsu treats the mask as an object that a person signs off on, with the composite built locally before anything is sent. That has two effects. You catch the failure that matters most in this pipeline, a mask that grabbed the background or cut off an arm, before you pay for generation. And you get a repeatable artefact, since the approved composite and its hashes are what the generation was run against, so a rerun is not a different take.
The two-tier draft and HD flow is the other difference. It moves the cost decision to the point where a human has seen a picture, which matters when a 1080p pass costs substantially more than a draft.
The price of that approach is dependency. The agent setup path, the cloudflared callback tunnel, the media host selection and the doctor scripts all exist to make a multi service pipeline work from a laptop. A team with its own orchestration, its own key management and a place to run a persistent worker gets less from this project than a solo editor does, and would more likely end up using the modules in pipeline.py and workflow.py as a reference than running the launcher.
Editorial conclusion
Genjustsu fits an editor who already has licensed source footage and character references and wants a repeatable replacement pipeline instead of hand driven per shot work, and it does not fit a team that cannot send its footage to third party APIs, since every mask, composite and prompt is uploaded to Enhancor, Replicate and Hugging Face, or a team that wants a local model, because the README states no local weights or GPU are needed for the hosted setup. Verify three things before committing: that your Enhancor key and webhook path work end to end, that the depth-derived mask actually covers your subject, and that the +3 semitone vocal pitch shift suits the footage you are working on. The project is MIT licensed, has no GitHub releases, and the last push was on 2026-10-08.
Frequently asked questions
How do I install the Genjustsu workflow?
Install Python 3.12 or newer plus the Rubber Band CLI and cloudflared, then run bash setup.sh in the project folder, which creates an isolated .venv, installs requirements.txt and creates a blank .env. For the face mesh modes, install Python 3.12 and run bash setup-face-mesh.sh, then check with .venv/bin/python doctor.py --mesh.
Which API keys does the Genjustsu workflow need?
You supply your own ENHANCOR_API_KEY and REPLICATE_API_TOKEN, and HF_TOKEN is optional for the Hugging Face depth alternative. The .env file also sets ENHANCOR_BASE_URL, ENHANCOR_WEBHOOK_URL and the MEDIA_HOST options.
Does the final video keep the original audio?
Yes. The README states that the final export restores the entire original source audio rather than generated audio, and the generated result's own audio is discarded and replaced with the source soundtrack after both the draft and the 1080p pass.
Why do I need cloudflared for Genjustsu?
Enhancor requires a webhook URL, so when no custom webhook is configured the launcher starts a callback only Quick Tunnel through cloudflared. The README states that the UI and media stay on localhost while the app and tunnel must be kept running for the duration of a job.
Does Genjustsu run models locally?
Not in the default setup. The README states that no local model weights or GPU are needed for the default hosted setup, since depth, segmentation, vocal separation and generation all run on hosted services.
Official sources
Add this badge to your README
If you maintain this project, the badge below links readers to this analysis and shows its maintenance status from the daily GitHub snapshot. Paste the markdown into your README; add ?metric=license or ?metric=stars to the image URL for a different field.

[](https://hysenlabs.com/projects/sirioberati-genjustsu-open-source-workflow)Star history chart for your README
[](https://hysenlabs.com/projects/sirioberati-genjustsu-open-source-workflow)Was this useful?