EfficientLoFTR: semi-dense local feature matching at sparse-like speed, from a CVPR 2024 highlight
Code for "Efficient LoFTR: Semi-Dense Local Feature Matching with Sparse-Like Speed", CVPR 2024
At a glance
- What is it?
- EfficientLoFTR is the released code for a semi-dense local feature matcher that keeps LoFTR's accuracy while running at a speed closer to sparse methods, with full and opt configurations, reparameterisation for inference and pretrained outdoor weights. It is now also available through Hugging Face Transformers, which is the easier route for most users.
- Who is it for?
- Adopt EfficientLoFTR if you need dense-ish local feature matching between image pairs and can use the Hugging Face Transformers route, since the model is integrated there and the demo notebook gives you a working pair-matching script. Do not adopt it as a general correspondence solver for indoor or object-centric images, because the README states the model is trained on MegaDepth and works best for outdoor scenes, with a possible domain gap indoors.
- Can I use it commercially?
- Check first. The repository uses a licence we do not classify automatically, so read its LICENSE file before any commercial use.
- Is it still maintained?
- Yes. The repository last received commits 54 days ago.
- What is it written in?
- Mainly Jupyter Notebook, according to GitHub's language statistics.
Answers come from the project's GitHub data, last synced on November 7, 2026, and from our analysis. They are not legal advice.
Star history
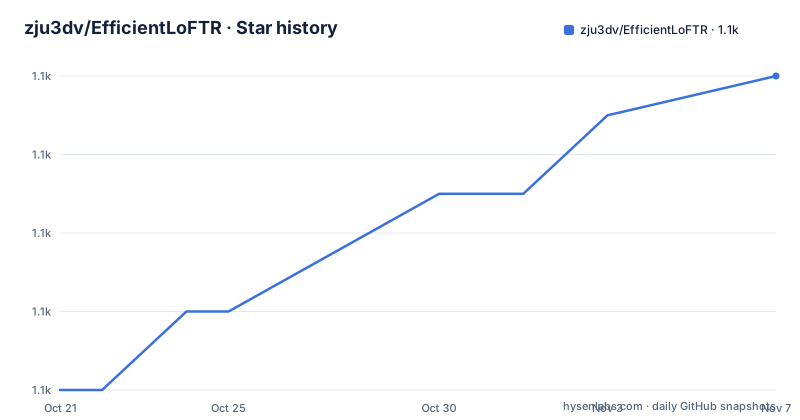
- zju3dv/EfficientLoFTR1,066 ★ · +8
| Repository | 2026-10-21 | 2026-11-07 |
|---|---|---|
| zju3dv/EfficientLoFTR | 1.1k | 1.1k |
8 Stars in the last 17 days, measured from the daily GitHub snapshot. Compare with other projects
Editorial analysis
What the paper contributed and what the repository ships
EfficientLoFTR is described in the README as code for the paper Efficient LoFTR: Semi-Dense Local Feature Matching with Sparse-Like Speed, a CVPR 2024 Highlight, with a project page and the paper PDF linked at the top.
The authors are Yifan Wang and Xingyi He as equal contributors, with Sida Peng, Dongli Tan and Xiaowei Zhou, all from the zju3dv group, whose name and the repository path suggest Zhejiang University.
The TODO list is fully ticked, and its shape tells you what is actually in the tree. Inference code and pretrained models are present, along with the code for reproducing the test-set results, options for flash-attention for better performance, a Jupyter notebook demo for matching a pair of images, and training code.
The last two points matter for adoption. Training code being present means the project is not inference-only, and the flash-attention option is a concrete performance lever rather than a vague claim.
The repository layout backs this up: there are src/, configs/, scripts/, notebooks/, data/, a train.py, a test.py, an environment.yaml and a separate environment_training.yaml, plus assets/ and a LICENSE file. The primary language is listed as Jupyter Notebook, which reflects the demo-first presentation, but the implementation is Python and PyTorch.
The licence field is recorded as a custom licence GitHub cannot classify, so the LICENSE file at the root is the authoritative text.
Installing the environment, and the two Google Drive downloads
The installation is a conda environment plus a pinned torch build.
conda env create -f environment.yaml
conda activate eloftr
pip install torch==2.0.0+cu118 --index-url https://download.pytorch.org/whl/cu118
pip install -r requirements.txt
The torch pin is specific: version 2.0.0 with the CUDA 11.8 wheel index. On a machine with a newer GPU stack this is likely the first thing you will want to change, and the README gives no guidance on newer versions.
Two things then come from Google Drive rather than from the repository. The test and training data is at a download link provided by LoFTR, so the upstream project hosts the datasets, and the pretrained model is at a separate link.
The requirements.txt shows the training stack, and it is a large one: albumentations 0.5.1 with the no-binary flag for imgaug and albumentations, ray for distributed training, einops 0.3.0, kornia 0.4.1, loguru, yacs for configuration, h5py 3.1.0, pytorch-lightning 1.3.5, torchmetrics 0.6.0, joblib, opencv_python 4.4.0.46 and pillow 9.5.0, plus jupyterlab, matplotlib, tqdm, autopep8, pylint and ipython.
Note the comment on the torchmetrics line, which points at an NVIDIA DeepLearningExamples issue about a version problem. That is the authors telling you that a pin in this file is there for a reason, and the pinned versions generally reflect an early 2024 ecosystem rather than current releases.
Basic usage, and the reparameterisation step you cannot skip
The basic usage block is short and has one step that is easy to overlook.
from src.loftr import LoFTR, full_default_cfg, reparameter

_default_cfg = deepcopy(full_default_cfg)
matcher = LoFTR(config=_default_cfg)
matcher.load_state_dict(torch.load("weights/eloftr_outdoor.ckpt")['state_dict'])
matcher = reparameter(matcher)  # Essential for good performance
matcher = matcher.eval().cuda()

img0_raw = cv2.imread("path/to/image0.jpg", cv2.IMREAD_GRAYSCALE)
img1_raw = cv2.imread("path/to/image1.jpg", cv2.IMREAD_GRAYSCALE)
img0_raw = cv2.resize(img0_raw, (img0_raw.shape[1]//32*32, img0_raw.shape[0]//32*32))
img1_raw = cv2.resize(img1_raw, (img1_raw.shape[1]//32*32, img1_raw.shape[0]//32*32))

batch = {'image0': img0, 'image1': img1}

with torch.no_grad():
    matcher(batch)
    mkpts0 = batch['mkpts0_f'].cpu().numpy()
    mkpts1 = batch['mkpts1_f'].cpu().numpy()
    mconf = batch['mconf'].cpu().numpy()
The reparameter call is annotated in the README's own code as essential for good performance. It converts the trained network into its inference-time form, and skipping it costs you accuracy for no apparent reason. The comment is doing real work.
The images are read in grayscale, and resized so that both dimensions are divisible by 32. That constraint is a direct consequence of the network's downsampling structure, and it means your input aspect ratio is silently changed by the resize. The tensors are built with a None dimension for batch and channel, divided by 255, and the matcher writes its results back into the batch dictionary as mkpts0_f, mkpts1_f and mconf.
The weights path in the example is a local weights/ directory, so the checkpoint downloaded from Google Drive has to be placed there under that name.
The opt configuration, mixed precision and the confidence rescaling
The advanced usage adds a model type and a precision mode, and the two interact in a way the README explains only once.
model_type is full for best quality or opt for best efficiency. precision is fp32 as the default, mp for mixed precision, or fp16 for best efficiency on a modern GPU.
The config selection is a straightforward branch on model_type, choosing full_default_cfg or opt_default_cfg, and the precision flags set _default_cfg['mp'] = True or _default_cfg['half'] = True. The fp16 path then applies matcher.half() and builds the input tensors as half precision, while the mixed precision path uses torch.autocast with device_type='cuda' around the matcher call instead.
The detail worth flagging is the post-processing step for the opt model.
if model_type == 'opt':
    mconf = (mconf - min(20.0, mconf.min())) / (max(30.0, mconf.max()) - min(20.0, mconf.min()))
The opt model's raw confidence scores are on a different scale from the full model's, and this line normalises them into a comparable range before they are used as the colour map for the visualisation with cm.jet. If you skip it, the matching figure will look wrong even when the matches themselves are fine, which is a confusing failure for a visualisation-only issue.
The domain caveat is stated plainly in the configuration notes: the model is trained on MegaDepth and works best for outdoor scenes, and there may be a domain gap for indoor environments. For indoor structure-from-motion or object matching, this is the limitation to weigh before anything else.
The Transformers route, and the 480x640 default
Since July 2025 EfficientLoFTR is part of Hugging Face Transformers, with credit given to sbucaille, and the README says you can run inference with a few lines of code using pip install transformers, with a model card linked for the zju-community efficientloftr model.
This is the most significant practical change for a new user, because it removes the conda environment, the pinned torch wheel, the Google Drive checkpoint download and the manual reparameterisation call from the path. If you are starting today and you are not reproducing the paper's test-set numbers, the Transformers integration is the sensible entry point.
The cost is the resolution constraint. The README notes that the default AutoImageProcessor resizes images to a resolution of 480x640 pixels, and that if you need high resolution matching you should modify the default config or refer to the basic or advanced usage. The native path, which resizes to multiples of 32, gives you control over the input scale; the Transformers path hands you a fixed default that you have to override for high resolution work.
For a library where the input resolution affects the number of candidate matches, that difference is the one to be aware of.
Editorial conclusion
Adopt EfficientLoFTR if you need dense-ish local feature matching between image pairs and can use the Hugging Face Transformers route, since the model is integrated there and the demo notebook gives you a working pair-matching script. Do not adopt it as a general correspondence solver for indoor or object-centric images, because the README states the model is trained on MegaDepth and works best for outdoor scenes, with a possible domain gap indoors. Verify first which configuration you need, since full and opt trade quality for efficiency and the opt path also rescales confidence scores before visualisation, and note the environment pins torch 2.0.0 with CUDA 11.8.
Frequently asked questions
How do I install EfficientLoFTR and run a first match?
Create the conda environment from environment.yaml, activate eloftr, install torch 2.0.0+cu118 from the cu118 wheel index and requirements.txt, then download the pretrained checkpoint and the test data from the linked Google Drive folders. The basic usage script then loads the weights, calls reparameter on the matcher and runs it on two grayscale images resized to multiples of 32.
What does the reparameter call do in EfficientLoFTR?
The README's own code annotates the reparameter(matcher) call as essential for good performance. It converts the loaded network into its inference-time form, so skipping it costs accuracy for no apparent benefit.
Can I run EfficientLoFTR with Hugging Face Transformers?
Yes. Since July 2025 it is part of Hugging Face Transformers, so you can run inference with pip install transformers and the zju-community efficientloftr model card. The default AutoImageProcessor resizes images to 480x640, so high resolution matching needs the default config changed or the native usage path.
What is the difference between the full and opt EfficientLoFTR configurations?
The full configuration is for best matching quality and the opt configuration for best efficiency with minimal quality loss. The opt model also returns confidence scores on a different scale, so the advanced usage rescales mconf before visualising the matches.
Official sources
Add this badge to your README
If you maintain this project, the badge below links readers to this analysis and shows its maintenance status from the daily GitHub snapshot. Paste the markdown into your README; add ?metric=license or ?metric=stars to the image URL for a different field.

[](https://hysenlabs.com/projects/zju3dv-efficientloftr)Star history chart for your README
[](https://hysenlabs.com/projects/zju3dv-efficientloftr)Was this useful?