napkins.dev: a wireframe-to-app generator built on a vision model and a browser sandbox
napkins.dev – from screenshot to app
At a glance
- What is it?
- Napkins is an open source tool that takes a screenshot of a wireframe and generates a working application from it, using Kimi K2.5 through Together AI for the model and Sandpack to run the result in the browser. The interesting engineering is not the prompt but the surrounding plumbing: image storage on S3, an eval harness with a benchmark file, and a roadmap that admits the generated apps are not yet editable.
- Who is it for?
- Napkins fits a developer or designer who wants to see what a rough wireframe turns into as a running interface, and who is willing to pay for model inference and set up a Together AI key and an S3 bucket.
- Can I use it commercially?
- Yes. MIT is a permissive licence: you can use, modify and sell software built on it, as long as you keep its copyright and licence notices.
- Is it still maintained?
- Yes. The repository last received commits 15 days ago.
- What is it written in?
- Mainly TypeScript, according to GitHub's language statistics.
Answers come from the project's GitHub data, last synced on November 7, 2026, and from our analysis. They are not legal advice.
Star history
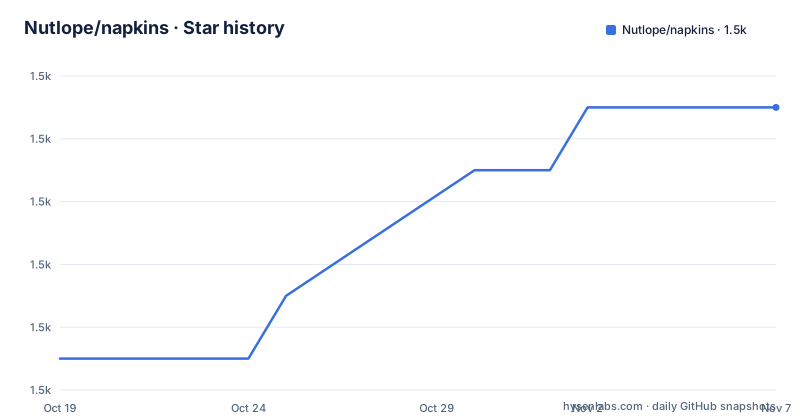
- Nutlope/napkins1,483 ★ · +8
| Repository | 2026-10-19 | 2026-11-07 |
|---|---|---|
| Nutlope/napkins | 1.5k | 1.5k |
8 Stars in the last 19 days, measured from the daily GitHub snapshot. Compare with other projects
Editorial analysis
The shape of the thing: screenshot in, running app out
Napkins is described as an open source wireframe to app generator, and the repository description is the slogan form of it, from screenshot to app. The homepage is napkins.dev, the primary language is TypeScript, and the licence is MIT.
The pipeline is described by the tech stack list, and it is worth reading in order because each piece has one job.
Kimi K2.5 is the LLM, with Together AI providing the LLM inference. The two are separate entries because the first is the model and the second is the service that serves it, and the links for both carry the same referral parameters, which tells you the model is reached through a Together AI endpoint rather than run locally.
Sandpack is the code sandbox, which is the part that makes the result interactive rather than a code snippet. A generated application that you can actually run in the browser is a different thing from a block of source code in a chat window, and Sandpack is the component that provides that.
S3 is for image storage, which is the reason the setup requires a bucket. The wireframe you upload has to live somewhere, and the project uses next-s3-upload for the upload path rather than rolling its own.
Next.js app router with Tailwind is the application itself, and Plausible is for website analytics, which is a privacy-respecting choice that also keeps the project's own traffic off Google's ad infrastructure.
The dependency list in package.json confirms every one of those choices and adds detail. @codesandbox/sandpack-react and @codesandbox/sandpack-themes are the Sandpack packages, next-plausible is the analytics integration, next-s3-upload is the storage path, together-ai is the inference client, and react-drag-drop-files handles the upload interaction. The rest is a standard Next.js 14 application with Radix UI primitives, lucide-react and heroicons for icons, framer-motion for animation, zod for validation, clsx and tailwind-merge for class handling, and class-variance-authority for variant styling. components.json at the repository root is the shadcn configuration, which matches the future task list mentioning a shadcn toggle.
Running it locally, and what you have to supply
The setup is four steps, and two of them involve accounts you have to create before anything works.
First, clone the repository:
git clone https://github.com/Nutlope/napkins
cd napkins
Second, create a .env file and add your Together AI API key as TOGETHER_API_KEY. The repository ships a .env.example, and the README says all required values are in that file.
Third, create an S3 bucket and add the credentials to your .env file, following the linked setup guide. The upload target has to be a real bucket, not a local path, which is the one piece of infrastructure this project assumes you already have or are willing to create.
Fourth, install and run:
npm install
npm run dev
The package.json also shows pnpm at [email protected] as the package manager, and there is a pnpm-lock.yaml and a pnpm-workspace.yaml in the repository, so the lockfile that will actually be used is pnpm's. The npm install line in the README is what the documentation says, and the lockfile suggests pnpm is what the maintainer develops against.
The scripts in package.json are the standard Next.js set, next dev, next build, next start and next lint, plus two that are not standard and are worth a second look.
The eval script runs npx tsx scripts/eval-focused.ts, and eval:single runs npx tsx scripts/eval-single.ts. There is an eval-benchmarks.md file at the repository root. So the project ships an evaluation harness and a write-up of its benchmarks, which is a meaningful thing for a project whose output is generated code, because otherwise there is no way to tell whether a prompt change made the results better or worse.
The scripts/ directory holds those two evaluation entry points, and esbuild appears in the dev dependencies, which is the bundler tsx uses under the hood to run TypeScript directly. So the eval harness is runnable with no separate build step, which is the right ergonomics for something you want to run repeatedly while iterating.
The future task list, which is the honest spec
The roadmap in the README is a list of unchecked boxes, and reading it as a spec tells you more about the project's state than any feature description would.
Make sure it looks nicer and less cluttered on mobile. That is a UI quality item, and it being the first one suggests the layout is functional rather than polished.
On the sidebar, show the output from the vision model. This is the most informative item on the list. It implies there is a vision model in the pipeline and that its output is not currently surfaced, which means the reasoning behind the generated code is invisible to the user. For a tool that turns an image into an app, showing what the model saw and what it inferred would be the difference between a black box and something you can steer.
Experiment with making it better through few shot prompts. That tells you the prompt is the lever and the current approach is a single shot, and that the author is aware that giving the model examples would help.
Add a shadcn toggle to allow folks to use or not use it. The components.json file in the repository root is the shadcn configuration, so shadcn is in the project and this task is about making it optional rather than default.
Allow folks to edit the generated app with a prompt, allow folks to choose from different themes, and show versions as the user edits the app. Those three are the interesting ones, because together they describe a very different product from what exists now. The current tool generates an app from a wireframe. The roadmap describes an iterative editor where you can modify the result by asking, pick a visual theme, and see the history of edits as versions. That is a substantial product change, and it is the difference between a demo of a capability and a tool you would use to build something.
The order of the list is also informative, since it reads as a prioritisation rather than a wishlist. Mobile polish comes before surfacing model output, and prompt experiments come before the shadcn toggle. The most valuable work, letting people edit what was generated, is last.
The eval harness, and why a benchmark file matters here
Two files in the repository listing are worth singling out, because they say something about how the project treats its own output.
There is eval-benchmarks.md at the repository root, and there is an eval script in package.json that runs npx tsx scripts/eval-focused.ts, alongside an eval:single that runs npx tsx scripts/eval-single.ts. So the project ships both a way to run evaluations and a document recording what they found.
That combination is what separates a serious tool from a demo. A screenshot-to-app generator produces output whose quality is hard to judge, because a plausible looking interface can be subtly wrong in a dozen ways, and a human looking at the result for a minute is not a measurement. Without a benchmark file, every claim about the tool improving is an impression. With one, a prompt change or a model swap becomes something you can evaluate rather than argue about.
The naming of the two scripts is also informative. eval:single is the obvious case, one input, one output, and eval-focused suggests running a focused set rather than the whole benchmark, which is what you want in a loop while changing something. The fact that they are run through tsx rather than being compiled first means there is no build step between a change and a measurement, which is the whole point of an eval harness in a project where the expensive resource is the model call rather than the CPU.
The esbuild dependency in devDependencies is what makes that possible, since tsx uses esbuild to strip types and run TypeScript directly. The evaluation harness therefore lives in the same language as the application, and it can import the application's own prompt construction rather than duplicating it, which is the difference between an eval that measures the product and one that measures a copy of it.
So the evaluation setup is the strongest signal in this repository about the project's intentions. A wireframe-to-app generator is easy to build and easy to demo. Building one that can tell you whether it got better is the work that makes it usable, and the benchmark file and the two eval scripts are that work.
The remaining piece a reader would want, and which the README does not summarise, is what the benchmarks measure and how they score the output. The file is in the repository, and it is the first thing to read before drawing any conclusion about the quality of what the tool generates.
Where this does not work, and the questions to ask before you rely on it
There are three limits that are structural rather than temporary, and they are worth separating from the roadmap items which are just work not yet done.
The first is that the data leaves your machine. The wireframe image goes to S3, and the model inference goes to Together AI. That is not a criticism, it is the design, but it means the project is not something you can run inside a network boundary without changing the infrastructure. A wireframe of an unreleased product, or a screenshot containing customer data, is material you would be uploading to a third party. The .env.example holding the credentials makes that visible, which is good, and it is a decision you have to make consciously rather than discover.
The second is that the output is a starting point, not a deliverable. A vision model producing an interface from a wireframe will produce something that resembles the wireframe. Whether that something is correct, complete, accessible, responsive or maintainable is a separate question that the model does not answer. The roadmap's own admission that the generated app cannot yet be edited with a prompt is the sharpest version of this: there is no loop in which you fix what it got wrong, other than regenerating and hoping.
The third is the cost. Every run is a paid model call, and the project gives you no indication of how many calls a single screenshot takes. The Kimi K2.5 and Together AI pairing is the inference path, and if the tool retries or iterates internally, the cost per screenshot is not one request. The referral parameters in the documentation links also tell you the project is funded partly by that referral, so the model choice is partly a commercial decision rather than purely a technical one.
Against those, the tool is genuinely useful for one thing. Turning a rough wireframe into something you can click is a fast way to get past a blank editor, to test a layout idea, or to show someone what a sketch would look like with real components. The components are real React with Tailwind and Radix, so the output is closer to a real application than to a mockup.
The questions to ask before relying on it are therefore specific. How many model calls does one generation take and what does it cost. What exactly is uploaded to S3 and for how long. And, reading the eval-benchmarks.md file, what the project's own measurements say about the quality of the output, because a project that ships a benchmark file is at least measuring the thing that matters.
Editorial conclusion
Napkins fits a developer or designer who wants to see what a rough wireframe turns into as a running interface, and who is willing to pay for model inference and set up a Together AI key and an S3 bucket. It is the wrong tool if you need a production application, since the roadmap still lists allowing people to edit the generated app with a prompt, and the wrong tool if you need your data to stay on your own infrastructure, because the model calls go to Together AI and the uploaded images go to S3. Before deploying, read the eval-benchmarks.md file, since the project ships its own evaluation harness, and treat the generated output as a starting point rather than a deliverable.
Frequently asked questions
What does napkins.dev do?
It is an open source wireframe to app generator. You give it a screenshot of a wireframe and it generates a working application, using Kimi K2.5 through Together AI for the model, Sandpack to run the result in the browser, and S3 to store the uploaded image.
How do I run Napkins locally?
Clone the repository, create a .env file with your Together AI API key as TOGETHER_API_KEY, create an S3 bucket and add its credentials to the .env file, then run npm install and npm run dev. All the required values are listed in the .env.example file.
Can I edit the generated app in Napkins?
Not yet. Allowing people to edit the generated app with a prompt is an unchecked item on the project's own future task list, alongside choosing from different themes and showing versions as the user edits. The generated output is a starting point rather than something you can iterate on in the tool.
What is the tech stack of Napkins?
Next.js app router with Tailwind, Sandpack for the code sandbox, S3 for image storage with next-s3-upload, Together AI for LLM inference, Plausible for analytics, React 18 with Radix UI primitives, framer-motion for animation, zod for validation and lucide-react for icons. The package manager is pnpm.
Official sources
Add this badge to your README
If you maintain this project, the badge below links readers to this analysis and shows its maintenance status from the daily GitHub snapshot. Paste the markdown into your README; add ?metric=license or ?metric=stars to the image URL for a different field.

[](https://hysenlabs.com/projects/nutlope-napkins)Star history chart for your README
[](https://hysenlabs.com/projects/nutlope-napkins)Was this useful?