ODM and the images folder contract: point clouds, meshes and orthophotos from a Docker run
A command line toolkit to generate maps, point clouds, 3D models and DEMs from drone, balloon or kite images. 📷
At a glance
- What is it?
- ODM is a Python command line toolkit that turns a folder of aerial images into point clouds, textured models, orthophotos and elevation data, driven by nothing more than a folder called images and a project name. You get a scriptable pipeline and no screen to watch, so the trade is control against feedback.
- Who is it for?
- Adopt ODM when your imagery already carries usable camera metadata and you want a pipeline you can script and pin by tag. Skip it when you need a GUI and do not want to adopt OpenDroneMap Desktop as a second project.
- Can I use it commercially?
- Yes, with strict conditions. AGPL-3.0 is a network copyleft licence: if people use a modified version over a network, for example as a hosted service, you must offer them its source code under the same licence.
- Is it still maintained?
- Yes. The repository last received commits 1 day ago.
- What is it written in?
- Mainly Python, according to GitHub's language statistics.
Answers come from the project's GitHub data, last synced on November 14, 2026, and from our analysis. They are not legal advice.
Star history
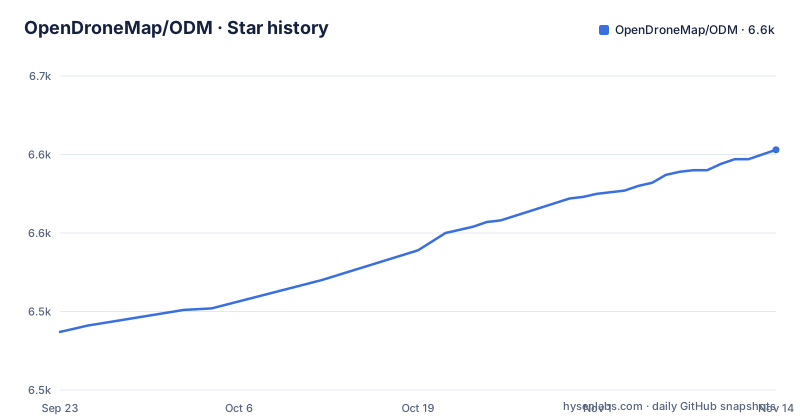
- OpenDroneMap/ODM6,603 ★ · +116
| Repository | 2026-09-23 | 2026-11-14 |
|---|---|---|
| OpenDroneMap/ODM | 6.5k | 6.6k |
116 Stars in the last 52 days, measured from the daily GitHub snapshot. Compare with other projects
Editorial analysis
A folder named images is the contract, and the project name is the dataset
ODM asks for no configuration file and no wizard. It asks for a directory of photographs and a name. Input formats are JPEGs, TIFFs or DNGs, and those files go into a subdirectory called images, for example /home/youruser/datasets/project/images. The command then receives the folder above the project directory as --project-path plus the bare name project. That single contract is the reason the toolkit drops into scripts so easily: a directory goes in, a directory of results comes out, and nothing waits for a click.
Docker pull, one run command, five output folders
The documented path is a container, and the image name is the entire install step:
docker pull opendronemap/odmMount the folder that holds your images directory into the container and run it. On Mac and Linux:
docker run -ti --rm -v /home/youruser/datasets:/datasets opendronemap/odm --project-path /datasets projectWindows uses the same line with a drive letter, for example -v c:/Users/youruser/datasets:/datasets. The volume is not decorative: the toolkit reads your JPEGs from /datasets and writes results back to the same place, so the mount has to point at the folder that contains the project directory. When the run finishes, the project directory holds one subfolder per processing stage:
    |-- images/
        |-- img-1234.jpg
    |-- opensfm/
    |-- odm_meshing/
        |-- odm_mesh.ply                    # A 3D mesh
    |-- odm_texturing/
        |-- odm_textured_model.obj          # Textured mesh
        |-- odm_textured_model_geo.obj      # Georeferenced textured mesh
    |-- odm_georeferencing/
        |-- odm_georeferenced_model.laz     # LAZ format point cloud
    |-- odm_orthophoto/
        |-- odm_orthophoto.tif              # Orthophoto GeoTiff
Those names are worth memorising, because they are where each product lands.
Two flags decide whether you get a DSM and how sharp the orthophoto is
A default run produces a point cloud, a textured model and an orthophoto. Flags change what else gets built. The documentation's own example asks for a digital surface model and increases orthophoto resolution in one command:
docker run -ti --rm -v /datasets:/datasets opendronemap/odm --project-path /datasets project --dsm --orthophoto-resolution 2--dsm is what adds the elevation product. --orthophoto-resolution 2 is the documentation's example of increasing the orthophoto resolution. Anything else goes in the same slot, and the documentation marks that slot with a placeholder rather than a real flag:
docker run -ti --rm -v /datasets:/datasets opendronemap/odm --project-path /datasets project [--additional --parameters --here]The full parameter table lives at docs.opendronemap.org/arguments, linked from that paragraph. Only a handful of flags appear on the front page, so a serious workflow means reading the argument reference rather than guessing names.
GPU SIFT needs a pinned tag and an NVIDIA container toolkit
SIFT feature extraction can run on a GPU, and taking that path changes both the image tag and the runtime flags:
docker run -ti --rm -v c:/Users/youruser/datasets:/datasets --gpus all opendronemap/odm:gpu --project-path /datasets project --feature-type siftThe project states that SIFT on a GPU runs about 2x faster than on the CPU on a typical consumer laptop. That is the project's own figure, and the page gives no way to reproduce it. The implementation is CUDA-based, so the claim is limited to most NVIDIA cards of the GTX 9xx generation or newer. Confirmation arrives early, as a line reading [INFO] Using GPU for extracting SIFT features after the device name. You can check that the container runtime sees the card before committing to a long job:
docker run --rm --gpus all nvidia/cuda:10.0-base nvidia-smiPinning is the detail that bites later. The tag opendronemap/odm:gpu follows the newest GPU release, so two machines running the same command months apart can pull different images. Use opendronemap/odm:<version>-gpu, for example opendronemap/odm:3.6.1-gpu, when a run has to repeat, and treat opendronemap/odm:edge-gpu as the moving development build rather than a release.
Video input hinges on a case-matched .srt sidecar
Since version 3.0.4 the toolkit reads video as well as stills. Drop .mp4, .mov, .lrv or .ts files into the same images folder and frames are extracted on the fly, so the folder contract does not change and video and photographs can sit in one dataset. Where the frames get their position is a separate file: a subtitle track carrying GPS information goes into the images folder under the name of its video, with my_video.mp4 paired to my_video.srt as the worked example. That match is case-sensitive, which makes a capitalised extension or a swapped underscore the entire failure surface of the feature. The case rule is stated once, in passing, next to the example, so pairing is worth checking by hand before a long job.
The GeoTIFF will not open in Photoshop, and the point cloud is compressed LAS
Each product lands in its own folder, which makes the pipeline visible after the fact. Meshing writes a Stanford PLY file, odm_mesh.ply. Texturing writes a Wavefront OBJ plus a positioned copy, odm_textured_model_geo.obj. Georeferencing writes odm_georeferenced_model.laz, and the extension matters: that is compressed LAS, not raw LAS, so a reader that opens .las and nothing else will refuse the file. The orthophoto is odm_orthophoto.tif. Readers are named per format: MeshLab for .ply and .obj, CloudCompare for .laz, QGIS for .tif. One pairing carries a warning. That .tif is a GeoTIFF, and opening it in Photoshop or GIMP may not work, because both expect a plain TIFF with no georeferencing attached. If your next step is a slide rather than a map, you are left doing a conversion the documentation does not hand you.
Desktop and NodeODM are the two documented exits from the shell
Two other front doors reach the same processing, and both are named without being explained. OpenDroneMap Desktop is there for people who would rather not type commands in a shell, wrapping the work in a user interface; the trade is a mouse-driven workflow in exchange for the scriptability the container gives you. NodeODM runs the other way, a separate project that makes ODM reachable across a network, which is what turns a single machine batch job into something a browser or another program can submit work to. Neither is built here, and this repository's documentation does not cover their configuration, so choosing either means adopting a second codebase and its own upgrade cycle. The difference is architectural rather than cosmetic: one replaces your terminal session, the other replaces an argument list with a service endpoint you have to keep alive.
No native Mac or Linux install, no documented resume, no note on a CPU fallback
Install coverage is uneven by platform. A native path is given for Windows only: take the setup from the releases page, open the ODM Console, then type
run C:\Users\youruser\datasets\project [--additional --parameters --here]For Mac and Linux the container is the quickstart route, and the README's Developers section describes building with pixi or the devcontainer. For contributors the build is explicit: the image runs pixi install --locked, then pixi run build and pixi run test, and the runtime layer is ubuntu:24.04. MSVC and the Windows SDK come from a host install of Visual Studio 2022 or Build Tools, or you work inside the devcontainer. The layout mirrors the pipeline, with opendm/ for code, stages/ for processing steps, run.py and settings.yaml at the front, and SuperBuild/ for compiled dependencies. Releases are not on a fixed clock: v3.6.0 shipped on 2025-10-24, v3.6.1 on 2026-07-28 and v3.6.2 on 2026-08-12, with the last push to master on 2026-10-29. The image declares org.opencontainers.image.licenses="AGPL-3.0-only", so read what that licence asks of a deployment before exposing ODM through NodeODM to anyone.
Editorial conclusion
Adopt ODM when your imagery already carries usable camera metadata and you want a pipeline you can script and pin by tag. Skip it when you need a GUI and do not want to adopt OpenDroneMap Desktop as a second project. Before the first run, settle three things the toolkit will not check for you: that you can live with the five output folders, which image tag you are pinning, and whether every video sidecar filename matches its video in case.
Frequently asked questions
Is OpenDroneMap free?
It is an open source command line toolkit under AGPL-3.0, and the documentation gives two ways to get it: the opendronemap/odm Docker image, or a native Windows setup from the releases page. Nothing in the documentation mentions a price, a subscription or a paid tier.
What is the best free drone photogrammetry software?
ODM is one candidate: it turns 2D images from a drone, balloon or kite into classified point clouds, textured 3D models, georeferenced orthorectified imagery and georeferenced digital elevation models. Its documentation never compares it with another photogrammetry package, so any ranking has to be made outside this repository.
Which programs open the point cloud and orthophoto that ODM produces?
QGIS is named for the odm_orthophoto.tif GeoTIFF, CloudCompare for the .laz point cloud and MeshLab for the .obj and .ply meshes. Opening that GeoTIFF in Photoshop or GIMP may not work, since both expect a plain TIFF.
Official sources
Add this badge to your README
If you maintain this project, the badge below links readers to this analysis and shows its maintenance status from the daily GitHub snapshot. Paste the markdown into your README; add ?metric=license or ?metric=stars to the image URL for a different field.

[](https://hysenlabs.com/projects/opendronemap-odm)Star history chart for your README
[](https://hysenlabs.com/projects/opendronemap-odm)Was this useful?