cloudgoat writes your lab credentials to a file in the project directory, and its Dockerfile loses Terraform behind a comment
CloudGoat is Rhino Security Labs' "Vulnerable by Design" AWS deployment tool
At a glance
- What is it?
- Rhino Security Labs' Vulnerable by Design deployment tool, which creates intentionally vulnerable cloud resources in an account you supply so you can practise cloud security testing against them. The install pulls both cloud command line tools, the create command writes the scenario's starting details to disk and to the console, and the container build has a comment sitting between two line continuations.
- Who is it for?
- CloudGoat is a good fit for a team that trains cloud security staff and is willing to run it against a dedicated throwaway account, because it is deliberately careless with cloud resources and that is the point. Read the terms before anything else: it creates intentionally vulnerable resources in an account you own, it can only clean up what it created, and the account needs permission to create and destroy resources.
- Can I use it commercially?
- Yes. BSD-3-Clause is a permissive licence: you can use, modify and sell software built on it, as long as you keep its copyright and licence notices.
- Is it still maintained?
- Yes. The repository last received commits 32 days ago.
- What is it written in?
- Mainly Python, according to GitHub's language statistics.
Answers come from the project's GitHub data, last synced on November 14, 2026, and from our analysis. They are not legal advice.
Star history
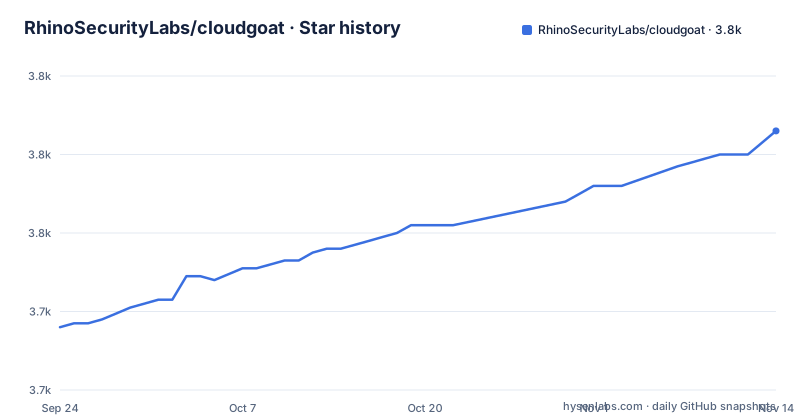
- RhinoSecurityLabs/cloudgoat3,786 ★ · +50
| Repository | 2026-09-24 | 2026-11-14 |
|---|---|---|
| RhinoSecurityLabs/cloudgoat | 3.7k | 3.8k |
50 Stars in the last 51 days, measured from the daily GitHub snapshot. Compare with other projects
Editorial analysis
Two warnings sit above the instructions for a reason
The first thing the file asks you to do is read two warnings. CloudGoat creates intentionally vulnerable resources into your account, so do not deploy it in a production environment or alongside any sensitive resources. And CloudGoat can only manage resources it creates, so if you make anything yourself during a scenario you have to remove it manually before the destroy command runs. Read with the requirements list, which asks for an AWS account and an Azure account each with sufficient privileges to create and destroy resources, and the shape of the tool is clear. It runs with broad create and destroy rights against real cloud accounts, on purpose, and its own documentation is what tells you so. That makes the decision you are making a decision about which account you are willing to make unsafe, not a decision about installing a package.
The headline says 2.0, three files say 2.5.0
The version story is spread across four places and they do not agree. The section that introduces the current generation is headed as an announcement that 2.0 is here. The release list is v2.5.0 from 2026-03-20, v2.4.0 from 2026-02-12 and v2.3.1 from 2025-09-18. The packaging manifest declares version 2.5.0, and the container image carries a label reading the same value, so the number is duplicated in two files on top of the tag. A second disagreement sits next to it. The manifest describes the package as a vulnerable AWS environment generator for pentesters, AWS only, while the same file requires the Azure command line tool and an Azure account and ships a configuration command for Azure. The README's own tagline is also narrower than the tool.
Every install pulls both cloud tools and both account logins
The requirements list is Terraform 1.5.0 or newer, the AWS CLI with a privileged AWS account, the Azure CLI with a privileged Azure account, and jq, plus Python 3.9 or newer, Linux or MacOS with Windows not officially supported, and bash 4.2 or newer if you want argument tab-completion. The two platform one-liners install all four tools:
sudo apt install terraform awscli azure-cli jq -yThen the quick start asks you to configure AWS and to configure Azure, and to log in to Azure with `az login`, before it gets to the whitelist command. So a practitioner who only works on AWS scenarios still installs the Azure CLI, names an Azure subscription and authenticates to Azure. That is the cost of a tool that spans two clouds from one command name, and it is paid at install time by everyone.
create writes the scenario's entry details into your project directory
When an environment is ready, a new folder appears in the project base directory, named after the scenario with a unique scenario ID appended. Inside it is a file called `start.txt` containing the resources you need to begin, and the same content is printed to the console when the create command finishes. Sometimes an SSH keypair named `cloudgoat` and `cloudgoat.pub` is created as well. So the credentials that open the lab land in a plain file on your disk and in your terminal scrollback. The file then warns you not to delete or modify the scenario folder or anything in it, because that could stop CloudGoat managing the scenario's resources. That makes the local folder load-bearing state: lose it and the cloud resources may stay behind, still running and still billing.
The Docker section warns you about the credential mount, correctly
The container section offers a default run, and a second run with a warning attached to it. The warning says that mounting your local AWS configuration files into the container means any user with access to the container has access to your host computer's AWS credentials, and then gives the command that does exactly that, binding the AWS directory into the container's root. The warning is the right warning and it is in the right place, which is more than most projects manage. What the section does not add is a scoped alternative, so the choice it leaves you is your full AWS configuration or nothing. If you use the second form, put a profile in that directory with only the permissions the scenarios need, and remember the image is referenced by the moving tag rather than a digest.
A comment between two continuations costs the image its Terraform
The container build starts from a Python Alpine image, installs a handful of tools, and then intends to install jq and download Terraform for the machine's architecture, pinning Terraform 1.11.2 from HashiCorp's release site and unpacking it into the binary directory. The package list is broken by its own comments. Two comment lines sit between backslash line-continuations: one announcing that jq is being installed, one announcing architecture detection. In a shell, a comment ends the command it appears in, so the arguments after it belong to a new command rather than to the package installation. Running the same fragment through a shell confirms it: jq is never passed to the package manager, the architecture case and the download that follow begin a line with `&&`, and the shell reports a syntax error. So either the image fails to build or it builds without jq and without Terraform, while a comment in the file claims jq is being installed. The rest of the file is tidier than that step: architecture detection covers x86 64-bit, 32-bit x86 and 64-bit ARM and exits with a message on anything else, the archive is removed after unpacking to keep the image smaller, and the AWS command line tool is installed with a pinned version and no cache. Only the Terraform download, which sits behind the comment, is affected.
A tests directory with no test runner, and a marker that cannot be satisfied
Two dependency details are worth reading closely. The manifest lists an optional typed-ast dependency whose marker is `python_version < '3.9'`, in a package whose own Python requirement is 3.9 or newer, so that marker can never be true and the dependency can never install; it is a leftover rather than a choice. And boto3 is pinned to a range with a hard upper bound below its next major, which means a routine AWS SDK release can block a fresh install until the constraint is moved. Meanwhile the repository root has a tests directory and the development dependency group contains only a formatter and a linter, both pinned to exact versions. The scenarios live under a directory tree the README links into, grouped by difficulty, each contributed by a named person, with cheat sheets linked at the bottom of every route's walkthrough. The manifest also names the five stated goals of the project, and two of them are about how it should be extended: modularity, so each scenario starts, resets or stops on its own, and expandability, so the core components, described as the Python application and the scenarios, can be added to by the community. Both are visible in the layout: the Python package, a scenarios tree keyed by cloud and name, and a tests directory beside them.
Editorial conclusion
CloudGoat is a good fit for a team that trains cloud security staff and is willing to run it against a dedicated throwaway account, because it is deliberately careless with cloud resources and that is the point. Read the terms before anything else: it creates intentionally vulnerable resources in an account you own, it can only clean up what it created, and the account needs permission to create and destroy resources. Four practical points. Give it an account that holds nothing you care about, because the tool's purpose is to make resources unsafe. Treat the scenario folder as state, since deleting it can leave cloud resources running and billing. Read the start file before you start, because the scenario's entry details are written there in plain text and echoed to the console. And check the container build yourself, because the Terraform install in the Dockerfile is separated from its own package command by a comment. Licence terms are BSD-3-Clause.
Frequently asked questions
What does CloudGoat do?
It deploys deliberately vulnerable cloud resources into an account you supply so you can practise cloud security testing against them. Each scenario is a standalone environment with a clear goal or set of goals, and CloudGoat can start up, reset or shut down each scenario independently.
What warnings does CloudGoat give?
Two. It creates intentionally vulnerable resources into your account, so it must not be deployed in a production environment or alongside sensitive resources. And it can only manage the resources it creates, so anything you make yourself during a scenario must be removed manually before the destroy command runs.
What do I need installed to run CloudGoat?
Linux or MacOS, since Windows is not officially supported; Python 3.9 or newer; Terraform 1.5.0 or newer; the AWS CLI with an account privileged enough to create and destroy resources; the Azure CLI with an equivalent Azure account; and jq. Argument tab-completion needs bash 4.2 or newer.
How do I install CloudGoat?
With `pipx install cloudgoat`. You then name the accounts it should use with `cloudgoat config aws` and `cloudgoat config azure`, log in to Azure with `az login`, and configure a whitelist with `cloudgoat config whitelist --auto`, a command the file does not explain further.
How do I clean up after a CloudGoat scenario?
Delete any resources you created yourself, since CloudGoat only manages the ones it created, then run the destroy command. The file advises glancing at your web console afterwards in case something was not deleted, and warns against deleting the scenario's local instance folder, which CloudGoat uses to keep track of its resources.
Official sources
Add this badge to your README
If you maintain this project, the badge below links readers to this analysis and shows its maintenance status from the daily GitHub snapshot. Paste the markdown into your README; add ?metric=license or ?metric=stars to the image URL for a different field.

[](https://hysenlabs.com/projects/rhinosecuritylabs-cloudgoat)Star history chart for your README
[](https://hysenlabs.com/projects/rhinosecuritylabs-cloudgoat)Was this useful?