Building Swift: build-toolchain, its non-exhaustive options and the Xcode failure flags
Swift is a high-performance system programming language with clean modern syntax, memory safety by default, and seamless interop with C and Objective-C code.
At a glance
- What is it?
- Swift is a system programming language whose compiler, standard library and runtimes live in one CMake-driven repository. The parts of the README that matter to anyone who builds it are the unglamorous ones. Two different scripts are involved, the option list is declared non-exhaustive, debug symbols are a separate archive you have to remember to install, and a changed Xcode can leave errors that the README says to address with --clean or --reconfigure.
- Who is it for?
- Swift suits someone who wants to work on the compiler, the standard library or the runtimes and is prepared to treat a local build as a large C++ compile rather than a package install, since that is what the repository sets up. It does not suit someone looking for a quick way to get the language onto a machine, because the README documents building rather than installing and defers the how to a separate guide.
- Can I use it commercially?
- Yes. Apache-2.0 is a permissive licence: you can use, modify and sell software built on it, as long as you keep its copyright and licence notices.
- Is it still maintained?
- Yes. The repository received new commits within the last day.
- What is it written in?
- Mainly Swift, according to GitHub's language statistics.
Answers come from the project's GitHub data, last synced on November 14, 2026, and from our analysis. They are not legal advice.
Star history
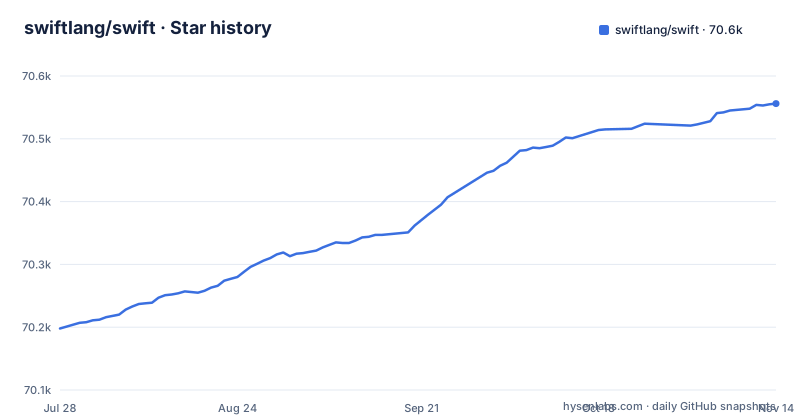
- swiftlang/swift70,556 ★ · +358
| Repository | 2026-07-28 | 2026-11-14 |
|---|---|---|
| swiftlang/swift | 70.2k | 70.6k |
358 Stars in the last 109 days, measured from the daily GitHub snapshot. Compare with other projects
Editorial analysis
The README links to apple/swift while the repository is swiftlang/swift
The build instructions point at the old organisation in several places. The link for `build-toolchain` is written as a path under `github.com/apple/swift/blob/main/utils/build-toolchain`, and the pre-submission testing link points at `github.com/apple/swift/blob/main/docs/ContinuousIntegration.md`. The repository itself is `swiftlang/swift`.
The reason to notice is that it dates the document. A README whose prose is current but whose URLs are from the previous home of the project is a file that gets edited in patches rather than rewritten, and that tells you how much to trust the rest of it as a description of the current layout.
The compiler's internal design documentation is referenced differently, as a path relative to the repository at `/docs/README.md`, and the contributor guides are the same: a first pull request guide, a getting started guide and an FAQ, all under `docs/HowToGuides`. So the README is an index that fans out into six or seven documents rather than a self-contained build description, and the entry point you want depends on which of three jobs you have: fixing the compiler, building the compiler once, or producing a distributable toolchain.
Two scripts, and the invocation path assumes a directory named swift
Building a toolchain runs a script the README reaches as `./swift/utils/build-toolchain $BUNDLE_PREFIX`. The leading `swift/` is not part of the repository, which is checked out into a directory that the invocation assumes is named `swift`. Run it from the wrong place and the path does not resolve, which is the first thing that bites someone following the line literally.
`$BUNDLE_PREFIX` is a string prepended to the build date to form the bundle identifier in the toolchain's `Info.plist`. The example given is that a prefix of `com.example` produces a toolchain whose identifier is `com.example.YYYYMMDD`. The output lands in the directory you invoked the script from, as a file named `swift-LOCAL-YYYY-MM-DD-a-osx.tar.gz`.
The second script appears in the failure section rather than the build section, where the advice for a changed Xcode is to pass `--clean` or `--reconfigure` to `build-script`. So there are two tools: `build-toolchain` bundles and packages, and `build-script` is the underlying CMake-driven build. The README documents the first in detail and the second only through the two flags you reach for when something has gone wrong, which is the right way round for a build script and the wrong way round for someone who wants to configure a build deliberately.
The option list is declared non-exhaustive, so --help is the only reference
The README introduces its option list with an explicit disclaimer that it is a non-exhaustive set of useful options, and then closes by saying more options may be added over time and that you should pass `--help` to `build-toolchain` to see the full set.
That sentence is doing real work and is easy to skim past. Four options are named, and all four are off by default: `--dry-run` for a dry run build, `--test` to test the toolchain after it has been compiled, `--distcc` to distribute the C++ part of the build, and `--sccache` to cache more C++ build artifacts for subsequent compiler builds.
Two of those are about the C++ specifically, which tells you where the time goes. Distributing compilation and caching compiled artefacts are both aimed at the same large C++ component, not at the Swift sources. The remaining two change what the script verifies and whether it builds at all, which means a run with no options is a plain build that does not check its own output.
The consequence is that a script wrapping this tool cannot be written from the README alone. Any automation that needs to know whether a step exists, or to pass something the documentation has not caught up with, has to shell out to `--help` and parse the result, and has to tolerate the list growing between runs.
Both --test and --sccache default to off, so a local toolchain is unverified
The defaults compose into a specific and slightly surprising position. Because `--test` is off by default, a toolchain produced by a plain invocation is compiled and packaged but never exercised. You get an archive, and whether the compiler in it works is something you discover afterwards by using it.
Because `--sccache` is also off by default, subsequent builds do not benefit from the cached C++ build artifacts it provides. The option exists to cache more C++ build artifacts so that subsequent builds are faster.
So the out-of-the-box behaviour is the slowest configuration with the least verification in it. That is a defensible default for a CI script that has its own verification stage elsewhere, and the README does say the script is what swift.org's CI uses to produce snapshots, which is the context those defaults were chosen for. It is a poor default for a person building once on a laptop.
The practical advice is short. Pass `--test` if you want to know the toolchain works, and pass `--sccache` before you build a second time rather than after. Both are documented; the only thing the README does not do is tell you that omitting them is the slow path.
Debug symbols are a separate archive, and a crash without them gives you nothing
Alongside the toolchain archive, the script generates a second one containing debug symbols. The README says it can be installed over the main archive, and that its purpose is allowing symbolication of any compiler crashes. The filename follows the same pattern with `-symbols` inserted: `swift-LOCAL-YYYY-MM-DD-a-osx-symbols.tar.gz`.
The installation commands are given as a pair, with the `sudo` variant writing to the system location and the plain variant writing to the user location:
$ sudo tar -xzf swift-LOCAL-YYYY-MM-DD-a-osx-symbols.tar.gz -C /
$ tar -xzf swift-LOCAL-YYYY-MM-DD-a-osx-symbols.tar.gz -C ~/
Nothing in the README flags this as optional, and it is not, for anyone who will debug the compiler. The README says the symbols archive is what allows symbolication of compiler crashes.
The same pair of commands installs the main archive, and both steps then end with selecting the local toolchain in Xcode through `Xcode->Toolchains`. That last part is a manual UI action, which is the only step in this whole procedure that is not a command you can paste.
A changed Xcode leaves a stale CMake cache, cleared by --clean or --reconfigure
The failure section is short and unusually specific about the most common cause. It says to work through the troubleshooting section of the getting started guide, to make sure you are using the correct release of Xcode, and then, if you have changed Xcode versions and still hit errors that look related to the Xcode version, to pass `--clean` to `build-script`.
The second half of the answer is the cheaper one. When a new version of Xcode is released, you can update your build without recompiling the entire project by passing `--reconfigure` to `build-script`.
The README's wording implies `--reconfigure` is the cheaper path, since it updates the build without recompiling the entire project, while `--clean` is what it suggests when errors persist after changing Xcode versions.
For a language whose compiler is a C++ build of this size, choosing wrongly is expensive. The README does not rank the two: it gives `--clean` for errors after changing Xcode versions and `--reconfigure` for updating a build when a new Xcode is released.
The compiler is written in Swift, and there are three separate test layers
The tree explains the shape of the project better than the prose does. `SwiftCompilerSources` holds Swift sources for parts of the compiler, and `stdlib`, `lib`, `include` and `Runtimes` hold the standard library, other libraries, public headers and the platform runtimes. `bindings`, `tools` and `utils` hold the surrounding tooling, with `utils` being where `build-toolchain` lives.
What is worth counting is the test surface. There are three separate top-level directories: `test`, `unittests` and `validation-test`. A change can pass one and still fail another, and the README does not explain the division.
The supporting files point the same way. There is a `Brewfile` for bootstrapping a macOS development machine through Homebrew, a `.flake8` for the Python side of the build and bootstrap scripts, `.clang-format` and `.clang-tidy` for the C++ sources, `benchmark` for performance work, `apinotes` for annotating APIs, `localization` for diagnostic messages, `CODE_OWNERS.TXT` for ownership, and a `CHANGELOG.md` at the root.
It is a repository with a large surface and a small README, which is the correct balance for a language implementation and also the reason the README points at seven other documents rather than pretending to be complete.
Editorial conclusion
Swift suits someone who wants to work on the compiler, the standard library or the runtimes and is prepared to treat a local build as a large C++ compile rather than a package install, since that is what the repository sets up. It does not suit someone looking for a quick way to get the language onto a machine, because the README documents building rather than installing and defers the how to a separate guide. Before you start, check which release you are targeting, because 6.4.1 and 6.4.2 were both published in October 2026. Then budget for the two steps people forget: pass --help to build-toolchain rather than trusting the README, and install the symbols archive, because the README says it is what allows symbolication of compiler crashes.
Frequently asked questions
how to install swift
The README does not give an install command; it documents building. Installing a toolchain means running build-toolchain with a bundle prefix, unpacking the resulting tarball into /Library/Developer/Toolchains/ or ~/Library/Developer/Toolchains/, and then selecting it in Xcode under Xcode->Toolchains. For just using the language, the README points to swift.org for documentation, and for building the compiler to a getting started guide under docs/HowToGuides.
how to install swift on mac
On macOS you build a toolchain and unpack it into one of two locations. The archive is swift-LOCAL-YYYY-MM-DD-a-osx.tar.gz, and there is a matching -symbols archive for debugging compiler crashes. After unpacking, the toolchain is chosen through the Xcode->Toolchains menu, which is a manual step rather than a command.
how to use swift code
The README describes the language rather than a tutorial. It calls Swift a high-performance system programming language that is memory-safe by default, gives direct access to existing C and Objective-C code and frameworks, and notes that Swift is not itself a C-derived language. It packages flow control, data structures and functions, with objects, protocols, closures and generics as higher-level constructs, and uses modules instead of headers.
how to use swift
For learning the language, the README points to the documentation on swift.org, and for the compiler's internal design to a documentation index in the repository's docs directory. For working on it, it separates three jobs: contributing compiler fixes, building the compiler as a one-off, and building a toolchain as a one-off, with guides under docs/HowToGuides, plus an FAQ for common questions.
Official sources
Add this badge to your README
If you maintain this project, the badge below links readers to this analysis and shows its maintenance status from the daily GitHub snapshot. Paste the markdown into your README; add ?metric=license or ?metric=stars to the image URL for a different field.

[](https://hysenlabs.com/projects/swiftlang-swift)Star history chart for your README
[](https://hysenlabs.com/projects/swiftlang-swift)Was this useful?